Beet Goat Cheese Gnocchi in Rosemary & Sage Butter Sauce


This is the other recipe I made at my cooking demo last Saturday, and I figured it’s time that I share it with you guys, too!

Pureed roasted beets and creamy tangy goat cheese come together for one of the easiest homemade pasta dishes you’ll ever tackle (promise!).

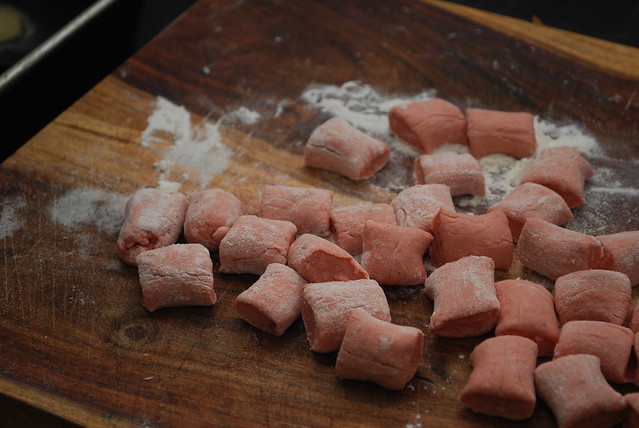
Start with pureed roasted beets (make them yourself, buy them pre-roasted and peeled in those lovely little vacuum packs, or go ahead and use canned, if you’d like) and whisk in the cheese, an egg and some flour to bind it all together.

You only need about a half cup of the puree for a batch of pasta big enough to serve four. These freeze well, too, so even if it’s just you, I recommend making the whole thing and freezing the rest for easy meals the rest of the week.


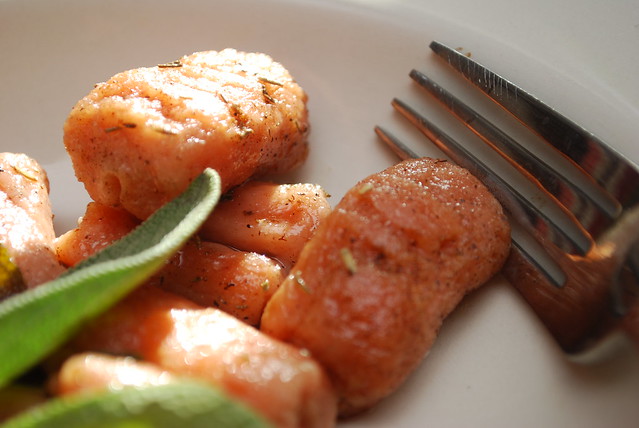
The little dumplings are soft and cook up quickly once they’re done.

I boil them and then crisp them just a bit in a skillet of hot browned butter gently scented with fresh herbs (sage and rosemary in this case, but go ahead and use what you have and what you like) and a little dash of nutmeg.

Or you can skip the butter (though I never would) and just serve them with your favorite sauce...something creamy and cheesy perhaps, or savory and red and right out of a jar.


I first made these a while ago, back when Eugene and I started dating, but I’ve tweaked the recipe since and this is how I like it best.

The beauty of it all is that you can play around with it until you find the way that YOU like it best. So use cream cheese instead of goat or ricotta if you prefer. If you don’t have (or don’t like) beets, try the same recipe with pumpkin, butternut squash, or sweet potatoes.

Make it in advance and freeze it until you’re ready to cook (a great trick for dinner parties and busy weeknight dinners), and then when you sit down with your glass of wine and everyone is about to dive in just casually let it drop that you made these.

From scratch.


****
New to Always Order Dessert? Consider subscribing to my RSS feed, follow me on Twitter, become a fan on Facebook, or sign up to receive my once-a-week e-mail updates by filling in your address in the box on the right.

And if you ever need any entertaining or cooking advice, please don't hesitate to
e-mail me.
Thanks for reading!

Beet Goat Cheese Gnocchi in Rosemary & Sage Butter Sauce
Serves: 4

Ingredients

 
For the gnocchi:
1/2 cup goat cheese (chevre)
1/2 + 2 tablespoons cup roasted beat puree (approximately 1-2
large beets, roasted, peeled, and pureed in food processor or blender)
1.5 cups all purpose flour (plus more for flouring boards)
1 whole egg, slightly beaten
1 tablespoon kosher salt
1 teaspoon freshly ground black pepper
1 teaspoon nutmeg

For the sauce:
1 stick unsalted butter
1 bunch fresh sage
1 sprig fresh rosemary
salt & pepper


Steps:
1. In a large bowl, whisk the goat cheese until smooth. Add the beet puree and mix until evenly combined.
2. Whisk in the egg, followed by the salt, pepper, and nutmeg.
3. Slowly add the flour into the beet mixture, 1/4 cup at a time until it is all incorporated into the dough. If your dough seems a bit too wet, feel free to add an extra 1/4 – 1/2 cup of all-purpose flour.
4. Turn the dough out onto a heavily floured work surface and knead for a few minutes. The dough will still be fairly wet, but you should be able to handle it by keeping your hands and the surface floured.
5. Working with about a handful of dough at a time, roll out a long snake about an inch thick. Use a floured knife to cut out the gnocchi every 1 inch. Roll each gnocchi along the tines of a fork (or simply indent by gently pressing the back of the fork into the side of each nugget).
6. Place the formed gnocchi on a floured baking sheet. These can be frozen for later use or cooked right away.
7. When ready to cook, bring a large pot of salted water to a rolling boil and add the gnocchi in batches. Let cook until they bob to the surface and then cook for an additional 2 minutes. Use a slotted spoon to pull out of the pot and set aside.
8. While the gnocchi are boiling, heat a heavy skillet (cast iron is ideal) over medium heat and melt the 1/2 stick of butter. Tear 5-6 fresh sage leaves in thirds and drop into the hot butter along with a tablespoon of fresh rosemary. Saute the herbs in the hot butter, letting the sage leaves crisp slightly. When the gnocchi are finished boiling, add them in batches to the hot butter and toast on each side for about a minute each. Repeat with each batch, adding more butter and herbs as necessary.

Season with salt and pepper to taste, and serve immediately with a drizzle of the butter sauce and a few of the crisped sage leaves scattered on top.

Cook's Note: These same gnocchi can also be served with other kinds of
pasta sauce such as marinara.
0

Beet Chocolate Bundt Cake


I just got home from an exciting day of hosting two live cooking shows at the New York Botanical Garden where I showed two audiences how to prepare different recipes featuring delicious, in-season beets. It was the first time I ever cooked before an audience, and I think it went pretty well!

I'm pretty exhausted after spending the day on my feet cooking, but I promised the audience that I would post this recipe for the Beet Chocolate Bundt Cake that I made so for now, here it is. I'll be back tomorrow with more details about the event (and a few pix, too!)

xoxo

Alejandra

P.S. I realize this cake is a little unusual, but it's delicious; everyone in the audience tasted it and liked it (some were clamoring for 2nd and 3rd pieces!).
 
0

Come Watch Me Cook at New York Botanical Garden on Saturday

Alejandra at New York Botanical Garden (Not to scale.)


If you're in the NY/NJ/Connecticut (heck...even Pennsylvania!) area, I'd love for you to come to the New York Botanical Garden tomorrow (Saturday). I'm going to be hosting two LIVE cooking shows on their state of the art Conservatory Kitchen Stage at 1pm and 3pm.

This will be the first time I've ever cooked before an audience so it would be really great to have your support and see some familiar faces out in the audience!

I'm going to be making two delicious beet recipes. The first, for the 1pm show, is Roasted Beet and Goat Cheese Gnocchi with Sage Brown Butter Sauce. At the 3PM show I will be making Beet Chocolate Bundt Cake with Chocolate Truffle Glaze. I'll also be talking about eating seasonally, working with beets, ways to serve them to those pesky "i hate beets" people, and a few of my personal beet anecdotes (don't we all have those?!).

If you haven't been to NYBG before or have been meaning to go check it out, this is the perfect time to do so. It's absolutely gorgeous there right now and there are activities and exhibits for the whole family to check out! Tickets are just $15 for adults, $13 for students, and $8 for kids. (babies get in free) That's about the same as a movie ticket for a whole day of fun! (Fun AND personal beet anecdotes!)

New York Botanical Garden is located in the Bronx right next to the Bronx Zoo (so you can make a whole day out of it and go check out the cute baby animals next door after my show). It's about 20 minutes from midtown on metro-north and 25 minutes from the GWB if you're driving in from NJ. Visit www.nybg.org for more details on the park, directions, and to buy your tickets.

I hope to you there!

xoxo

Alejandra
0

Kitchen Tip: How to Roast Beets

It's prime beet season and the earthy (and incredibly affordable!) jewels are everywhere. While beets can be prepared in any manner of ways, my absolute favorite way is to roast them. Unlike boiling, which tends to wash them out, roasting preserves the gorgeous natural colors, keeps the tenderness intact, and deepens and enhances it's characteristic earthy sweetness.

The bonus is that roasted beets can be prepared in a large batch all at once, then stored in the fridge for a bevy of uses over the coming week. Think sliced into salads, paired with tangy goat cheese as an appetizer, sauteed in hot herbed butter, mashed into ravioli filling, or (my favorite) pureed and baked into chocolate cake. Roasted beets are in fact so versatile that they're actually sold that way at the grocery store, but there is no need to spend extra bucks to have someone do the work. With just a few quick steps, you can learn to roast a perfect beet every single time.


0

Peppadew, Peach, and Feta Side Salad

I've recently become smitten with Peppadew peppers. I had some a few days ago as part of a salad served in (of all places) my office cafeteria, and instantly fell in love. Sweet and (mildly) spicy with a perfect touch of acidity from the pickling, Peppadews are wonderful paired with cheeses like feta or goat, can be tucked into a sandwich or burger, or even used as a topping on pizza.

Similar to cherry tomatoes in appearance and size (though not flavor), Peppadews is actually the trademarked name of a variety of sweet piquante pepper native to South Africa. The name is a reference to the pickled version, and are sold stemmed and seeded with a tiny open cavity just perfect for stuffing.


For this salad, I was inspired by the one I had at work, and paired the peppadew peppers with a combination of salty Bulgarian feta and diced, broiled peaches that I first tossed in a simple dressing of lemon juice, olive oil, and black pepper before placing under the flame for a few minutes (I live in an apartment so grilling isn't an option, but if it is for you, by all means do!)

0

Reader Question: Do I have to refrigerate almond butter?

My friends and readers regularly send me e-mails with food and cooking questions, and I figured I might start sharing some of these here with you. This one is from my friend Matt (sometimes referred to as BFF Matt):

Alejandra-

You know I like to follow rules.  

So I got back from a run around Lake Merritt this morning and needed a nice scoop of almond butter before heading over to Blue Bottle for the latteIwouldorderifondeathrow.  My endorphin high was completely shuttered because I remembered that on the side of my freshly opened almond butter it told me to 'stir and refrigerate after opening' as it always does. 

Look, I hate refrigerating peanut and almond butter; the refrigerator sucks the life and creaminess out of an otherwise smooth treat.  I just don't want to have to 'defrost' my fucking almond butter before I eat it.

All I am saying is, what am I risking by not refrigerating my favorite post-run snack?

Ahhh...Matt. What an excellent question!

I feel the same way you do about peanut butter and almond butter (and, for that matter, cow butter). I only ever eat the organic unsweetened kind so when I refrigerate it, it gets extra hard and unmanageable which is just no fun.

0

Salted Honey Butter Caramels

A couple weeks ago, a few of the girls I work with and I took out our (now-former) coworker Dana for a good-bye lunch at nearby Landmarc restaurant. One of my favorite spots in the city, the food at Landmarc is reliably delicious, but even more so are the generous handfuls of homemade butter caramels that come out complimentary along with the check. Soft, chewy, with just a slight tinge of burnt sugar, these caramels are absolutely addictive. I usually gobble up a couple right at the table and tuck the extras away in my purse for a surprise treat at a later date.

The night after our lunch, I found myself laying in bed thinking about those caramels. I'd already eaten the extra one in my purse (it barely made it back to the office) and proceeded to spend the rest of the night plotting my next trip, wondering if I would be able to slip away during lunch the next day for a repeat meal.


Morning light made me realize just how impractical it would be to pay for an entire lunch simply for a handful of complimentary caramels, so I decided that I would just have to make them myself. Cobbling together various classic caramel recipes, I tweaked and stirred until I finally fell upon the one that seemed closest to the buttery, chewy treats I remembered.

This recipe is actually quite easy. You need a candy thermometer, of course, but other than that, it's really just a bit of occasional stirring and patience. The hard part comes at the end, once the caramel has been cooled and cut into (semi) uniform pieces; that's when you'll have to sit and wrap each individual piece for hours.

I made mine early on a Sunday evening and then proceeded to sit on the couch cutting and wrapping caramels straight through an episode of Rubicon (my new favorite), then Mad Men, then immediate encore of Mad Men, followed by the first half of the encore of Rubicon. Yes. That would be 3.5 hours of wrapping caramels.


It's easy, but tedious. Fortunately, you're guaranteed to consume every third piece (at least during the first hour) so you'll have enough of a sugar rush to get you through the whole batch. If possible, I recommend recruiting the aid of a friend or child (preferably not a diabetic one).

Another tip: cutting the caramel into pieces might seem impossible (and sticky) but I found that it's really easy if you use a pair of clean kitchen shears. Just snip and wrap! And don't worry if the pieces aren't all uniform; that, I think, is part of the charm.


****
New to Always Order Dessert? Consider subscribing to my RSS feed, follow me on Twitter, become a fan on Facebook, or sign up to receive my once-a-week e-mail updates by filling in your address in the box on the right.

And if you ever need any entertaining or cooking advice, please don't hesitate to
e-mail me.
Thanks for reading!

Salted Honey Butter Caramels
Makes about 60-75 individual pieces

Ingredients
6 tablespoons unsalted butter (plus a bit more for greasing the pan)
1.5 cups heavy cream
2 cups granulated white sugar
3/4 cup honey
2 heaping teaspoons Kosher salt

Special equipment: 9" square baking pan, candy thermometer, heavy pot or saucepan

1. Butter a 9" square baking pan well and set aside. Combine the butter, cream, sugar, honey, and salt in a heavy saucepan or skillet (I used my Dutch oven) and place of medium heat. Stir gently until the butter melts and sugar dissolves.

2. Let the sugar continue to cook, stirring it every so often (doesn't have to be continuous), until it darkens to a golden brown and the thermometer reads 245 degrees F. (This will take about 30-45 minutes or so, possibly longer depending on your stove and the size/type of pot you use; note that the temperature MUST reach 245 before you can pour the caramel out of the pot or it won't set)

3. Gently pour the caramel into the prepared pan and let cool at room temperature for about an hour or two until it is set and cool to the touch.

4. Use a spatula to release the sides of the caramel (it will be buttery) and flip out the slab of candy onto a cookie sheet. Use clean kitchen shears or a sharp knife to cut into small rectangles or cubes. Wrap each piece in parchment paper or wax paper.

Store at room temperature for up to a week or two (if they last that long), although I've found that these are best eaten within 2-3 days as temperature fluctuations in your home can make them a bit grainy. Note that these can also be refrigerated for weeks at a time.
0

Anise Biscotti


As part of my wedding planning, I’ve been spending quite a bit of time lately thinking about cookies and candies that can be made in advance. Though I haven’t really figured out the specifics yet, I’ll likely end up making several different kinds of these make-ahead treat to use either as favors or on a dessert table, or perhaps even served on platters of mignardises to be set on each table post-dinner along with the cake and coffee.

The latter solution made me think of the classic cantuccini that were served along with tiny cups of Vin Santo after dinner at nearly every restaurant in Florence. A classic Tuscan treat, the cantuccini are tiny, dry little biscotti-type cookies that are meant to be dipped in the sweet wine (or coffee) for a bit of sweetness after the meal. When I went back to New Jersey after my time in Florence (where I went to culinary school), I brought my dad a bag of the little hard cookies and a bottle of Vin Santo to try, and we ate them after our dinner for weeks after my return.


Cantuccini, and other types of biscotti, are perfect after a large meal, and convenient for the hostess as they can be made well in advance since they’re supposed to be stale to better soak up coffee. Anise biscotti, in particular, have always been of favorite of mine. I use pure anise oil instead of extract for a stronger flavor without as much moisture (you can use about half the amount of oil as you would extract; often even less than that) and add whole anise seeds for a little extra texture and flavor. If you prefer almond, you can substitute that extract instead.

This batch that I made lasted me nearly a full month, and I swear they were just as fragrant and delicious on week three. Note that this batter tends to spread so try to make the logs as narrow as possible (I made HUGE biscotti the first time I made them because my batter was a bit wide). Not that there is a problem with huge biscotti...

Oh and you should know that these turn out a little softer than the kind you’d get at the store (or by the Starbucks register). They’re hard, but not break-your-teeth hard—just dry and firm enough to be perfect for dipping. 


Anise Biscotti
Makes about 30-40 cookies

3 1/4 cups all purpose flour
1 tablespoon baking powder
1 teaspoon Kosher salt
2 teaspoons whole anise seeds
1 cup butter, melted
1 tablespoon extra virgin olive oil
1 1/4 cup granulated white sugar
1 tablespoon vanilla extract
3/4 teaspoon anise oil or 1.5 teaspoons anise extract (oil is stronger)
1 teaspoon lemon zest
3 large eggs, room temperature


Directions
Preheat your oven to 350 degrees and place the rack in the center of the oven. Line two large baking sheets with parchment paper or a silpat.

In a large bowl, sift together the flour, baking powder, salt, and anise seeds. Set aside.

In another bowl, combine the melted butter, olive oil, sugar, extract, anise oil, and zest. Whisk in the eggs one at a time until each is combined well.

Add the dry ingredients to the butter mixture and stir until completely combined and no dry bits remain (the anise seeds should be well distributed throughout the batter).

Dived the dough in half and shape each half into a long log down the center of the baking sheet. (don’t worry if it spreads a little bit, it’ll rise in the oven).

Bake each batch for 30 minutes (you can bake both at the same time if your oven is big enough). Pull the logs out of the oven and let cool for about 10 to 15 minutes before using a sharp knife to cut slices in the longs, each about 3/4 inch thick. Turn the slices over onto their sides and bake again for about 10 minutes then flip the slices to the other side and bake for another 10 minutes.

Remove from the oven and transfer to a rack to cool completely. Once cool, these can be stored in an air-tight container in a dry environment for up to 2 weeks (sometimes even longer).
0

I'm Going to Be on Mad Men!!!

My love of Mad Men (and all things retro) is a bit of a running theme here on Always Order Dessert, so I'm sure many of you are not the least bit surprised to hear that I'm currently vying for a role on this INCREDIBLE show.

AMC and Banana Republic are co-sponsoring a contest called the "Mad Men Casting Call" where fans of the show are invited to enter a photo of themselves showing their best "Mad Men Style." I decided to join the fun and entered a photo of myself taken during the swank Mad Men cocktail party I hosted last Christmas. People are asked to vote on the photos and 10 male and 10 female finalists will be chosen at the end of the voting period (in mid-September). From their, the director of the show will select one Male and one Female winner to win a walk-on role on an episode of Mad Men.

This, as I'm sure you can understand, would be an absolute DREAM for me. You can totally help me get on there! All you have to do is click the "VOTE" button under my photo. You can vote for me once a day every day (or even more if you have multiple computers). You can also help get the word out by posting the link to my photo on Facebook, Twitter, sending it to your friends via email, etc. It's super simple as it requires absolutely NO login info or registering.

Let's make this happen together!!!

Vote for me here: http://madmencastingcall.amctv.com/browse/detail/ZQJ33H

xoxo

Alejandra

P.S. I'm calling on the Law of Attraction to make the post title a reality. ;)
0
Back to Top