Smoky Jalapeño Poppers

Smoky Jalapeño Poppers
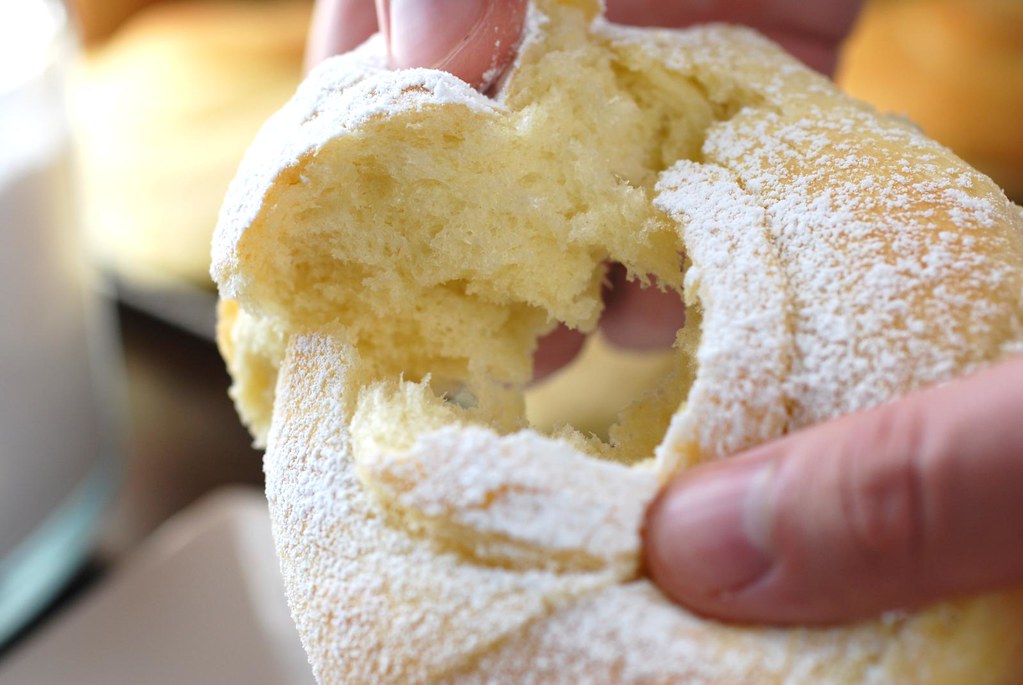
Until I made these Smoky Jalapeño Poppers, I'd never used more than one or two jalapeño in a recipe at a time. Oh, I'd minced one to add to my guacamole or thinly sliced a couple into my spicy artichoke dip, but I'd never had to work my way through a full bag of them. And because of this, I seriously (seriously) underestimated their heat.

To put it bluntly, these peppers burn.

I figured this out somewhere around my eighth pepper. I'd been calmly slicing into the gorgeous little green babies with my paring knife and then sliding my bare pointer finger into the small opening in order to pluck out the core of seeds. The work was tedious, but calming. At least until I noticed the weird sensation on the sides of my hands. I tried washing them, but the feeling only intensified. Soon my hands were red and hot to the touch, and no amount of scrubbing or lathering would make it stop.

I have to tell you, it's an incredibly frustrating sensation to have your hands feel as if they're on fire when they clearly are not. I kept staring at them, wondering if perhaps I was spontaneously human combusting. In a flash of inspiration, I remembered the bottle of chilled lidocaine I had sitting in the fridge since our trip to Aruba a couple months ago (where Eugene got an entirely kind of burn). I slathered a generous amount of the cool numbing cream onto my hands and reveled in the instant relief.

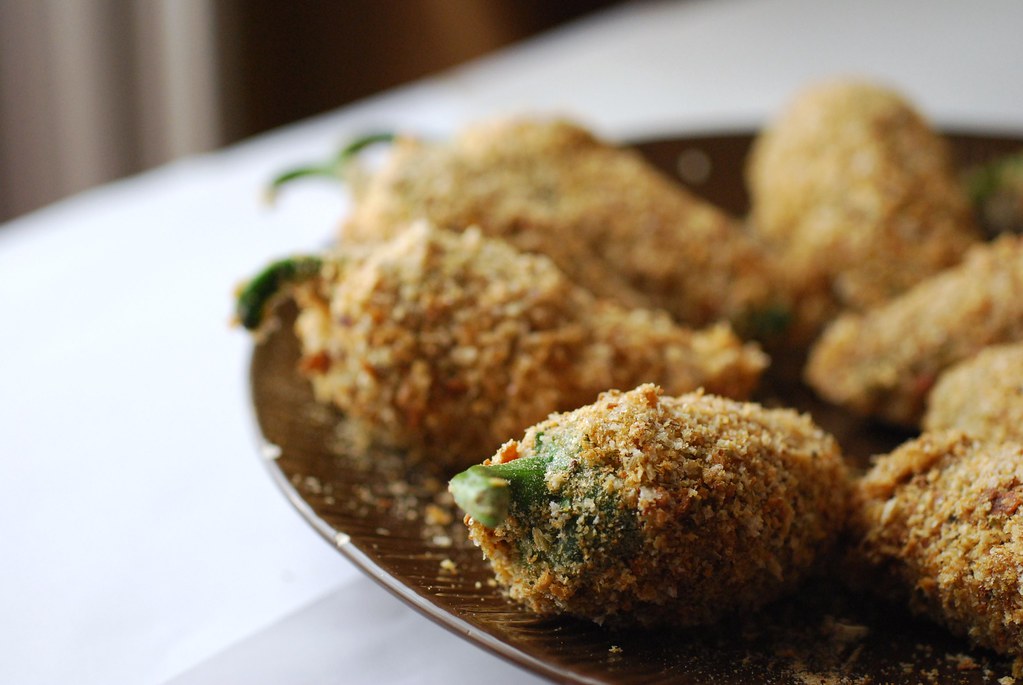
Despite the sacrificed skin cells, the jalapeño poppers came out fantastic: golden and crisp on the outside with a creamy and gooey (and spicy!) center. The combination of cheeses and the smoked paprika in this recipe elevated these classic bar snacks to something a little bit more elegant that the usual TGI Fridays version.

Oh and if you have leftovers, they can be frozen and then reheated in a 400 degree oven for about 5 minutes. They won't be as awesome as at first, but still pretty good.

Smoky Jalapeño Poppers


Smoky Jalapeño Poppers

12 fresh jalapeño peppers
1 cup coarsely grated Extra Sharp Cheddar
½ cup coarsely grated Asiago
½ cup cream cheese, softened
1 teaspoon chipotle flavored Tabasco (or other smoked hot sauce)
3 large eggs
1 cup plain whole wheat breadcrumbs (use the regular kind, not panko)
1 teaspoon Kosher salt
½ teaspoon ground black pepper
1 tablespoon smoked Spanish paprika

About 5 cups vegetable oil

Special equipment: latex gloves (the fitted kinds doctors use, not the bright yellow cleaning lady kind)

Use a paring knife to cut a slit in each jalapeno all the way from the stem to the tip, and then another small slit perpendicular to the first on top (it'll look like a T)

Insert your (gloved!) fingertip through the top of the opening and gently wiggle the core loose, then remove. Rinse under cold water to remove any additional seeds. Pat dry gently with a paper or clean towel, and set aside. Repeat with each pepper.

Once the peppers have been seeded, combine the cheddar, asiago, cream cheese, and tabasco until smooth and well blended.

Use a spoon to scoop gently nudge the cheese filling into the peppers. Once full, close the open pepper and squeeze gently to bring it back to its original shape. Don't worry if the pepper tears a bit, just squeeze it shut.

In a shallow bowl, combine the breadcrumbs with the salt, pepper, and smoked paprika and sift well. In a separate shallow bowl, lightly beat the three eggs.

Holding each pepper by its stem, lightly bathe it in the egg and then coat with the seasoned breadcrumb mixture. Don't worry if the breadcrumbs don't stick completely; this is only the first dunk. Do this for each pepper and then repeat one more time so that each pepper gets two coatings of eggs and breadcrumbs each. Set on a plate to dry slightly.

In the meantime, pour about 2 1/2 inches of oil (such as canola) into a heavy bottomed cast iron skillet or Dutch oven and heat to 325 degrees F. When the oil is hot, fry the peppers in batches of 3 or 4, making sure not to crowd your pan. Keep an eye on the heat of the oil and adjust as necessary so that it stays steady.

When the first batch is golden (about 5 minutes), remove to a paper towel-lined platter to drain and repeat with the remaining peppers. Toss a quick sprinkle of salt over the freshly fried peppers and serve immediately.

Any leftovers should be frozen flat and then stored in a freezer bag. Reheat in a 400 degree F oven for 5 minutes.
11

Homemade Pecan Milk


I am so impatient. Really. I have the hardest time making things that actually require me to start the day ahead. Mostly because I only realize this right at that moment when I'm going to start my baking (it's usually baking) and read that the first step requires something to sit or soak or proof or whatever overnight.

Overnight?! No way! Because when I bake it's because I want cake or bread now, or at least 2 or 3 hours from now, but definitely not tomorrow.

This is why I never make sourdough, and why I shamelessly dropped out of the Bread Baker's Apprentice challenge before the first week even finished. Forget proofing, I'm more than happy with challah, which everybody knows is Jewish for "The World's Most Perfect and Delicious Bread," and which I (and you too!) can make, start-to-finish, in less time than it takes me to watch Forrest Gump for the 87th time on AMC.

And yet, despite all these truths, I'm about to share with you a recipe that you won't be able to taste until tomorrow. Or at least until very, very late tonight. I know. I'm awful, but read on...


So the recipe is for homemade Pecan Milk, which is a dairy-free "milk" similar to almond or rice milk, but better. Better because it's lusciously creamy and tastes kind of like an amazing nutty milkshake, except that it's actually healthy. According to ILovePecans.org (that's an actual website although I suspect it *might* be a little biased), pecans contain more than 19 vitamins and minerals -- including vitamin A, vitamin E, folic acid, calcium, magnesium, phosphorus, potassium, several B vitamins and zinc. They're also a great source of fiber, and have been shown to control weight and possibly even prevent heart attacks.

So basically here I'm giving you a recipe for life-granting elixir. A life-granting elixir that tastes like a milkshake. Aren't I awesome?

You can drink pecan milk (aka life-granting elixir) straight, over ice, or even in your coffee in place of regular milk or soy milk. Pour it over your cereal. Warm it up and drink a big mug of it while sitting on your bed wearing pajamas and listening to your Kindle read you a bed-time story in her sexy robotic Kindle voice. It's the future, kids. And in the future we have talking paper and milk made out of nuts. And pajamas. It's like the Jetsons.


So the only problem that I see is trying to figure out what to do with the eight hours you have to let the nuts soak. You probably already have plenty of things to do, but if no, here are a few suggestions:

First, you should make this perfect for Fall Pumpkin Spice Challah.

That only took three hours, so now you should make this Vanilla Bean Challah so that you don't have to share the pumpkin one.

It's now been six hours and you're probably craving a little protein, so why not make yourself a bowl of this Pumpkin Chili.

And now it's time for the milkshake.

Oh and by the way, this recipe also works fantastically with cashews or, if you love luxury and want to lavishly celebrate the end of the recession, macadamia nuts. (Gasp!)

It's the future, kids. Enjoy it.


Pecan Milk


1 1/4 cups raw or roasted pecans (unsalted)
4 cups filtered or spring water
1/4 cup raw honey (can substitute maple syrup)
1/3 cup coconut milk
1 teaspoon ground cinnamon
1/4 teaspoon freshly grated nutmeg
1/2 teaspoon celtic sea salt (or Kosher salt)
Additional honey or sugar for sweetening.

1.)Combine the pecans, salt, and water in an air-tight container. Seal and leave to soak in the refrigerator for at least 8 hours or overnight.

2.) Pour the soaked pecans and the water mixture into a blender (note that the water will have turned slightly golden from the nuts). Add the honey, coconut milk, cinnamon, and nutmeg. Process on high for two minutes or until the mixture is well combined and smooth. Sweeten to taste and store in the refrigerator. This will last one week refrigerated in an air-tight container.

Note: If you'd like a smoother beverage, pour the pecan milk through a sieve lined with cheesecloth.


19

Sticky Books: Michelle Norris of Brown Eyed Baker

Michelle Norris is the blogger and baker behind Brown Eyed Baker, a "sweet, savory, sinful" blog that features recipes and posts about breads, desserts, and other tempting baked goods (with an occasional savory dish thrown in). She also writes "how to" articles, such as the recent four-part series on how to build and stock a baking pantry, which are an incredible resource for novice and seasoned cooks alike.

Michelle is a marketing analyst by day, and has recently started her own baking business selling cakes, cupcakes, and cookies to a clientele of local Pittsburgh-area customers. Readers of her blog who live too far away may also soon be able to taste these goodies for themselves; she's currently working on making a selection of her cookies available for online purchase and shipping.

Those stains on well-used cookbooks are often a badge of honor for passionate cooks and Michelle is no different. "I get such a sense of pride when I go to leaf through a cookbook and the pages stick together," she says. "It makes me feel accomplished in the kitchen."


Michelle's Top Three Sticky Books

1. Baking: From My Home to Yours by Dorie Greenspan.
I received this book for Christmas 2007 from my sister. I had heard a few other bloggers singing its praises and was so excited to finally have it in my kitchen. The minute I opened it and started reading the forward, I was in awe of Dorie. She is a home baker, like so many of us, and just wants to share her love of baking with others. I have made dozens of recipes from this book, but my top 3 are probably Hidden Berry and Cream Cheese Torte, French Chocolate Brownies, and the Perfect Party Cake.

2. The Bread Baker’s Apprentice by Peter Reinhart
I purchased this book with a Barnes & Noble gift card I got for my birthday a couple of years ago, but it was some time before I finally cracked it open. Once I did, I found that I couldn’t put it down. The entire first part of the book is written almost as a textbook, with a large amount of information about the science behind bread baking. This serves not only as a great introduction for a beginner bread baker, but also as a fabulous resource for even the seasoned veterans. Of all the baked goods I have ever made, the one that my boyfriend requests more than anything else is Cinnamon Raisin Bagels from this book. He likes them toasted with butter, while I prefer cream cheese or peanut butter. Any way you top them, you can’t go wrong!

3. The Perfect Scoop by David Lebovitz

This may be a biased selection since I've just spent the entire summer churning ice cream, but this book IS sticky! Since I was new to homemade ice cream, I wanted a book that could serve not only as a source for great recipes, but also as a resource I could use as I delved into the world of homemade ice cream. This book delivered in every way I had hoped. The book has an entire section devoted to equipment and techniques, and dozens of incredibly delicious recipes. I could have eaten the Tin Roof Ice Cream all by myself (and just about did!). The Chocolate Ice Cream is the richest, most intense chocolate ice cream I have ever eaten. On top of these great recipes, I was able to use the methods and techniques to create my own recipes for things like Pistachio Ice Cream.
6

Julie & Julia & Alejandra: Adventures in Julia Child's Kitchen at the Smithsonian

Alejandra and Julie Powell and Julia Child

"There was no question of where to make the drop-off -- at the center of the exhibit, beneath a large black-and-white photo of Julia in chef's apron and wild seventies polyester shirt, one hip cocked, grinning. There was even a narrow shelf running along under it, as if it really was a shrine, and pilgrims really were expected to leave their offerings there."

Julie Powell,
Julie & Julia


I caused a bit of a ruckus at the Smithsonian National Museum of American History the other day. Those of you who have seen or read Julie & Julia will probably understand why.

The brilliant idea struck me late on Friday night as we were packing for our weekend getaway. My friend Lindsay had invited us down to the city and was throwing a dinner party in our honor. Even though we were coming in from five states away, I certainly wasn't about to show up empty-handed so I promised that I would bring a homemade dessert. I chose Molly's "Winning Hearts and Minds Cake" as it's an easy (but amazing) chocolate cake that actually tastes better on the second day.

That night, in the midst of the packing and scrambling that usually occurs before a trip, I popped into the kitchen to stir up the copious eggs and butter and chocolate that basically constitute the entirety of that recipe. Once the cake was in the oven, I noticed the now-empty box of butter.

"I'm bringing this to Washington!" I announced, running into the living room with the butter box in my hands. "And we can go to the Museum of American History and I can recreate that scene from Julie & Julia where Julie takes the awkward picture with the butter!"

I ran to the computer to Google image search "Julie Powell Butter Smithsonian" while Eugene gave me that look that he gives me when it's already midnight and we have to get up in 4 hours and instead of packing I'm Googling things about food. The picture came up and I dragged the laptop over to my mirror so that I could practice mimicking Amy-as-Julie's awkward pose.

"This is going to be great!" I told him, while I dismantled the box to keep it from getting crushed in transit. I think by this point, Eugene was just glad I wasn't bringing actual butter to DC with us.

***********************************************

We actually didn't make it to the museum until our last day in Washington (although that wording implies the scheduling wasn't intentional...which it absolutely was).

We started at the Air & Space Museum (long been my favorite of the Smithsonians) and then walked across the National Mall to American History. It was only once we were inside that I realized I'd completely forgotten to bring along tape to put my butter box back together again. As soon as we got past security, I dragged Eugene to the gift shop in search of "some gum or something sticky" that I could use to seal the box. Unfortunately, there were no gum or stickers or tape of any kind anywhere in the store.

I started to despair until no other than Julia Child came to my rescue. Near the back of the store there was a display of Julia Child cookbooks. I turned one over and realized that the sticky price tag on the back of the book would be perfect. With Eugene blocking me from view, I slowly pulled off the price sticker off the book and ran out of the store. In the main hall I ripped the sticker in half and used it to tape the box back into shape. We were now ready for phase two of our mission.


Julia Child Exhibit at the Smithsonian
The Julia Child exhibit at the Smithsonian has always been a popular one, but even more so since the movie opened. The exhibit was teeming with tourists taking pictures and watching the Julia videos playing on a constant loop on a TV screen near the front. I suddenly started getting a little nervous that my plan wasn't going to be as easy as I imagined. We walked around trying to find the exact spot in the movie where Amy Adams/Julie Powell left the butter, but it quickly became apparent that the movie had lied. There was no neat little corner with a guest book and framed portrait of Julia. The location from the movie didn't exist in real life.

"Hollywood lied!" I hissed at Eugene as we realized that we weren't going to be able to recreate the scene. Disappointed, I pushed past the throngs of people and pressed my face up against the plastic window looking into Julia's kitchen. It was smaller than I remembered, but really lovely. All the elements where there: the beautiful peg board with Paul's outlines, the pictures of cats, the gorgeous copper pots. Close to the window, there was a memo pad and Julia's phone with little bits of tape stuck to it. I looked at it closely and realized something remarkable! On the speed dial pad, next to some names I didn't recognize, there was a button clearly marked "Dorie. G."

"It's Dorie!" I said out loud to nobody in particular, and stood in amazement at seeing Dorie Greenspan's name listed on Julia's speed dial. I pointed it out to Eugene who didn't know what I was talking about, but I figured you guys would (I can always count on you!), so I took a picture. Now if I could only figure out the rest of those names...

Dorie Greenspan on Julia's Speed Dial
By this point it was pretty clear that we weren't going to get the photo I'd wanted. Just as we were ready to move on to the next exhibit, a group of people watching the videos cleared out and, like a glorious mirage, Julia appeared.

"Oh my God!" I called Eugene over and pointed out the large photo of Julia in a crazy polyester shirt and apron. "It's a picture! I can do it here!" Beneath the portrait, just like in the book, there was a little ledge. The perfect spot for my butter.

Julia Child at the Smithsonian
I gave Eugene the camera and walked over to the spot. There were still a lot of people around so I had to summon up my nerves, but I did it. I pulled the butter out of my bag and placed it on the ledge while Eugene snapped away. I did my best to recreate the awkward pose from memory: one hand straight, one hand towards the photo, chin scrunched into my shoulder.

While I was posing, people suddenly started to recognize what I was doing. I kept hearing them whisper "butter" and "Julie & Julia."

"You brought your own butter!" One man finally said to me when I finished with the shoot.

"Did you see the movie? I'm a food blogger. I'm trying to recreate the scene," I explained hastily. He laughed appreciatively, noting that he loved the movie, and I gave him my business card so he could check the site out later. A mini crowd had gathered by this point so I told them all about the blog and handed out a few more cards.

Eugene turned to me after the crowd moved on. "Are you satisfied now?" he asked.

"Oh yes!" I said, and took his hand as we headed over to the next exhibit.

Leaving butter for Julia Child at the Smithsonian
Back in New York the next day, I pulled out my copy of the book and flipped to the end where Julie makes her pilgrimage to Washington. I laughed because her description of the moment was actually a lot like what I experienced. And from her words, there is no doubt that the picture I saw was the same one she took her photo with. The movie may have lied, but ultimately my recreation of it ended up being a lot closer to the original than I'd imagined.
14

Sticky Books: Lori Lange of Recipe Girl

I'm not sure if you noticed, but things have been a little quiet around here this week. I didn't mean for it to be that way, but sometime late Sunday night I got knocked right off my feet by a nasty cold that left me sleepy and whiny and incapable of consuming anything but plain whole wheat noodles with butter, rum raisin cookies, and mugs of steaming TheraFlu. The latter, by the way, is delicious. It's like a hot cup of Minute Maid soda fountain lemonade. Someone on Twitter pointed out that in "real life," TheraFlu is actually not delicious, and that the fact that I think so is a clear indication that I'm still ill. I guess I'll have to wait a few more days before I can confirm that theory, but for now...Om Nom Nom!! Pass me the TheraFlu, please!

Next week I'll be back to my regular posting schedule, with a few posts about the food and hi-jinx and more food that Eugene and I got into on our little getaway this past weekend. Until then, I'm excited to share with you the second installment of the Friday Sticky Books column here on Always Order Dessert. This week, we're featuring Lori Lange of the incredible recipe and entertaining website, RecipeGirl.com.

Note: If you're just learning about the Sticky Books feature, click here to read more about the project.


About Lori
A former elementary school teacher from San Diego, California, Lori Lange left the classroom in 2005 to start RecipeGirl.com. Lori now spends her (incredibly enviable) days cooking, baking, and photographing food for her website which houses a collection of more than 2,500 original and adapted recipes. The site also features a food blog and a searchable database of entertainment menus for all occasions. When I sent her the interview, Lori hinted that she's also got a brand new food blog in the works, so be sure to keep checking her site for more details!

Lori confessed that she owns 219 (!!!) cookbooks, but was happy to share her top three stickiest with us:

1. California Sol Food: Casual Cooking from the Junior League of San Diego

This one is near and dear to me since I was involved in the recipe testing and selection for this book. The recipes are divided into 'times of the day' (brunch, happy hour, dinner, etc) and each of them is representative of the fresh, seasonal flavors of Southern California. I've made over half of the recipes in this book, and they've all been fabulous. My favorite is a recipe that came from my family's kitchen: Summer Salad. I've recommended this salad to so many people, and it inevitably becomes their favorite too. I also really love the Margarita Cake.

2. The King Arthur Flour Cookie Companion by King Arthur Flour
I'm addicted to baking, and cookies are my favorite thing to experiment with. There are so many recipes in this cookbook that I don't think I could ever possibly ever get through them all, but I intend to try! For many of the cookie/bar/snack recipes, there are multiple variations listed. My all-time favorite recipe from this book is the Cinnamon Bun Cookies. Magic in the Middles are a must for Chocolate-Peanut Butter fans.

3. The Food You Crave: Luscious Recipes for a Healthy Life by Ellie Krieger
I picked up this cookbook on a whim, and I can't believe how much I use it. This is the cookbook I turn to most for quick and healthy meals. I've never watched Ellie Krieger on Food Network, but her recipes are reliable and delicious. They're easy enough for a novice cook, and gourmet enough for an experienced foodie. My favorites: Chickpea and Spinach Salad with Cumin Dressing and Fish Tacos with Chipotle Cream.

___________

Awesome, right? I can already tell this Sticky Books thing is going to be dangerous. (Although possibly very profitable for Amazon). Have you guys tried any recipes from these books? I haven't yet, but those fish tacos are calling my name...

Remember to check back every Friday for more Sticky Books from your favorite bloggers, and in the meantime, I'd love to hear about your favorite cookbooks below!
8

Sticky Books: An Introduction & Selections by Marc Matsumoto of No Recipes


I recently woke up thinking about a recipe I used to make when I first started to experiment in the kitchen. It came from a cookbook that my mother had gotten sometime in the early 80s from Cooking Light magazine. Along with the usual "light" recipes, the book had an entire chapter on microwave cookery. Though I was still too young to mess around with the stove, my mom let me go to town with the microwave (once I understood that metal things were off limits, that is).

There was an easy lemon pudding cake that quickly became my favorite. It was a kind of souffle that relied on stiff egg whites for height and just the teensiest bit of flour. I made the pudding cakes all the time that year until I was able to graduate to box mixes and the oven. I don't think I thought about those little lemon cakes again until the other day when they reappeared for no reason at all. I called my mom and she promised to look for the book. We stopped by the house for dinner a couple weeks ago, and found the book sitting on the kitchen shelf. I excitedly flipped through the pages right to the recipe for lemon pudding cakes. There was the picture I'd remembered, and the page...well it was filthy! Crusts of long ago flour and sugar and a rip where the paper had glued itself together. It was the only page in the book that looked like that; the surest evidence of a favorite recipe.

We all have books like this, sticky and splattered with frosting from that cake we made grandpa on his 75th birthday or the splatter of cranberry sauce from the first time mom let you help with Thanksgiving. Seeing that messy and beloved page made me wonder about the stories in other people's cookbook pages, and so Sticky Books, a new weekly interview column here on Always Order Dessert, was born.

Each Friday, a different food blogger or will share his or her top three favorite cookbooks with my readers. Sticky books are a badge of honor for the home cook, sometimes even more memorable than the album full of snapshots, and so I'm excited that so many incredible bloggers have been willing to share them with us. If you have experiences with the books that these bloggers mention, I invite you to leave them in the comments, and please don't hesitate to tell us about your own sticky books.

____
Sticky Books: Marc Matsumoto of No Recipes


Marc Matsumoto started his food blog No Recipes nearly two years ago. Based on the philosophy that cooking is 50% technique, 40% inspiration, and 10% ingredients, he strongly believes that armed with a handful of basic techniques and a little inspiration, anyone can make a tasty meal from even the most derelict pantry.

When I sent Marc the questions for this feature, he told me about a new event that he just launched on his blog called Blog Away Hunger, which is meant to raise money for the World Food Program. The WFP gets food aid to the people that need it most, and with one in seven people on Earth suffering from chronic hunger, they need all the support they can get. He's inviting everybody to participate in this event by simply creating a meal that costs less than what you'd normally spend, post about it on your own blog or website, and then donate the money you saved to the WFP. You can check out Marc's blog for more details.

And now, in Marc's words, his top three Sticky Books:

Marc: Since I don't cook with recipes, my most used cookbooks tend to be reference books where I can quickly look up information on ingredients and basic techniques.

1. On Food and Cooking by Harold McGee
This is my "stickiest" cookbook. It doesn't contain any recipes, but it holds within its blessed binding, answers to nearly any food related question you may have. Like "How is soy sauce made?" or "What do cell walls have to do with the mealiness or meltingness of fruit?". This is the Webster's of the culinary world.

2. The Best Recipe by the editors of Cooks Illustrated
What I love about the folks at Cooks Illustrated is that they take scientific rigor and apply it to food. Through a documented process and iterative testing, they figure out the best way to do something. As with anything that comes out of a lab, their recipes tend to lack soul, but what it lacks in character is more than compensated for with rock solid techniques and play-by-play details.

3. Japanese Cooking: A Simple Art by Shizuo Tsuji
You won't find any drool-worthy photos or nostalgic stories here, but if you want a reference book on Japanese ingredients and cooking, this is the only English language book that will meet your needs. Like Julia Child, with her tome: Mastering the Art of French Cooking, Tsuji opens the door into the mystical world of Japanese food with her book.


Have you cooked with any of Marc's favorite cookbooks? Tell us about them in the comments! And remember to check back next Friday for the next edition of Sticky Books.
6

Pan de Mallorca / Mallorcan Sweet Rolls

pan de mallorca
A friend traveling to San Juan called me in the middle of the afternoon a few weeks ago to ask for recommendations. I rattled off my usual favorite restaurants and shops and my preferred hotel and then, lowering my voice a bit to indicate the seriousness of what was to come, I told her that she was not allowed to leave the island without trying a mallorca. Preferably, I added, toasted and filled with ham and cheese.

Mallorcas, as I grew up calling them, are a sweet, coiled enriched bread (similar to a brioche) that is served dusted with copious amounts of powdered sugar. The breads are best freshly baked and toasted with lots of butter, or (my favorite) filled with thick slices of baked ham or jamon Serrano and some kind of cheese. In Puerto Rican cafes and bakeries (you can even find them at the local Starbucks there!), the options are invariably Swiss or American (as wonderful as the island is, they have terrible taste in cheese). I like to use a nicely aged cheddar instead. If you're a tourist, the counter person will probably assume you don't want powdered sugar on your sandwich, but I urge you to insist that they give it to you. The combination of salty ham and sweet bread is sublime. Even better, have them press the sandwich for you before dusting with sugar.

mallorcas

The Old San Juan cafe, La Bombonera, is famous for its mallorcas, but I actually most associate my visits with the ones I've eaten another bakery/cafe called Kasalta. Kasalta has been around since my parents were children. According them, it started out as a small cafe that grew and expanded over the years as it became increasingly more popular. Today, the bakery stretches down a long, narrow room, with various stations for coffee, desserts, sandwiches, savory dishes, and deli meats set up along the long counter. Opposite the counter are a series of cafeteria-style picnic tables where the dine-in guests randomly grab seats to eat their sandwiches. The seats are made for sharing, so don't hesitate to join another family if there aren't any empty tables available.

Growing up, we flew to Puerto Rico about once or twice a year for the various holidays and weddings and funerals that cause families to bundle into planes and zip across various North American flight routes. We felt lucky that for us these trips always meant a Caribbean vacation with fancy hotels and pools and beaches, while the other kids in our class were sleeping on sofa beds and air mattresses in random uninteresting suburbs just outside of Buffalo or Baltimore.


pan de mallorca
Of course, this also made the return home a bit tragic. The last day of vacation usually is. Suitcases haphazardly packed, squeezing back into a pair of suddenly-snug jeans (the only long pants that were brought on the trip). As kids we dashed in and out of the bathrooms and the hallways, snagging as many tiny shampoo bottles and shower caps as we could. Not to mention hotel pens and notepads emblazoned with that Ritz Carlton lion or the trademark blue Hilton "H." After check-out, the luggage was piled into the rental car and my dad would take us to our final stop: Kasalta.

We'd stock up. Egg and ham sandwiches or scrambles for breakfast that were eaten at the table, along with several Cuban or Media Noche or Mallorca sandwiches to eat on the plane. And then, triumphantly, the box of pastries. Flaky quesitos filled with sweet cheese and guava, almond pastries, doughy triangles filled with dulce de leche, and a few freshly baked mallorcas for good measure. The box was tied up with one of those thin red and white strings and tucked carefully into the carry-on; a final taste of the island meant to carry us through the next couple days of reentry.

pan de mallorca
On my most recent trip to the island, back in February with Eugene, I indulged in these treats every morning thanks to the overpriced but so good it was almost worth it buffet at the Caribe Hilton (aforementioned favored hotel). To help justify the 60-dollar-a-day breakfast, I'd wrap several mallorcas in a napkin just before heading back to our room and spend most of the day nibbling on them and spilling powdered sugar all over the floor and my black bathing suit. Classy, I know.

I woke up craving them a few days ago, so I set off on a hunt for a good recipe. I found one at The Noshery that looked promising since the blogger, Meseidy, is actually Puerto Rican and knows first-hand what those little rolls of deliciousness should taste like. The recipe came together easily, and the results were heavenly. The dough was one of the softest doughs I've ever worked with. Seriously, it was like poking a little baby in the belly. I just wanted to squeeze it, it was so cute!

pan de mallorca
The best part is that the entire recipe only takes about 3 hours to make (including risings), and as most of the time is inactive. It's the sort of recipe that can come together easily in the evening while watching your favorite shows or even getting dinner together. They'll keep well overnight and in the morning you can treat yourself and your family to freshly baked sweet rolls.

I modified the recipe only slightly, adding a bit of vanilla bean and a pinch of salt. I also had to add an extra cup of flour since my dough was much too wet (it was a humid day). Next time I make these, I think I'll combine lard with the butter just to see what happens (marvelous things, I'm sure!). Mallorcas, by the way, came to Puerto Rico by way of the Spanish who brought them from the Balearic island of Majorca. There, the bread is known by its proper name of ensaïmada (literally "en-larded"), since ordering "Pan de Majorca" while actually in Majorca would otherwise cause much confusion.

Restaurant Information:

Kasalta
1966 Calle McLeary
San Juan, PR 00911
(787) 727-7340


pan de mallorca

Note: Eugene is concerned that I didn't credit his hand modeling debut above. He was worried that you would think those are my man-hands. So just for the record, I don't have man-hands. Those are Eugene's.

P. S. Want more great Puerto Rican recipes? Check out my eCookbook: The Puerto Rican Christmas Table with 40+ recipes and full-color photos. Click here to learn more!

****
New to Always Order Dessert? Consider subscribing to my RSS feed, follow me on Twitter, or sign up to receive my once-a-week e-mail updates by filling in your address in the box on the right. And if you ever need any entertaining or cooking advice, please don't hesitate to e-mail me.


Pan de Mallorca/ Mallorcan Sweet Rolls

Adapted from The Noshery

2 1/4 teaspoons dry yeast
3/4 cup white sugar
5 to 6 cups all purpose flour, divided, plus more for dusting
1 cup warm milk (warm enough to leave your fingertip in it for 10 seconds)
1 cup warm water (warm enough to leave your fingertip in it for 10 seconds)
6 egg yolks
1 vanilla bean, scraped (optional)
2 sticks (1/2 pound) unsalted butter, melted and cooled to room temperature
1 teaspoon salt

In the base of your electric mixer, combine the warm milk, warm water, yeast, sugar, and 1 cup of flour and whisk well. Leave to rise at room temperature for 45 minutes. The mixture should have risen and appear frothy and bubbly after the rise.

Whisk in the egg yolks, vanilla, and the remaining flour until it is all incorporated. Whisk in the salt and 1/2 of the melted butter. Cover the bowl with an oiled plastic wrap and let rise for 1 hour until doubled.

Liberally dust your surface and your hands with flour to prevent the dough from sticking. Empty the dough out onto the surface and sprinkle it all over with flour. use your hands to knead it slightly. It will be soft and will feel almost liquid in the center, but you should be able to handle it by keeping your hands floured.

Divide the dough into 12 equal portions and roll each portion out into a snake about 12 inches long. Use a brush to coat the dough snake with a generous brush of melted butter, then coil into a little roll and place on a baking sheet lined with parchment paper. Space the rolls out evenly, only six to a sheet so they have room to rise.

When you're done rolling them out, brush with a little more butter and let them rise until they have doubled once again (about 30 minutes). (At this time, preheat your oven to 375 degrees)

When done rising, brush once again with the remaining butter, and bake in the oven at 375 degrees for 12-15 minutes or until golden and puffed.

Cool on a rack and dust liberally with powdered sugar just before serving.

15
Back to Top