Bagged Lunch Ideas: Egg Salad w/ Caramelized Shallots & Chives


Like a wacky sitcom neighbor who pops in unannounced, summer has been arriving in New York in tiny sporadic bursts these past few weeks. It's too soon, people cry, as they pull off the jackets and cardigans they cautiously grabbed before leaving the house that same morning. The train ride home each night is either a mass of huddled girls shivering in prematurely ambitious shorts or steaming commuters, fanning themselves with their coats bundled in a pile on their laps.

The excessively hot days--today it's already hit 90!--make me sleepy, and when I finally get in the door and drop my piles and bags and heels on the floor (yes, the floor), the last thing on my mind is standing in front of my stove for an hour. Instead, my cravings these days have turned toward the cool and salad-like. I made this herby tuna salad one day, and a similar version with showers of lemon zest another (my mercury levels are likely through the roof at this point). There were two nights of simply pan-fried chicken breasts served on a big mess of greens with this embarrassingly easy Caesar dressing.


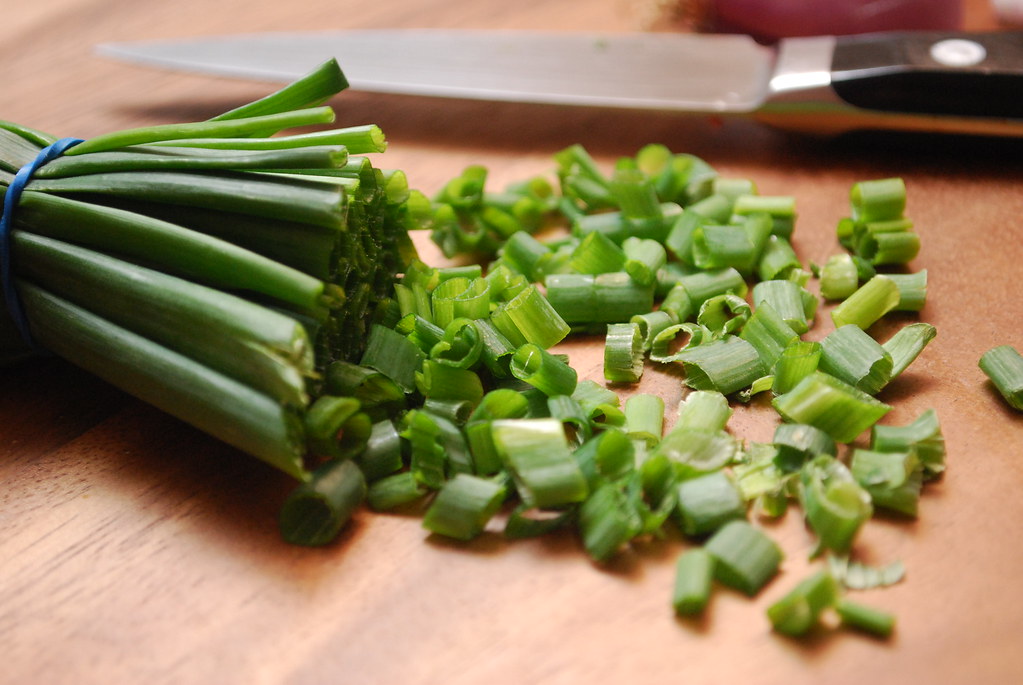
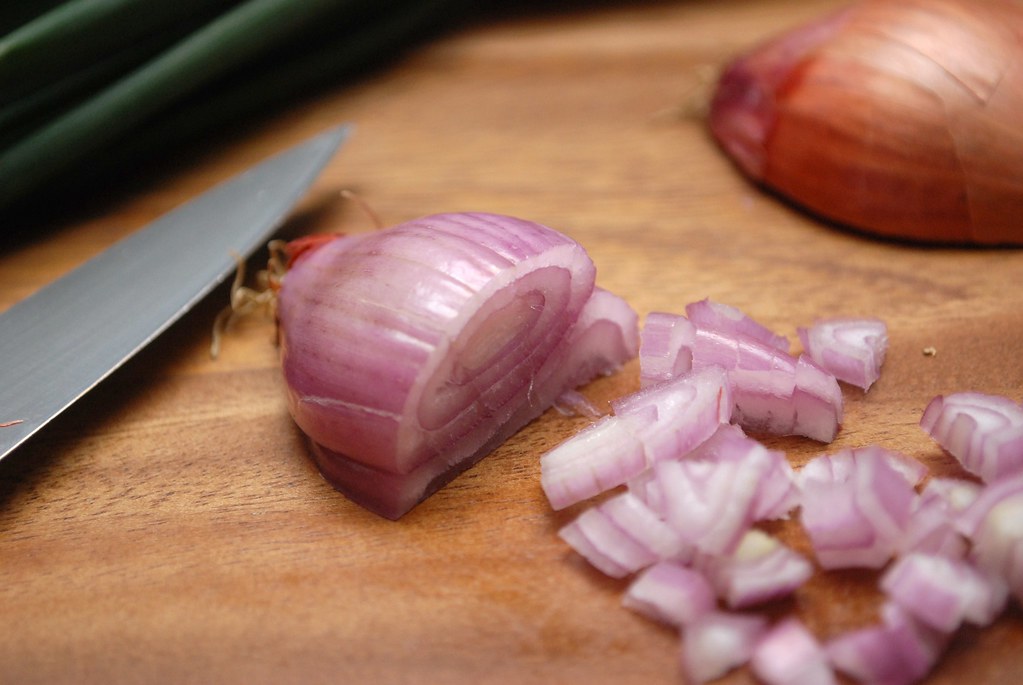
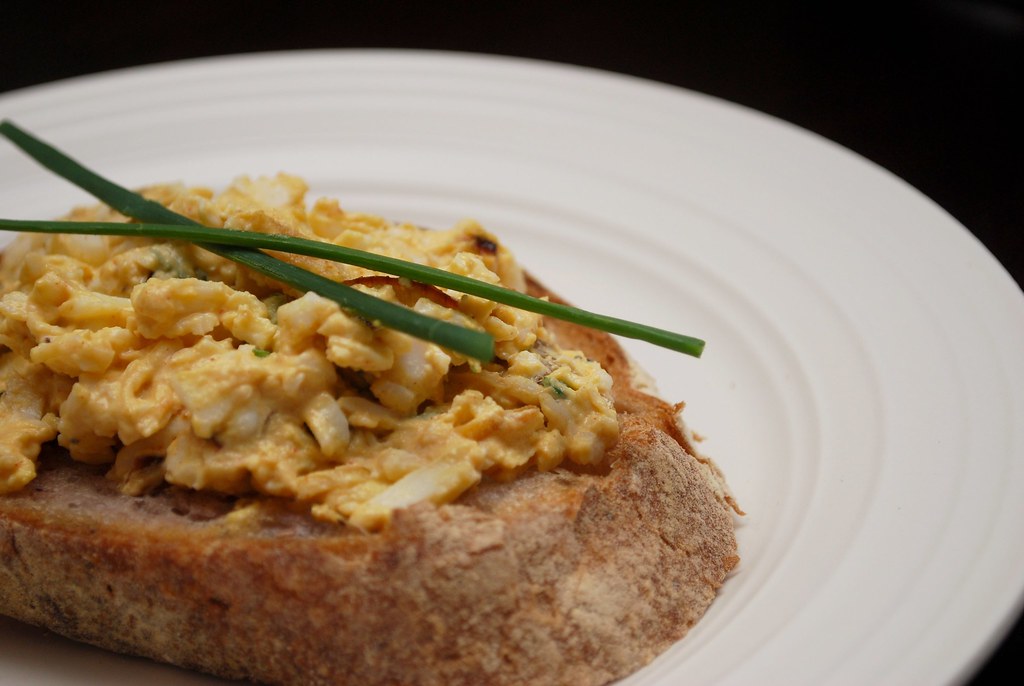
Last night, I just wanted egg salad. That's egg salad my way, with diced caramelized shallots, finely chopped onion chives, and generous dashes of both cayenne and smoked Spanish paprika. The resulting salad is simultaneously smoky, creamy, and spicy, with tiny bits of sweet. If you *really* want to make it my way, let the shallots caramelize just a bit too long until they're a little crisp. Let them hit that cusp just before burned, for a little extra smoke that I find irresistible.

Eugene likes his egg salad on big slices of freshly baked olive bread from the farmer's market. I take it straight up, spoonful after spoonful right from the bowl I make it in. It's my favorite bagged lunch, and so I always make just enough so that I can bring a few scoops with me to work the next day. Occasionally, it's all I can do to not eat it for breakfast! ;)


Everyone has their own methods and tweaks for making an ideal egg salad, but below is my style. To get the eggs fluffy and evenly sized, I grate them on the larger side of a box grater. If I'm making a lot of egg salad (usually for a brunch party), I just toss them into my food processor with the largest grating wheel in place. As impatient as I am, I also find it's best to wait until the next day to have it. An evening in the fridge does wonders for the texture and flavors, which is why it's an ideal dish to prepare to bring to work the next day.

No matter how many eggs I start with, I always find myself wishing I'd made more. This recipe calls for 8 eggs and makes enough for dinner for two, plus one more lunch tomorrow (you guys can fight over it!). It can, of course, be easily doubled or halved.

A Tip: If you prefer it in sandwich form for lunch, just pack it in a container with the two slices of bread in a separate baggy or wrapped in paper, and assemble the sandwich at the office. This will keep the bread from getting soggy (and you can keep the bread room temperature while you refrigerate the eggs).


Now tell me, how do YOU like your egg salad?


Egg Salad with Caramelized Shallots & Chives
Makes about 3 cups.

Ingredients
8 large eggs
1 large shallot, diced
1 tablespoon butter
1/2 cup mayonnaise
1 teaspoon smoked spanish paprika
1/2 teaspoon cayenne
Kosher salt
Black Pepper
1/4 cup onion chives, chopped


Place eggs in a medium saucepan and cover with cold water. Place over high heat just until the water reaches a rapid boil. Turn off heat and let cool to room temperature (about 10 minutes). Shake pan gently to crack shells and place under cold running water for about 15 minutes (refilling with fresh cold water every so often).

While the eggs are cooking, heat a heavy-bottomed skillet over medium heat. Add the butter and the shallots and saute until caramelized (about 7-10 minutes).

When the eggs are cool, peel and grate using the large side of a box grater. Combined in a large bowl with mayonnaise, paprika, cayenne, salt, and pepper. Fold in the caramelized onions and chopped chives.

Serve immediately, or chill in the fridge. Can be made up to 24 hours in advance.
0

Kitchen Tip: Cheater Caesar Salad Dressing


Before I go any further with this tip, I want to make it clear that this is NOT a recipe for a classic Caesar dressing. Real Caesar dressing is an emulsion of oil, garlic, eggs, anchovies, and other ingredients that calls for a few more steps than this. This is NOT that.

What this is, is a ridiculously easy homemade Caesar salad dressing that you can whisk together in about 2 minutes without dirtying too many plates. The trick is using mayonnaise as the base. Mayo, as you may know, is already a combination of oil, eggs, and lemon juice, so by using it you're basically just skipping a couple steps (and bowls).

To make, all you need are two anchovy fillets, a garlic clove, some mayo, lemon juice, a dash of oregano, and a little salt and pepper. If you'd like, you can also add in some grated Parmesan cheese. It just takes one bowl, and the result is this thick and creamy dressing that's pretty darn close (I say even better!) to the Caesar salad dressing you'd get from a bottle or with your salad at lunchtime.

I love this over a big plate of crisp greens and sliced grilled chicken. It's also really good as a spread in sandwiches and wraps. Or toss it with cooked jumbo shrimp for a fun main course.

Note: You have to like anchovies for this recipe to work; no skipping them here, OK? ;)

Creamy Cheater Caesar Salad Dressing
This makes about 1/2 cup of dressing

Ingredients
2 anchovy fillets (or 1 teaspoon anchovy paste)
1 garlic clove
salt and pepper
1/2 cup mayonnaise
2 tablespoons lemon juice
1/2 teaspoon dried oregano
3 tablespoons Parmesan cheese (optional)

Using a fork and small bowl (or mortar & pestle), mash the anchovy fillets (or anchovy paste) and garlic clove into a course paste along with pinch of kosher salt and freshly cracked pepper.

Add the half cup of mayo and the lemon juice. Whisk until combined and smooth. Stir in the oregano and (if using) the grated Parmesan cheese.

Taste and adjust seasoning with more salt and pepper, if desired.

Serve on the side with salad greens or use as a spread in wraps and sandwiches. Also wonderful over grilled chicken!

Keeps in the fridge, covered, up to 2 days (if chilled, whisk gently before serving).
0

Join Me for Dessert!


A few weeks ago I hinted that I was busily working on some events for the summer. I'm excited because I can *finally* announce one of them. (And, I really really really hope that you'll be able to join us!)

On Wednesday, June 9th, I, along with the folks at The LAMP, am co-hosting a charity bake-off to benefit their amazing media literacy programs for kids, teens, and parents in underserved communities. I've actually taught a few web literacy workshops for The LAMP, and have witnessed first-hand how important the work they're doing is. As bloggers and otherwise Internet and media savvy people, it's sometimes hard to realize just how little many people know and understand about the multi-media messages that are thrown at them everyday. With their workshops and programs, they're working to give kids, teens, and their parents, the tools and skills they need to navigate the messages and think critically for themselves. That is definitely a cause that I--and this blog of mine--can get behind!


The event is going to be a delicious one. We've assembled a group of uber-talented food bloggers who will be squaring off against each other with their decadent baked treats. A panel of noted foodie judges, including Brooke Parkhurst--NY Daily News food columnist and writer (along with her husband, Chopped champ James Briscione) of the forthcoming cookbook Just Married and Cooking, and Giulia Melucci--author of saucy "foodoir" I Loved, I Lost, I Made Spaghetti.

The Double Windsor Bar in Brooklyn is hosting us for the evening. And yes, I said Brooklyn. Those of you who know me personally, know that I live all the way up in Harlem and *rarely* step foot below the Upper West Side (let alone outside of Manhattan!) so you know this is definitely going to be good.

Tickets are just 20 bucks in advance (buy your tickets here) or $25 at the door. It's limited entry so I definitely recommend getting your ticket soon! The amount is tax deductible, and your admission grants you automatic entry into the raffles, access to exclusive drink specials, and (of course!) a tasting plate of all the delicious treats.

I'm really excited about this, and hope that those of you in New York (or nearby) can make it. Feel free to email me if you have any questions.

I'll see you on June 9th!

Details:

Best Desserts! A Benefit for The LAMP
Wednesday, June 9, 7-9pm
Double Windsor Bar, 210 Prospect Park West (at 16th St.), Brooklyn NY
Admission: $20 in advance, $25 at the door (admission gets you access to exclusive drink specials and amazing desserts made by New York's hottest food bloggers)

Buy your ticket now!

All proceeds benefit The LAMP

About The LAMP:
The LAMP (Learning About Multimedia Project) is a non-profit organization bringing free, hands-on media literacy workshops to youth, parents, families and educators throughout New York City. Based in Brooklyn, The LAMP was founded in 2007 by Katherine Fry, Ph.D., and community organizer D.C. Vito with the vision that one day, media literacy will be seen as the critical requirement to understanding the world and our place in it. As part of this effort, The LAMP works in communities to build healthy relationships with all forms of media, with a focus on communities which are considered at-risk or underserved. To date, more than 700 students have benefited from workshops with The LAMP on a range of topics, such as cyber wellness, news literacy, advertising literacy and much more.
0

Party Inspiration: A Memorial Day Picnic!


Whenever I plan parties, I start off by collecting pictures, recipes, and objects that inspire me. For my recent clothing swap party, I wanted a really girly and fun style, and was inspired by vintage aprons, pink-striped paper straws, and bouquets of bright springtime flowers. My retro cocktail party grew out of my personal love for midcentury cookbooks, Mad Men, Breakfast at Tiffany's, and vintage copper Jell-o molds.

I usually use my Tumblr account to group together these photos and then use them for inspiration while I plan my menu and shop for decorations (that's actually what I've been doing for my wedding planning). This morning, I woke up and decided that it would be fun to put together a series of inspiration boards that you can use when planning your own parties.

Since Memorial Day is right around the corner, I'm starting off with a patriotic picnic board. Think gingham picnic blankets, flirty sundresses, vintage-style soda pop, lemony chicken salad sandwiches, tart lemonade, the first strawberries of the season, and plenty of berry-filled desserts. (Click the image to enlarge, and see below for image sources, shopping info, and recipe suggestions!)

I hope you enjoy!


A Memorial Day Picnic Inspiration Board

(From Left to Right, Top to Bottom)

1. Rhubarb, Rosewater & Cherry Crumble (recipe)
2. Blueberry Almond Cake w/ Lemon Cream Cheese Frosting (recipe)
3. Vintage Sodas (via Country Living)
4. Fresh Strawberries
5. Lemony Waldorf Chicken Salad Sandwiches (Recipe coming soon!)
6. Memorial Day Party Invite E-Card (via Pingg.com)
7. Roasted Potato Salad w/ Smoked Paprika & Red Pepper Dressing (recipe)
8. Crusty French Baguette
9. Sustainable Party Cups (How fun are these cups!? Reusable and dishwasher safe version of the classic red party cups.)
10. Classic red gingham picnic blanket (via Dreamstime)
11. Passion Fruit Lemonade (recipe)
12. "Chalk Full of Style" Sundress


****
New to Always Order Dessert? Consider subscribing to my RSS feed, follow me on Twitter, become a fan on Facebook, or sign up to receive my once-a-week e-mail updates by filling in your address in the box on the right.

And if you ever need any entertaining or cooking advice, please don't hesitate to
e-mail me.

Thanks for reading!
0

Coconut Macaroon Cupcakes w/ Bittersweet Ganache Icing


Last Sunday I woke up with the urge to bake so even before Eugene had completely opened his eyes, I made my way into the kitchen and got to work.

You know I love to bake with almond meal, so I decided on a chewy macaroon-like cupcake that used almond meal and ground desiccated coconut as its base. I used coconut oil instead of butter (you can also use olive oil if you don't have the former) and a bit of coconut milk for added moisture. A generous shot of my homemade vanilla extract helped round out the flavors.


They baked up perfectly in just about 20 minutes, after which I bopped around impatiently waiting for them to cool. The tops are golden and chewy, and the insides are very soft and moist. I topped a few of them with some leftover bittersweet chocolate ganache I had in the fridge from a cake I made earlier in the week. The sparkles are silver sanding sugar that I bought at Williams Sonoma last year, but have never quite gotten around to using yet. I love how they contrast with the shiny foil liners, although in the future I will use paper liners; the foil ones don't allow the bottom of the cupcakes to cool properly and they tend to steam a bit which isn't ideal for a cake.

That evening, after a day spent indulging in various dishes at the 9th Ave International Food Festival, I brought these cupcakes over to my future in-law's house for dinner. They were meant to be a gift for Eugene's dad who is a coconut fiend, but he was forced to share as the rest of the table dove in.


****
New to Always Order Dessert? Consider subscribing to my RSS feed, follow me on Twitter, become a fan on Facebook, or sign up to receive my once-a-week e-mail updates by filling in your address in the box on the right.

And if you ever need any entertaining or cooking advice, please don't hesitate to
e-mail me.

Thanks for reading!

Coconut Macaroon Cupcakes
These chewy and moist cupcakes can be served with or without the chocolate ganache icing.

Ingredients
2 cups almond meal
1/2 cup plus 2 tablespoons unsweetened ground desiccated coconut
1 teaspoon baking powder
1 teaspoon salt
1 cup sugar
4 large eggs
1/2 cup coconut or olive oil
1/2 cup coconut milk
1 teaspoon vanilla extract


1.Preheat your oven to 350 degrees and line your muffin tins with cupcake liners.

2. In a large bowl, combine the 2 cups almond meal, 1/2 cup plus 2 tablespoons ground desiccated coconut, baking powder, and salt. Set aside.

3. In the base of your mixer, combine the cup of sugar and the 4 large eggs. Whisk for 4-5 minutes, or until the eggs are light, frothy, and have doubled in volume. Add the coconut oil, coconut milk, and vanilla and whisk until incorporated.

4. Fold in the dry ingredients, mixing only until they are well incorporated.

5. Use an ice cream scoop or spoon to divide the batter evenly between the tins (you should get about a dozen large cupcakes, 2 dozen small ones).

6. Bake for about 20 minutes or until the tops are golden and a cake tester inserted into the center comes out clean. Remove from the tins and let cool on a rack. Serve as is, or if you'd like, top with chocolate ganache. (Recipe below)

Best served within 24 hours.

Basic Bittersweet Ganache

Ingredients
2 Cups Heavy Cream
1 pound bittersweet chocolate (chips or chopped)

Place the chopped chocolate in a large heatproof bowl. Heat the heavy cream over medium heat just until it reaches a simmer. Pour the hot heavy cream over the chocolate pieces and used a whisk to mix and combine until smooth. Let cool at room temperature. The ganache will thicken when cool.
0

Forget Japan. I'm big in Holland. And Italy.


Some of you already know that when not puttering about in the kitchen or on this blog, I work as a magazine editor for the international editions of Cosmopolitan magazine. Working with international mags is a pretty cool mixed bag of a job, and occasionally, I get some tasks that are really fun.

Most recently, one of my editors in Holland wrote me and asked if I could help her gather a list of some New York City "hotspots." Basically, with the upcoming release of the Sex and the City 2 movie, (for which yes, I already have tickets), they wanted to do a piece featuring some "real" New York girls sharing their favorite spots to shop, eat, and dance in the city. She also asked if I could include my own tips in the list.

I got to work and contacted some friends and fellow bloggers to contribute. I interviewed about a dozen girls total, and I actually ended up with pages and pages of tips. Naturally, due to space constraints, the magazines could only run a few suggestions each, but I'm sure we'll find another great use for the other interviews in the future.

At the very least, I now have a kick-ass long list of places I need to check out here in NYC stat!


The story just came out (in the June issue of Dutch Cosmo) and I thought I'd share it with you! (That's it above.) Cosmo Italy (another edition that I work with) also picked up the story (though they used different tips and featured a different selection from the girls I interviewed.)

Click on the pictures to enlarge them and see them up close. I think that a few of you may notice a some familiar faces on the list. Including fellow food bloggers Katy Atlas from Sugarlaws, Michelle Judd from Taste as You Go, Jordan Reid from Ramshackleglam, and Grace from GraceNotes NYC.


Big thanks to all the girls who generously shared their time and amazing recommendations!

By the way, my New York picks?

Ilili, which I wrote about here, is my current favorite restaurant in the city. (And I hear that they now serve brunch! Yay!)

Kashkaval, which I wrote about here and also recommended in this article in the London Times, is my favorite lunch and meeting-girlfriends-for-dinner spot. They also have delicious (and amazingly priced) fondue. Yum!

Sexy champagne bar Flute.

And for shopping, Century 21 (it's a battle, but you make out like a bandit when you persevere!) and Fabulous Franny's (truly fabulous spot for killer vintage finds and vintage eyeglasses. Very necessary when you like to throw retro-themed cocktail parties.)

xoxo

Alejandra

P.S. I'm totally adding "Big Apple Insider" to my official bio. ;)


****
New to Always Order Dessert? Consider subscribing to my RSS feed, follow me on Twitter, become a fan on Facebook, or sign up to receive my once-a-week e-mail updates by filling in your address in the box on the right.

And if you ever need any entertaining or cooking advice, please don't hesitate to
e-mail me.
Thanks for reading!
0

Kicky Popcorn Recipe

At movie theaters, I'm always a candy girl. Junior Mints, to be exact.

At home, though, I'm all about the popcorn. I blame my mother who used to regularly walk out of the kitchen with a bowl of it for the family to share while watching a rented movie. There were many earnest discussions about just how long to set the microwave for each individual brand, in the hopes of popping every last kernel. I even picked up her habit of sucking the remaining salt and butter off the last few kernels at the bottom that didn't make it. A habit that grossed my dad and brother out, but which we continue to this day.

And if I go back even further in my memory. Back two houses from New Jersey to Queens, to a time when I was so small I needed a chair to reach the stove, I remember watching in fascination as my mom quickly shook the Jiffy Pop above the flame. Her hand in an oven mitt, the wire hanger-like handle, the soft foil covering that would grow and expand like a bloated belly with each pop. I'd beg for a chance and finally I got it, tiny hand tucked inside the giant glove, wrapped around the thin, hot handle. "You have to keep shaking it," she'd instruct, guiding my arm in the motion. Funny how I don't remember the taste of that kind, just the heat and the science.

A decade and a half later, I was in Italy. Alone in a country where, for the first time, I didn't know the language. It was just a few hours after the tiny taxi had dropped me and my 7 suitcases in the middle of a tiny piazza. Unpacked bags stacked around the apartment and I curled up on the couch--a standard version from the new Ikea that had recently opened in Tuscany, much to the chagrin and outrage of purists who claimed the paint-by-color furniture didn't belong in these ancient homes. I was too tired to care, dying to go to sleep but waiting for a man named Roberto who was, according to the rental agency, coming that night at 8 to show me the hidden switches and quirks of my new home.

I was hungry, too, because since arriving I'd been too anxious and exhausted to leave the apartment. The treats I'd saved from my Air France flight were gone. So instead I smoked through the pack of cigarettes I'd purchased on my Paris layover (emblazoned in big black bold letters with the phrase "Fumer Tue"), and poked around the kitchen. There were pots and knives (from Ikea), and a jumble of spices. the top shelf was covered in dozens of empty wine bottles left by the previous occupants. I didn't know yet that my roommates and I would more than triple the collection before we left. On the counter sat a glass bottle of olive oil and, inexplicably, a large mason jar filled with popcorn kernels.


There was no microwave, but remembering the Jiffy Pop, I hunted around for a suitable pot. I drizzled in olive oil and a handful of kernals, estimating all my measurements. The lid fit tightly and I set it over the stove. Soon the familiar noise filled the room, loud and violent inside the metal pot. I shook, for good measure, and kept going until the popping slowed and I removed the lid.

It worked.

I grabbed the salt shaker and went back to the couch, where I salted and ate right from the pot while watching MTV Italia and waiting for Roberto.

*********

Popcorn became a staple when I lived in Florence. We had been bequeathed a seemingly endless supply, and my roommates and I often turned to it when money was tight (and it was always tight). First we ate it plain, just olive oil and salt, but soon we added things. Grated pecorino and black pepper was a favorite. As was cumin and cayenne. Occasionally I ate it with milk and sugar, and called it "the poor girl's corn flakes."


For this version, a new favorite, I added smoked paprika, cayenne, and salt. I started with plain buttered microwaved popcorn, but you can start however you like. If you've never tried it, I recommend doing it on the stove at least once. There's just something awesome about it.

****
New to Always Order Dessert? Consider subscribing to my RSS feed, follow me on Twitter, become a fan on Facebook, or sign up to receive my once-a-week e-mail updates by filling in your address in the box on the right.

And if you ever need any entertaining or cooking advice, please don't hesitate to
e-mail me.Thanks for reading!


Kicky Popcorn

1 large bowl (about 5-6 cups) freshly popped buttered popcorn
1 teaspoon Smoked Spanish Paprika
1/2 teaspoon Cayenne Pepper
1/2 teaspoon cracked black pepper
salt, to taste

In a large container with a cover (you can use a pot with a lid or a Tupperware-style container), combine the hot popcorn with the spices. Cover and shake until fully coated.

Salt to taste and serve.
0

The Healthy Way to Deep Fry


I know some people shy away from frying food, but the truth is that when done correctly, frying is actually not as unhealthy a cooking method as you might think!

Back when I was in high school, my friends and I took a public speaking class where we each had to give presentations. I (big surprise) did a cooking demo, and showed the class how to make a homemade egg cream. My friend Nick, who at the time was working part-time in the kitchen of a pizza parlor, gave a demo about the "healthy" way to deep-fry that was probably one of the most useful things I ever learned in high school.

First, you should understand what actually happens when you drop a piece of food into the hot oil. All food, as you know, contains water. So whether it's a chicken wing, a shrimp, or a piece of broccoli, there is naturally occurring water inside of it. As soon as you drop it into the hot oil, that water is converted into steam (from the heat). As you know, oil and water don't mix, so this steam comes out of the food and forms a kind of barrier that prevents the oil from penetrating it.

In those seconds when that steam is surrounding the food and keeping the oil out, the food is quickly browning and creating that crisp delicious exterior that we love about fried food. This crust then takes over protection duties, and keeps the oil out while the rest of the food continues to cook on the inside due to the high heat. (Think of it like a mini oven inside the crisp exterior.)


The magic ingredient to make this all run smoothly? Temperature. Specifically, a temperature between 350 and 375 degrees F. (about 177-190 Celcius).

That's why whenever you read a recipe for a fried dish it's going to tell you to fry it at this temperature; because this is the perfect temperature in which this process can take place. Any hotter than 375, and the steam will evaporate quickly, the exterior will crisp and brown too fast, and the food on the inside won't cook completely. Any lower than 350, and exterior of the food won't be able to develop in time to protect the inside before the steam evaporates, so you'll end up absorbing way more oil (and calories) than you would have if it were cooked properly.

Makes sense, right?

I remember being totally fascinated by this explanation when I was 17, and 10 years later, I still think about it every single time that I fry. (Actually, I should probably send Nick this link as soon as I post it. I wonder if he even remembers this!) And in case you're skeptical of something I learned from another 17-year-old, I'll note that this same lesson was essentially repeated by my chef instructor when I went to culinary school a few years later.

So that said, there are some other things to keep in mind when frying. Here are my tips (please feel free to add your own in the comments):


1. Use a heavy-bottomed pot that will help retain the heat from the burners and conduct it evenly. If the pot is too thin, the oil will heat up too fast and the food will burn. I usually use my dutch oven or my cast iron skillet. If I'm only frying a couple things, I'll use a smaller saucepan (seen above). If all my wedding registry dreams come true, I'll soon have some even better pots that I can use.

2. Get a thermometer. Seriously, you have to do it. They're 10-20 dollars and will give you that much more confidence when dealing with the oil. You can also use them for candy or jam making if you're so inclined.

3. Use clean oil to fry. I know some people like to strain their oil and reuse, but I'm not really a fan of that because the properties of the oil break down a bit each time you use it. Reused oil is more likely to smoke and burn your food. It can also absorb flavors that will ruin the taste of your food. (If you feel bad throwing it out after one use, you can look for centers that recycle used cooking oil.)

4. Man the controls. Sometimes I feel like I'm flying a plane when I fry. The reason? You need to use the burners to regulate the temperature of the oil. When you add food to the pot, the heat will drop quickly, so raise the flame to get it back where you want it. If it gets too hot, lower it. (If you own a deep fryer, this is moot, but I know most of you don't.)


5. Don't add everything to the pot at once or the temperature will drop. This isn't like boiling. You can only fry a few things at a time; how many determines on the size of what you're cooking and how big your pot is. Fry them in batches; it'll still go quickly.

6. Fried leftovers don't reheat well, but if you must, I suggest you freeze them and then reheat in a 400 degree oven for about 5 minutes. Don't even think about microwaving them.

7. Salt *after* you fry. Salt will pull moisture to the food's surface and make it splatter when you add it to the oil. It will also lower the smoking point of the oil. Adding it to the food after it's fried will prevent this.

8. Use a good metal or heat-resistant silicon slotted spoon to take things out of the oil, and sift out any bits of breading or food after each batch. Never use wooden utensils; they tend to retain moisture which will make your oil splatter and spit. Plastic will melt.

Finally, what kind of oil you cook with is up to you. Personally, I only ever use virgin coconut oil (which I buy in bulk from this store) or grapeseed oil, both for health and taste reasons. Coconut oil is one of my absolute favorite things to cook with, and I may delve into why in a future post.


But for now, you're ready to fry! Here are some recipes you can now guilt-lessly (well, almost!) try:

Fried Macaroni & Cheese

Sweet Carrot Zeppole

Smokey Jalapeno Poppers

Arancini di Riso
0

5 Under 5: Entertaining Solutions

In the survey, one of the things many of you indicated as a challenge keeping you from entertaining more, is the expense involved. You also noted that you often feel like you don't have enough entertaining supplies or serving items to throw a successful bash.

I totally understand these two issues, because they're ones that I have to deal with each time I host a party. I own quite a few serving pieces (too many, Eugene might say), but in order to create the atmosphere or theme I'm planning, I usually feel I like I have to go out and purchase a few special items. Whether it's retro platters for my 1960s Cocktail Party or pretty girly plates for a girl's brunch, I always end up spending quite a bit on serving and decorating pieces.

With that in mind, I did a search for some cute entertaining pieces that will look great, and which (best part!) are all $5 or less! I hope these options will inspire you to do your own hunting around. We should all (including me!) remember that stylish entertaining doesn't have to come with a hefty price tag.


Professional Steel Serving Trays


If you're into hosting parties, you NEED to become familiar with restaurant supply shops. You can find them in most major cities, and they're all over the Internet. Most of them will let you buy pieces individually and the prices are AMAZING. If you've ever been to a professionally catered event, you'll have seen the waiters walking around with one of these trays.

Large enough to hold a selection of hors d'oeuvres, the raised rolled edges will keep sauces (or unsteady treats) from falling off the edge as you pass them around. The crisp stainless steel will blend with most themes and will keep you from worry about broken or chipped edges.

Best part? At only $2.65 each for these, you can afford to buy a few and never worry about having enough serving trays again!


Calypso Citron Summer Stemless Glasses


Crate & Barrel is one of my favorites for inexpensive entertaining pieces. They carry products in a range of prices, but I always head right for the cheap stuff.

These gorgeous green stemless glasses are perfect for summer parties (whether in your backyard or in your tiny living room). Handcrafted from recycled glass, they'll be sure to appeal the eco-conscious, and are bright and colorful enough that you won't need much else to set the theme at your party. Don't they just look straight out of a Mexican restaurant or hotel pool bar?!

Use these to serve margaritas, lemonade, or sangria; even ice water with a few lime slices will conjure up those fun vacation vibes when served in these. For a bit more, C&B also carries matching pitchers and stemmed glasses.

Compostable Forks, Knives, and Spoons

While I try to use stainless steel or other reusable flatware as often as I can, there are times when disposable party supplies really do come in handy (during picnics or large gatherings, for example). That’s why I was so excited to discover these Compostable utensils.

Sold in packs of 50 for $5 each, these utensils are sturdy and made from Crystalized Polyactic Acid, an earth-friendly, renewable material that is certified to break down within 180 days in a commercial composting facility. Even the packaging they come in is compostable!


Mini Galvanized Tubs
When I was planning my Clothing Swap Brunch Party a few weeks ago, I found a bunch of these in the dollar bins at Target. I bought a few, not sure right away what I’d use them for, but certain they’d come in handy. I was right! I ended up filling each of them with things like loose candy and dried edamame. They made adorable serving pieces that I distributed around the room so that guests would always have something to munch on, no matter where they were standing.

You could also use these to hold a pillar candle (filling the rest of the basin w/ marbles or stones), or to hold crackers or flatware. Lined with a thick napkin, they would also be good for serving flatbread or pita. The possibilities are limited only by your imagination, and the price makes them a great bargain.

Tip: the bigger versions of these, also available on that site and still a bargain at less than $20, are great for holding wine, beer, or sodas; just fill with ice and beverages and let guests help themselves!) Cheap and elegant serving pieces rock!

Mini Porcelain Pie Plates


Another find from Crate & Barrel; these little pie plates are just too cute! Less than two bucks each, you can use these to make (or just serve!) individual desserts for your guests like mini pies or mini tarts. Or make personal savory pot-pies—people just love getting their own individual dish at a dinner party!

The attractive little plates are also cute enough to stand on their own holding candy, nuts, or candles for a centerpiece. Or use them in your bathroom to hold a little selection of pretty guests soaps. Once again, the possibilities are endless!


Now what about you? Have you spotted any inexpensive or clever entertaining pieces lately?
0

Like the Census...but Delicious!

Hey all!

I've been jazzing up the content here on Always Order Dessert to give you more of the recipes and articles that you find most interesting. To better achieve this, I realized I need to hear from you, my awesome readers, about the subjects that would be helpful to you!

I'd love it if you could take a couple minutes right now to fill out this really brief survey. It only takes about 2 minutes to fill in (it's mostly multiple choice), but will really help me a lot. And I'll be sure to repay you back tenfold with delicious recipes and exciting content. Good deal? ;)

Just click this link to get started:
http://www.surveymonkey.com/s/MCRR7C8

xoxo

Alejandra


P.S. If you have any questions about it, feel free to email me at alejandra@alwaysorderdessert.com or message me on Twitter @nandita.
0

Happy Mother's Day Weekend!


I'm running a bit late today with my weekend links, but I'm hoping that you'll take a peek at these over the coming days. Perhaps over a lazy cup of tea tomorrow morning?

Sunday is Mother's Day so our weekend will be mom-centric. First dinner at Brasserie 8 1/2 with Eugene's mom and family, and on Sunday we're going to church and brunch with my family.

I'm also working on a piece to submit for the 48 Hour Mag project (which is just fantastic!) and am planning to sit down and work out my calendar for the summer. I can't reveal full details yet, but I'm working on some really exciting events that will be open to all of you!

Things like a live cooking demo at the New York Botanical Gardens, my 2nd annual Always Order Dessert Food Blogger--and food lover!--Picnic (I'm actually thinking of hosting two this year!), and an entertaining workshop that I'm currently developing. I'm also helping a bit with the planning for a very cool food and media-related benefit/bake-off taking place next month. I should have more details for you about all of these events pretty soon, and am hoping that I'll see some (or all!) of you there!

So while I head off to work on this stuff, here are a few cool things I've spotted this week.

Enjoy your weekend, and Happy Mother's Day to the moms among you (and to the moms who made you)!


*************************

Gorgeous photos of homemade chilaquiles by Channelle.

These are supposed to be cookies, but they look like potatoes to me. Either way, very cute poster.

I am in love with these blooming champagne cocktails with wild hibiscus. I kind of want to drop these little blossoms at the bottom of everyone's glass at my wedding.

And buy your own preserved hibiscus flowers here.

Make your mother (or yourself) a batch of homemade vanilla salt.

Or maybe some of these macadamia maple sticky bars? (Man, do I love macadamia nuts!)

I love this little envelope necklace.

I keep hearing about Toasted Marshmallow Milkshakes. Seems like something I need to try soon!

And another delicious pistachio cake!

Wouldn't this make a fun (and adorable!) centerpiece for a party? Photo Pinwheel Garden from Photojojo.

I want to make some of the Paper Curtains for my library. (via Snippet & Ink)

On eating alone.

Love these food-related watercolors from Vanilla Bug!
0

Jalapeño Ice Cream


A few weeks ago, my friend Rose e-mailed me with an unusual request. She wanted to know if I could help her track down jalapeño ice cream here in the city. "Or," she added, "perhaps you know how to make it?"

"I have no idea where to buy it," I told her, "but I can definitely figure out how to make it." Even as I typed, I was envisioning little green jalapeños steeping and bobbing in a saucer of cream.

The idea of a jalapeño-flavored ice cream might seem a bit odd on paper, but if you think about it for a bit, the idea starts to make sense. Anyone who has ever taken a bite of anything a bit too spicy will know that the most commonly offered remedies are dairy products: a glass of milk ordered at the Mexican restaurant, the dollop of sour cream on a bowl of chili, or a ramekin filled with blue cheese dressing planted in the center of the buffalo wing platter. Serious cooks (or trivia fanatics) may also know that a spoonful of sugar or a drizzle of honey is a smart way to quell the culinary flames brought on by a loose top on the cayenne spice jar.


Taking these factors into consideration, the idea of a cool and creamy ice cream laced with the grassy heat of jalapeño peppers really seems quite fascinating!

Like with most recipes, I decided to look back into my archives to see what's worked in the past. Custard ice creams, rich with copious egg yolks, are popular, but of all the frozen treats I've ever made, my favorite is still the Lebanese milk ice cream which uses cornstarch in it's base.

Essentially a frozen pudding, the texture is thick and velvet-like and it scoops beautifully. And because there are no yolks in the batter, the flavor of the ice cream really has a chance to shine through sans competition. The kicker is that it's quick, and virtually fool-proof--a bonus for those of you who have had trouble with custards breaking or curdling.


For flavorings, I used 3 jalapeños, one vanilla bean (I buy them inexpensively in bulk from this online shop), and a 1/4 cup of molasses; the latter which brought out the naturally earthy and muddy tones of the jalapeño in a way that I never expected.

Honestly, it was the addition of molasses which made me fall in love with this recipe and what has me craving another bite as I type this. Unfortunately, i don't have any ice cream left in my freezer. I packed up the entire batch I made, surrounded it with ice packs, and handed it off to Rose and her boyfriend Mike who made the trip here expressly to pick it up.


And the reason for the request? It was their anniversary, and Rose wanted to surprise her guy with this treat, which had caught his eye in a magazine ages ago.

I think it goes without saying that this ice cream is an acquired taste. As Rose described it to me in her e-mail the next day, "It was really interesting and complex - starting off on one note, and ending on another (hot!) one! It was like mind-trick ice cream, because it felt so cool but tasted so hot."

If the above appeals to you. If you're into spicy cocktails and keep a bottle of hot sauce at your desk (I always do!), well then I say go, run, make it now and tell me what you think!


****
New to Always Order Dessert? Consider subscribing to my RSS feed, follow me on Twitter, become a fan on Facebook, or sign up to receive my once-a-week e-mail updates by filling in your address in the box on the right.

And if you ever need any entertaining or cooking advice, please don't hesitate to
e-mail me.
Thanks for reading!


Jalapeño Ice Cream

Makes about 6 1/2 cup servings
This egg less ice cream uses cornstarch to form a creamy, almost velvet-like base. Depending on how spicy you would like it, you can adjust the number of jalapenos in this recipe. Don’t skip the molasses because that brings out the earthy tones of the jalapeño (trust me on this!)

Ingredients
1 1/2 cups heavy cream
1 1/2 cups whole milk
3/4 cup sugar
1 teaspoon salt
3 fresh jalapeño peppers, split in half
1 vanilla bean, split in half
1/4 cup molasses
3 tablespoons cornstarch
A few drops green food coloring (optional)

Combine the heavy cream, whole milk, sugar, and salt in a medium saucepan. Add the molasses, jalapeños, and vanilla bean. Place over medium heat and heat just until bubbles start to form (it happens quickly so stay with it), stirring to dissolve the molasses and sugar. Remove from heat, cover, and let cool to room temperature.

Once the cream mixture has cooled, use a sieve to strain out the jalapeños (and any accompanying seeds) and vanilla beans, and return the strained cream mixture to a saucepan. Use a measuring cup to scoop out about 1/2 cup of this mixture (doesn't have to be exact) into a separate bowl or cup and whisk in the 3 tablespoons of cornstarch to form a slurry. Pour the cornstarch slurry back in with the rest of the cream and return to the stove.

[If a green tint is desired (totally optional!), this is the time to whisk in a few drops of green food color.]

Over medium heat, cook the cream mixture while stirring constantly in one direction until the mixture thickens. Continue to let it cook for an additional few minutes, tasting it occasionally until you can no longer detect the taste of cornstarch. Once the starch is completely cooked and the mixture is thick enough to coat the back of a spoon, turn off the heat.

Pour the mixture into a large bowl and press a piece of plastic wrap against the surface (this will help prevent a skin from forming on it while it cools). Chill in your refrigerator for 3-4 hours until completely cool (you can make this up to 24 hours in advance).

Freeze in ice cream maker according to manufacturer's instructions. Once it's the consistency of soft-serve, pour into an air-tight and freezer proof container and freeze for at least 4 hours (again, overnight is also OK) before serving.

The ice cream will keep in a sealed container in your freezer for up to 2 weeks.
0

Pistachio Rosewater Cake


It's no secret that I have a thing for baking with nuts. I owe it all to a now seemingly long-ago attempt at the low-carb dieting, which I was actually following when I first started this blog as evidenced by some of my earlier recipes. I've always loved to bake, but flour-based treats were prohibited if I wanted to stay on track, so I threw myself into researching alternative flours. This introduced me to the amazing world of almond meal and coconut flour; things which I still use quite regularly today.

Atkins is a thing of the past for me right now (though I may take it back up come wedding dress fitting time!), but I'm glad that because of that experience I was able to expand my baking (and cooking) repertoire to work with ingredients that I may have otherwise totally ignored. My successes with almond flour led me to hazelnut meal which encouraged me to experiment with macadamia nuts and pecans, and soon almond paste (which is not the least bit low-carb, but which makes cakes incredibly moist).


One afternoon a couple years ago, I stopped by Whole Foods to pick up some almond paste for a batch of Italian Rainbow Cookies, and noticed a row of Pistachio Nut Paste cans lined up just above. My brain started whirring and I impulsively tossed a couple of them in my basket (ignoring the $11 Whole Foods price tag). That night, I baked a three-layer pistachio cake filled with chocolate ganache and topped with white chocolate. It was gorgeous (think layers of green, black, and white--so pretty!) and tasted even better than it looked.

Since then, I've been wanting to try out more recipes using pistachio paste, but had a hard time justifying the steep price tag. So I decided to make some myself. I ordered a bag of bulk raw pistachios and subbed them for the almonds in my homemade almond paste recipe. Much to my surprise, it worked!


I used a portion of the homemade pistachio paste to create this cake, which is a bit more modest than the one I previously described. I also added a bit of rosewater for a slightly Mediterranean feel, though this is absolutely optional (replace it with vanilla extract if you prefer). Topped with a rich dark chocolate ganache and a few salty roasted pistachios, it's a lovely afternoon cake that takes little effort to make, but which looks absolutely gorgeous on the plate.

Tip: I used homemade pistachio nut paste for this recipe (as described above), but I've also had no trouble finding it (by a company called "Love n' Bake") at my local Whole Foods. It's about 10-11 dollars there which is quite a bit, but you can also find it for a bit less on Amazon or from my favorite baking supply store NutsOnline.com. If you have any questions about this, just ask me in the comments; I'm happy to help!


Pistachio Rosewater Cake
Makes one 9" round single-layer cake

Ingredients
1.5 sticks butter, softened
3/4 cups granulated white sugar
3 large eggs
6 ounces of pistachio nut paste (just a little bit over 1/2 a regular sized can)
1 teaspoon pure almond extract
1 teaspoon rosewater
1.5 cups all-purpose flour, sifted
1.5 teaspoons baking powder
1/2 teaspoon green liquid food coloring (optional); can also subtitute equivalent gel food coloring

For syrup:
1/2 cup water
1/2 cup sugar
3 tablespoons amaretto liquour

For the ganache:
1 cup heavy cream
12 oz semisweet chocolate

Optional Garnish: whole roasted pistachios, marzipan flowers

Equipment: 1 round 9" springform pan with at least 2" sides, or 1 9" round baking pan with at least 2" sides

Prepare your pan by buttering and flouring. If using a regular cake pan (not a springform) I suggest adding a round of parchment paper to the bottom to prevent sticking.

Preheat your oven to 350 degrees F. In the base of an electric mixer, cream the butter and sugar until fluffy. About 5 minutes. Add the eggs and continue to beat for 3 more minutes. Add the pistachio paste, almond extract, and rose water and continue to beat until combined.

In a separate bowl, sift together the flour and baking powder then slowly add to the pistachio paste batter and mix until just combined. If using food color, add the green food color and fold in until evenly distributed.

Pour the batter into the prepared baking pan and bake in on the center rack in the preheated 350 degree oven for approximately 40 minutes or until a tester inserted into the center comes out clean. Remove from the oven and let cool for 5 minutes, then turn over onto a cooling rack and let cool until it reaches room temperature.

While the cake is cooling, prepare the ganache by heating 1 cup of heavy cream in a small saucepan just until bubbles start to form around the edge. Turn off the heat and pour over the chocolate in a large bowl. Stir continuously until melted completely and smooth. Let cool.

Also prepare the syrup: combine the 1/2 cup water and 1/2 cup sugar in a small saucepan over medium heat, stirring until the sugar fully dissolves. Remove from the heat and let cool. Pour in the amaretto and set aside.

Once the cake is cool, use a pastry brush dipped in the amaretto syrup to brush the top and sides of the cake several times, allowing the syrup to absorb. Place the cake on the serving dish and tuck slices of parchment paper under the cake to protect the dish. Pour about 1-2 cups of the ganache over the cake. Garnish with pistachios and marzipan flowers, if desired. Let cool for 2 hours, or until the ganache thickens. Gently slide out the parchment paper pieces from under the cake and serve.
0
Back to Top