Giveaway: In the Small Kitchen

UPDATE: This contest is now closed. Congratulations to Melanie Cherea who won the random drawing. Stay tuned for other upcoming giveaways!

I've got a fun giveaway for you today!

In the Small Kitchen is a brand new cookbook by Cara Eisenpress and Phoebe Lapine, the fabulous blogger girls behind the blog Big Girls, Small Kitchen.

The book features a variety of delicious, straightforward recipes geared towards beginning cooks. Everything from simple lunch dishes to fancier recipes for holidays and parties. It features a few cocktails and lots of tips and tricks for new cooks.

Oh, and the foreword is written by none other than the fabulous Ina Garten (!!!) who is a long-time family friend of Phoebe's and who served as their mentor. (Again, !!!)

The book is lovely, and  would make a great gift for a new grad heading out on his or her own, or really just about anyone who is just starting out.

I have one copy of the book to give to you. To win it, all you have to do is leave a comment below telling me what was the first dish you remember making.  US residents only, please. All entries must be in by this Friday, 5PM EST.

I will select one winner using random number generator. Good luck!!

xo

Alejandra


****
New to Always Order Dessert? Consider subscribing to my RSS feed, follow me on Twitter, become a fan on Facebook, or sign up to receive my once-a-week e-mail updates by filling in your address in the box on the right. I also offer custom menu planning services and offer a variety of culinary workshops in the NYC area. Click here to find out more!

And if you ever need any entertaining or cooking advice, please don't hesitate to
e-mail me.
Thanks for reading!
0

Inspired Living: Cool as a Cucumber

I've started keeping a mason jar filled with cucumber juice in my fridge as I've discovered that it is the best thing ever for making a quick, refreshing beverage. A splash in a tall glass of cold water with a squeeze of lemon (or lime) makes a healthy, cooling beverage perfect for sipping at any time of day.

To make, just chop as many cucumbers as you'd like (I do about 2 large ones at a time) into a few large chunks. Add to your blender or food processor, then puree until smooth. Strain through a fine sieve (or a colander lined with cheesecloth) and you're done! (Use the leftover solids for tzatziki or salad dressing). If you have a juicer like I do, it's even easier-- all you have to do is run a couple fresh cucumbers through the machine.

Store the juice in an air-tight glass jar (such as a mason or other clean canning jar). I've found that this will keep well in the fridge for about 2 weeks--and you can add a splash or two to your water as needed. (This cucumber juice also makes a great base for cocktails!)


Looking for other ways to stay cool as the weather heats up? Try this cucumber cooler or this passion fruit lemonade.


****
New to Always Order Dessert? Consider subscribing to my RSS feed, follow me on Twitter, become a fan on Facebook, or sign up to receive my once-a-week e-mail updates by filling in your address in the box on the right. I also offer custom menu planning services and offer a variety of culinary workshops in the NYC area. Click here to find out more!

And if you ever need any entertaining or cooking advice, please don't hesitate to
e-mail me.
Thanks for reading!
 
0

On Honey Milk Ice Cream and Jersey Cows

For the past few weeks, I've been daydreaming about making a batch of honey ice cream. Not just any kind of honey ice cream; I specifically wanted something really simple--no eggs or custard or complicated flavorings--just good milk, cream, and honey, churned in the ice cream maker until frozen. Perhaps with a touch of vanilla bean dancing in the background of it all.

Having recently signed up for a dairy co-op that delivers fresh raw milk and cream, pastured eggs, and other farm delights to my New York City door once a week, I knew I wanted to use my new dairy bounty to create this ice cream. The milk I used comes from a Jersey cow on a nearby Amish farm and was delivered to my door less than 24-hours after it was milked and strained. Golden, with a subtle, grassy undertone, the milk is rich, creamy, sweet, and tastes like springtime.

And the cream…oh man, the cream is thicker than anything I've ever seen. The texture is gooey and dense, reminiscent of Devon double-cream. A spoon stuck into it stands up straight and tall, and when I lift it out, the cream clings on, even if I hold it upside-down. The light cream is a little bit looser, but even this is more like a thick yogurt than any cream I've ever purchased at the grocery store. So sweet and luxurious on its own that you don't even need to add sugar. A dollop on top of a bowl of berries or stirred into a mug of hot chocolate or coffee feels absolutely decadent.

This is just pure heavy cream, right from the Jersey cow. Amazing, right?

Before signing up for this service, I did quite a bit of research and learned that Jersey cow milk is about the best you can get. High in protein, vitamins, and minerals, grass-fed Jersey cow milk is the most nutritionally rich milk available (also good is milk from Jersey's cousin Guernsey). By comparison, the majority of US industrial dairies (the ones that produce the milk most commonly found at the supermarket) use Holstein cows, which are efficient for corporate production as they are able to produce massive quantities of milk, but unfortunately the quality is very thin, watery, and much less nutritionally rich even before it goes through the pasteurization process.

Just in terms of numbers, Jersey cow milk is about 6% butterfat (hence that gorgeous, thick cream), while the average Holstein cow's milk is only about 3%. While you might think that this is a benefit (low-fat, right?) it's actually not, since it's the fat in milk that helps your body absorb the vitamins, calcium, and protein that most people drink milk for in the first place. The cream is actually the part that contains vitamins A and D, both of which are fat-soluble. Without Vitamin D, the body can only absorb less than 10 percent of dietary calcium.


So when you drink fat-free milk, you're essentially just getting sugar (aka lactose) and not much else, something which even the US government acknowledged and then tried to rectify by legally requiring industrial milk producers to artificially fortify their skim and 2% milk with synthetic versions of vitamins A and D, something which I personally don't want in my body. (There is actually some debate about the possible toxicity of these particular synthetic vitamins, though that's a whole 'nother story.)

[Want to verify this? Grab a carton of grocery store skim milk (any brand, even organic ones) and check the ingredients. It'll say something along the lines of "Fat Free Milk With Vitamin A Palmitate And Vitamin D3"; A Palmitate and D3 are the synthetics. Click the names to find out more about each one and you'll learn, among other things, that synthetic Vitamin D3 is used in large quantities for rat and possum control. Yup.]

But I digress. My point is that when you really think about, it's kind of silly to go through all that trouble when the stuff that comes from the cow is already pure perfection! And honestly, at the end of the day, this just tastes so much better than anything I've ever gotten at the store.

Another thing whole Jersey cow milk is especially good for is ice cream. The naturally luscious texture of the milk and cream means that you don't need to add things like eggs or cornstarch to get that thick, custardy kind of ice cream texture. Yet more proof that when you start with real, whole ingredients, you're already more than half-way towards a stunning dish.


Creamy and cold, with a pleasing honey flavor throughout, this honey ice cream recipe is as simple as can be and produces an ice cream that is just perfect served with a bowl of fresh berries, or on top of a simple piece of cake. Whether you pick something bold and sweet or soft and floral, use a honey with a flavor that you already love on its own, and I guarantee you'll love the results.

P.S. If any of you are in the NY/NJ area and are interested in trying out the dairy delivery service I mentioned, shoot me an email and I'll give you the details.


****
New to Always Order Dessert? Consider subscribing to my RSS feed, follow me on Twitter, become a fan on Facebook, or sign up to receive my once-a-week e-mail updates by filling in your address in the box on the right. I also offer custom menu planning services and offer a variety of culinary workshops in the NYC area. Click here to find out more!

And if you ever need any entertaining or cooking advice, please don't hesitate to
e-mail me.
Thanks for reading!

Honey Milk Ice Cream
As this recipe has few ingredients, make sure you start with the freshest milk available in your neighborhood. If you have access to raw milk direct from a farmer, I really recommend using that. Otherwise lightly-pasteurized local milk from a nearby creamery is your next-best bet (often available at Farmer's Markets, farm stands, or well-stocked grocery stores like Whole Foods).

Ingredients
1 1/2 cups fresh whole milk
1 1/2 cups fresh heavy cream
1/2 vanilla bean, split
1 pinch sea salt
1/2 cup honey


Directions
In a small saucepan, combine the whole milk, heavy cream, 1/2 vanilla bean, sea salt, and honey. Heat on medium heat just until it starts to simmer, then remove from heat and let cool to room temperature. Transfer to an air-tight container, and let chill in the refrigerator for at least 3 hours, up to 24.

Once chilled, remove the vanilla bean (you can rinse and use for other recipes) whisk the ice cream mixture a few times and then pour into your ice cream maker, freezing according to manufacturer's instructions. The ice cream will be soft-serve texture once it runs through the ice cream maker; to get a more frozen texture, place in an air-tight container and freeze for at least 4 hours before serving. Ice cream will keep well in freezer for about two weeks.
0

What's In My Grocery Bag II

Many of you seemed to really enjoy the What's in My Grocery Bag post I wore a couple weeks ago, so I've decided to make this a regular feature!

Just like last time, I'm including a detailed list of every single thing in this week's grocery bag, along with a few notes on how I plan to use each item. My hope for this series is that you'll get some ideas for using ingredients, and learn a little bit more about the way that I cook and shop beyond the recipes that I post here. (Plus, I can totally appreciate the voyeuristic element of seeing what's inside somebody else's fridge.)

If you have any questions about how to cook an ingredient I mention here, or want to share your own recipe ideas for things, just leave it in the comments below.

Enjoy!

Dairy
1/2 lb New York State Extra-Sharp Cheddar (I'm going to make jalapeno and cheddar tater tots with these using a recipe I got from Marc Murphy based on the one he serves at his restaurant Ditch Plains.)
1 16oz carton of Oikos Organic Greek Yogurt in Plain (I typically prefer Fage yogurt, but they were out so I got Oikos. I use this as a substitute for sour cream in dips, sauces, tacos, and chili).
1 gallon Organic nymilk Whole Milk (I'm going to attempt homemade fresh mozzarella using a mozzarella-making kit that Eugene bought me. According to the instructions, this 1 gallon of milk should yield 1 pound of mozzarella. Fingers crossed!)

Fruit
2 6oz cartons of blueberries (they're back! Will probably just eat these fresh with a bit of cream or ice cream; perhaps use a few in pancakes)
1 16oz carton of strawberries (strawberries have just come back in season in NY. Will enjoy this first batch sliced with perhaps a touch of fresh mint)
1 Cantaloupe  (I love how affordable fruit is in season; this huge, sweet melon was just $1.99!, I'll cut it up and eat it fresh and cold. I also like to pop a few cubes in the freezer and eat them like ice pops.)
1 Francine Mango (Francine mangoes are a very soft and sweet Haitian variety; I want to try this kind as I've never had it before.)
2 Tommy Atkins Mangoes (Tommy Atkins mangoes are firmer and more common. I'm planning to slice these and served topped with chili powder, salt, and lime.)
8 Lemons (lemon water, tea, in cooking for marinades, on fish and seafood)
5 Hass Avocados (I want to try an avocado popsicle recipe I read, and of course, a lot of salads! My favorite is arugula, avocado, sardines, and a lemon vinaigrette--perfect summer lunch full of fiber, protein, and good fats.)
1 Bunch Bananas (quick breakfast or snack on the go, but really mostly for doing this thing I do where I dip the peeled banana in melted semi-sweet chocolate and freeze, then eat. It's my favorite weeknight dessert!)
2 On the Vine Tomatoes (for fresh salsa)
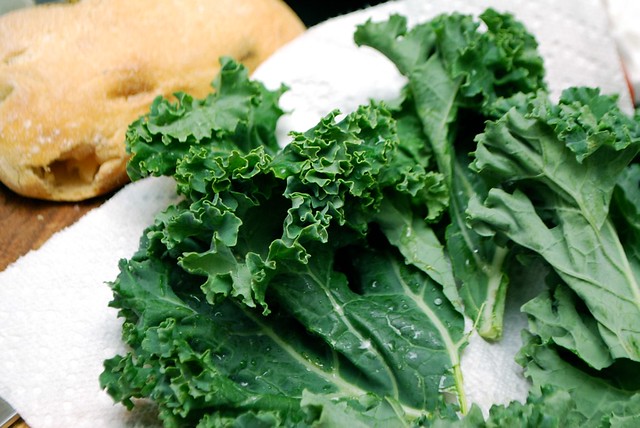

Vegetables & Herbs
1 package Organic Alfalfa Sprouts (love these in sandwiches with just a bit of mayo on whole grain bread, also great in salads and turkey burgers)
1 bunch Organic Watercress (my favorite salad green--love that spicy, peppery bite. It's also great pureed with Greek yogurt and garlic for a quick salad dressing or veggie dip)
Organic White Mushrooms (going to add these to my turkey burger patties)
1 bunch Local Asparagus (roasted with olive oil and lots and lots of pepper--seriously my favorite way to eat them)
3 Belgian Endive (I'm planning to braise these in olive oil and serve with gremolata, just like we had at Eat Write Retreat! Sublime.)
Cilantro (I use this in salsa, sofrito, on fish tacos, and in cocktails)
Parsley (to make gremolata for the braised endive)
Mint (will julienne and sprinkle on fresh berries, use in my morning water along with some lemon and cucumber juice, use in cocktails)
6 Jalapeno Peppers (will be using these in the aforementioned jalapeno and cheddar tater tots (!!), also in salsa, guacamole, and cocktails)
1 Red Bell Pepper (not exactly sure yet, but always good to have around)
1 package Satur Farms Wild Arugula (salad with avocado, lemon vinaigrette, and sardines or smoked oysters)

Seafood

2 Farm-Raised Tilapia Fillets (pan-fried and served with a lemon, butter, and parsley sauce)
1lb Shell-Off Cleaned Fresh Wild Rock Shrimp (sauteed over salad)
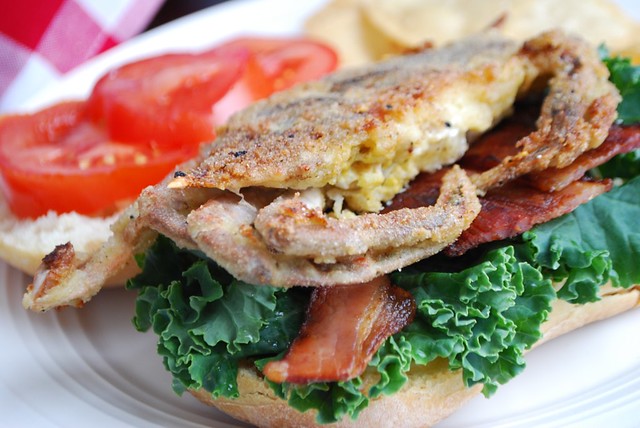
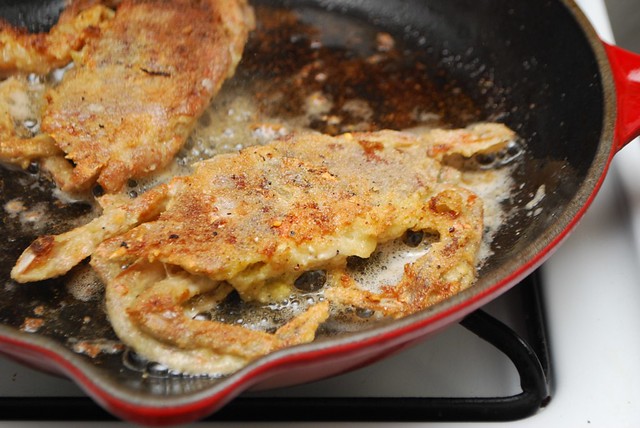
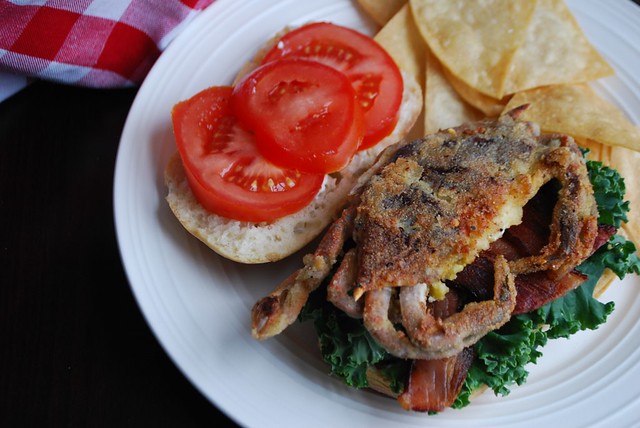
4 Wild Soft-Shell Crabs (I actually already cooked and ate these! Made soft-shell crab tacos with cumin yogurt, avocado, and fresh salsa.)

Meat
2lbs Ground Turkey (turkey burgers! I'm thinking chipotle mayo, alfalfa sprouts, and freshly baked wholegrain buns)
2lbs Organic Grass-Fed Ground Beef (meatballs; Eugene really liked the ones I made last week so I'm going to reprise and make extra that I can freeze for quick meals in the future)

Grocery
1 can Goya Coconut Milk (I want to make a Puerto Rican frozen dessert that my grandmother used to make me. It's called limber de coco. I'll definitely be posting about this!)
1 bag Goya Red Lentils (braised lentils, lentil soup)
1 bottle Monini Il Monello First-Pressed Extra-Virgin Olive Oil, 2009 Vintage (good olive oil for salad dressing, soup garnishes, and to dip bread into)
Rice Select Jasmati Long Grain Jasmine Rice (to accompany the lentils, chicken, other dishes. I'm not a huge rice fan, but I love jasmine rice)
1 jar Roland Hot Sliced Jalapeno Pepper (to use in those tater tots I keep mentioning. Also for garnishes on burgers, sandwiches. Eugene also just likes to eat pickled things along with his food.)
1 Spice Supreme Chili Powder (I'd just run out so I got a new jar for chili, black bean soup, to sprinkle on fresh sliced mangoes along with a bit of cayenne, salt, and lime juice)
1 Spice Supreme Curry Powder (I never buy curry as I don't really love it, but I wanted to experiment a bit with it on lentils and possibly chicken)

Bakery
2 Par-baked French Baguettes (I love to bake from scratch, but par-baked (partially baked) breads are amazing because they allow you to have freshly baked bread in a total of 40 minutes. I keep a few of these in my freezer and pull them out and finish baking them whenever I want something to accompany a soup, or to serve with cheese, or for sandwiches.)
1 Par-baked Raisin Pumpernickel Bread (this kind is especially good with creamy aged cheeses, just add some fruit and a glass of wine for a perfect summer supper or picnic)


0

How to Store Asparagus

I've been buying as much asparagus as possible lately, tossing it into my basket whenever I see a good bunch, then going back for a second batch. I cook it simply, tossed in olive oil and sea salt with an overly generous shower of roughly cracked black pepper on top. I love the pepper with asparagus; it's a trick I picked up from my mother-in-law, who served it to use this way at dinner a few weeks ago. That night I started with a few stalks, then served myself seconds and thirds and fourths, until my mother-in-law just told me to finish the tray, which I did.

As easy as it is to cook asparagus, there are times when I don't get to it quickly enough and find with dismay that the once bright, crisp, greens stalks have given up on me, flopping over in my hand almost as if to say, "we couldn't wait any longer." And so I decided to be a bit more diligent, putting into action a trick I'd learned years ago from some lady at the supermarket, but which I'd never quite bothered to follow. And what do you know? It worked!

How to Store Asparagus
Step 1: When you get home from the store or market, pull the asparagus out and trim off about an inch from the bottom, much like you would with a bouquet of flowers. The quickest way to do this is just to keep the rubber band on the bunch and run a chef's knife through the whole thing in one swoop.

Step 2: Fill a wide mouth glass jar or container with tall sides with 2 inches of cold filtered or bottled water, and insert the trimmed asparagus bunch inside, making sure the bottom of every stem is immersed in the water. (I have, in a pinch, used a plastic storage container instead of a glass jar and it worked just fine, but glass is better as you don't have to worry about any chemicals leaching into your food; you can leave the rubber band on or off--totally up to you.)


Step 3: Take a clean plastic bag (such as a plastic produce bag or large zipped baggie) and fit it over the asparagus and glass jar, pulling down so that it is at least a couple inches below the lid. It doesn't have to affix tightly, just enough to create a kind of plastic bubble around the asparagus. (I promise the asparagus won't suffocate!)

Step 4: Place the entire thing in the refrigerator, preferably closer to the back where it is coldest.

Stored like this, the asparagus should stay fresh and crisp for at least a week, sometimes even longer depending on how fresh it was when you brought it home. Swap out the water if you notice it start to get a bit cloudy. It is, of course, best to use the asparagus as soon as possible, but this is a great way to extend the shelf life and keep it from wilting before you are able to use it.

Note: this trick also works really well for parsley and cilantro!


Wondering what to do with that asparagus now that you know how to store it? You can make roasted asparagus, but my favorite is this Creamy Asparagus Soup with a bacon and asparagus tip garnish.


****
New to Always Order Dessert? Consider subscribing to my RSS feed, follow me on Twitter, become a fan on Facebook, or sign up to receive my once-a-week e-mail updates by filling in your address in the box on the right.

And if you ever need any entertaining or cooking advice, please don't hesitate to
e-mail me.
Thanks for reading!
0

3 Really Good Things I Ate During Eat Write Retreat

I just got back from 3 fun, inspiring, and (gotta admit) exhausting (in a good way!!) days in my old stomping grounds of Washington, DC. I was there for a food blogger conference called Eat Write Retreat, and while I was planning to start off telling you about it with a post recapping the actual weekend and things we learned/discussed, I couldn't get past all the little delicious things I discovered and ate while I was there. I don't usually do product reviews here, but these were so good I couldn't not mention them. (I also figured that this might be even more fun for you since you can't attend a conference you missed, but you can definitely pop over to the store to pick up and experience a few of these things for yourself.)


1. Lifeway Frozen Kefir 
Having skipped breakfast that morning, I was really happy when the conference staff came by our table on Sunday with little cartons of frozen kefir. I loved this stuff! It was like ice cream and frozen yogurt got married and had a baby. A tangy, not too sweet baby, with a dense and creamy texture that I couldn't stop digging my spoon into.

I also loved that the samples were packaged in these cute little cartons with tiny individual spoons hidden beneath the label, just like the Italian ice cartons I grew up eating in New Jersey during the summer months.

Kefir, as you may know, is a cultured probiotic beverage very similar to drinkable yogurt, with many of the same health benefits as yogurt (some say more, even). It's made from milk that is fermented with kefir grains, and originated thousands of years ago in the Caucasus mountains.

I did a bit of research on this awesomeness (the frozen kefir, not the Caucasus mountains) when I got home and found out that it's a relatively new product so not yet available in all stores, but if you're curious about it, I really recommend sending their Twitter account a message and asking them where you can find it in your neighborhood. That's actually what I did, and was told it's going to soon be popping up in NYC at Food Emporium and (ugh) Gristedes. (Ugh because Gristedes is pretty much my least favorite grocery chain in the whole wide world.) That said, if I can buy this kick-ass frozen kefir there, I may just suck it up and go get some.

I'm also planning on trying to recreate my own version of the frozen treat using homemade kefir and maybe raw honey or maple syrup. I will of course be sure to report back if it works out!


2. Goo Goo Clusters
Oh man! Have you heard of these? I hadn't until this weekend and they were a revelation. It's a 99-year-old southern candy, based out of Nashville, and it is just freaking delicious.

They have a thick, chewy nougat and caramel center, with a bit of crunch from the peanuts, all enrobed in really good milk chocolate. It's actually reminiscent of a Snickers bar, but much less cloying, with a richer, more homemade flavor and a round little rustic shape.

I could not get enough of these all weekend, stuffing several into my purse anytime I passed by a sample display. There is also a pecan version that I fell hard for, and a peanut butter version that tastes like what a Reese's should taste like.

These are available widely in the south and can also be purchased online. (The VP of the company also mentioned that they're in talks with Duane Reade so keep an eye out for them, fellow New Yorkers!)


3. Honey Ridge Farms Lemon Honey Creme 
Whenever I had a sore throat growing up, my mom or dad would whisk together equal parts fresh lemon juice and honey until smooth and then feed it to us by the spoonful. My mom was never really into over-the-counter medications, preferring natural and herbal remedies, so this was our cough syrup. And it was delicious. So delicious that I would sometimes extend or exaggerate my symptoms just to get a few more spoonfuls of that honey-lemon nectar. I still take this when my throat is sore, and it's what I give Eugene when he is sick.

All that to say that my first spoonful of this honey lemon creme tasted like a dozen childhood memories. With just three ingredients--honey, lemon peel, and lemon concentrate--it's not far from what I ate as a child. It actually tastes like lemon curd whipped with honey, and can be spread on bread or scones, drizzled on ice cream, or used to sweeten tea. It would also be great for savory dishes; the jar actually recommends adding it to marinades, and I bet it would make a really nice addition to a dipping sauce for fried chicken.

(The honey cremes come in other flavors, but lemon is the only one I've tried so far.)


*In the interest of full disclosure, you should know that these items were all given to us as samples in our gift bag or distributed for free during the conference. But this didn't affect my opinion as we got TONS of free stuff and there were actually a few things that I didn't like at all. I was genuinely excited to learn about the products I featured here, and plan on definitely purchasing them in the future.


****
New to Always Order Dessert? Consider subscribing to my RSS feed, follow me on Twitter, become a fan on Facebook, or sign up to receive my once-a-week e-mail updates by filling in your address in the box on the right.

And if you ever need any entertaining or cooking advice, please don't hesitate to
e-mail me.
Thanks for reading!
0

Rhubarb Raspberry Crisp


There are some people who grew up with rhubarb. They remember the first time they took a bite of the tempting red stalks, wincing as they discovered that, raw and unadorned, rhubarb is no treat. Or they have sweet memories of breakfast porridge topped with spoonfuls of compote, simmered long until soft and sweet.

I don't have any of those memories. Rhubarb wasn't even in my vocabulary until I was about 19 or 20, already in college and working in a Washington, DC office full of men who wore navy suits and loved scotch and Reagan. Someone's wife brought in a pie one day and I was instantly captivated by this funny, tart vegetable masquerading as dessert.


Since then, I've cooked with it several times, making crumble and compote, getting excited each spring when the bright, fuchsia stalks pop up in the market again.  I brought some home last week, fully intending to make compote or perhaps a rustic crostata, but Eugene asked if I would instead make him something similar to the rhubarb and cherry crumble I made a few summers ago.

I agreed, but without cherries or enough rhubarb to let them fly solo, I pulled out a bag of frozen raspberries I remembered buying a while ago for an occasion like this. I was concerned that the results would prove too tart, but I was blown away by how good they tasted together. Even better than any strawberry or cherry combination I've ever tasted before.


I wanted a crisp topping, so I combined rolled oats with sliced almonds, crunchy turbinado sugar,  melted butter, and a touch of sea salt. Relying on just a bit of whole wheat flour to bring it all together. You can really get creative here, substituting things like pumpkin seeds, coconut, flax, or other nuts or flours according to your tastes and what you have on hand.

This was fantastic straight out of the oven. The day I made it, I served myself a bowl and topped it off with a huge dollop of homemade whipped cream that I sweetened with just the barest hint of real maple syrup. It was around noon so I ate the whole thing and called it lunch. Later that same day, I served it the same way to Eugene for dessert.

Eugene was happy. I was happy. And even my mom, who rarely eats dessert, enjoyed a full serving of it when she came by the next day.


****


Rhubarb Raspberry Crisp

Ingredients
2 cups rhubarb, sliced in 1" pieces
2 cups raspberries, fresh or frozen
1 cup turbinado sugar ("sugar in the raw"; can also substitute granulated white sugar)
Juice of 1/2 lemon
1 teaspoon vanilla extract
3 tablespoons cornstarch

For the topping
1/2 cup plus 2 tablespoons unsalted butter, divided
1 cup rolled oats (not instant)
1 cup sliced almonds (can substitute pecans, walnuts, or hazelnuts)
1/2 cup whole wheat flour (can substitute AP)
1/2 cup turbinado sugar ("sugar in the raw")
1/2 teaspoon allspice
1 teaspoon kosher salt


Directions
Preheat oven to 350 degrees. Butter an 8" glass or metal baking dish and place on a large cookie sheet to catch any drips (I like to line it with my silpat or parchment paper to make clean-up easier).

In a large bowl, combine the rhubarb, raspberries, 1 cup turbinado sugar, lemon juice, vanilla extract, and cornstarch. Toss well to coat evenly. Let sit for 20 minutes at room temperature.

While the filling sits, prepare the topping. Melt the 1/2 cup butter and let cool slightly. In a large bowl, whisk together the oats, almonds, flour, 1/2 cup turbinado sugar, allspice, and kosher salt. Pour in the melted butter and use your hands to mix well, squeezing the filling into crumbs.

Pour the filling into the prepared baking dish and distribute all the crumb topping on top. Cut the remaining 2 tablespoons of butter into small pieces and dot the surface of the crisp.

Bake for 45 minutes to 1 hour, or until the filling is bubbling and the top is golden and crisp. Let cool at room temperature for at least 40 minutes before serving.
0

Tarte Flambée with Goat Cheese

tarte flambee

About a year ago, Eugene and I went to a midnight feast at Landmarc, one of my favorite restaurants here in the city. Once the usual dinner patrons had left, the staff transformed the restaurant, covering the tables with red and white gingham tablecloths and setting up stations around the large room.

There was a moules and frites station, with steaming pots of mussels simmered in a rosemary and bacon broth and endless batches of seasoned french fries (with mayonnaise for dipping, of course). There was a giant table covered with a huge assortment of cheeses, freshly baked French bread, and fruit. In the middle of the room, a long line servers sat behind piles of freshly grilled sausages and charcuterie with various types of mustard for dipping. The tables were each set with fresh vegetables, butter, and salt, and a waitress came around offering slices of smoky bacon tarte flambée, the Alsatian flat-bread pizza topped with fromage blanc, caramelized onions, and crisped lardon.

tarte flambee


Of all the amazing things we ate that night, it was the tarte flambée that made the most impression on me, and one I've been meaning to recreate since then.  It wasn't until one day last week when I realized that I pretty much had all the ingredients I needed. In my freezer, there was a ball of homemade pizza dough, leftover from the pizzagaina I'd made a few weeks earlier. I had a basket of onions and thick slab bacon in the refrigerator. In place of the traditional fromage blanc or creme fraiche, I realized I could use goat cheese, which I happened to have quite a bit of on hand.

I let the dough defrost in the fridge over night, and got to work on the topping, which can be made in advance. I used my scissors to snip the bacon--a smokey black forest kind--into 1" strips, then sauteed them in a large cast iron skillet until the fat rendered. To the cooking bacon and fat I added about 2 cups of thinly sliced onion. I let the two cook together until the bacon was nearly all crisp and the onions nearly all caramelized. As they would continue to cook in the hot oven, there was no need to cook them all the way--just enough to guarantee crisp bits of bacon and sweet, caramelized pieces of onion in every bite.

tarte flambee ready for the oven
Once I was ready to bake, I turned my oven up as high as it would go (about 500) and placed the rack on the lowest rung. Then I rolled the pizza dough out into a long, very thin, rustic oval. Any shape will do, of course, but I like the way the long oval looks when served on a board at a party.  I dusted a baking sheet with a little flour and spread the thin oval on it diagonally so that it would fit.

I heated the goat cheese just until it softened and thinned it out with some heavy cream, whisking until smooth and then pouring and spreading the mixture evenly over the dough until it reached just about a 1/4 inch from the edge. I then spread the cooked bacon and onion mixture evenly over the entire pie and topped it off with a generous sprinkle of freshly ground black pepper and bit of sea salt.

tarte flambee


I slipped the cookie sheet into the oven and about 10 or so minutes later pulled out a gorgeous tart with crisp, golden edges and bubbling filling. We ate this for dinner paired along with an apple and arugula salad. I also brought out a small dish of anchovies that we spread on top of the pizza; if you like anchovies, it's a garnish that I definitely, definitely recommend.

Eugene loved this, as I'm sure you can imagine, and the next night he asked me if we would be having tarte flambee again. We were not, unfortunately, and we were both disappointed.

tarte flambee


Tarte Flambée with Goat Cheese
Also known as flammekueche and flammkuchen, it is said that tarte flambée was created by Alsatian bread bakers who would use it to test the heat of their ovens. At peak temperature, the tart would cook in just one or two minutes, the edges of the thin pie nearly burned by the heat of the flames, hence the name. You can easily modify this dish based on what you have available, the goat cheese can be substituted with fromage blanc (as in the original), ricotta, cottage cheese, or even regular cream cheese. You can also use puff pastry instead (adjusting the baking time and temperature as needed) or substitute a whole wheat pizza dough, if desired.


Ingredients
1/2 pound pizza dough (homemade or store-bought)
4 strips thick-cut slab bacon, cut into 1" strips
1 large yellow onion, sliced thinly
4 oz goat cheese, softened (herbed goat cheese also works lovely here; I actually used a chevre by Cypress Grove called Herbs de Humboldt)
1/3 cup heavy cream
freshly ground black pepper
sea salt

Directions
Preheat your oven as high as it will go (at least 450 degrees) and position the baking rack on the lowest rung.

Cook the bacon in a large, heavy skillet or dutch oven until the fat is rendered, but the bacon is not yet totally crisp. Add the sliced onions and stir well to coat evenly in the bacon fat. Let cook over medium-high heat until the bacon is nearly all crisp and the onions are close to being caramelized (about 7 minutes). Turn off heat and let cool in the pan.

Roll the dough out into a thin, long oval. If the dough keeps shrinking back, let it relax a bit before trying again. Dust a large cookie sheet with flour and position the rolled out dough on it.

Whisk the softened goat cheese until smooth (it might help to nuke it in the microwave for 20 or so seconds to melt it a bit). Add the cream and whisk until combined. Pour the cheese and cream mixture over the dough and spread out evenly leaving only 1/4 inch of dough on all sides.

Top the dough and cheese with the cooled bacon and onion mixture, drizzling on any bacon fat that remains in the pan. Season liberally with freshly ground black pepper and hint of sea salt.

Place in the oven and let bake for about 10 to 12 minutes, or until the edges are golden and crisp (they may bubble up a bit; that's OK.

Remove from the oven and let cool for at least 5 minutes before cutting and serving. Can be eaten hot, at room temperature, or even cold. Cut into small pieces, this also makes for a wonderful appetizer.


0

What's in My Grocery Bag

I totally had a picture of my grocery bag overflowing with food to accompany this post, but my camera ate it. (It must have looked very delicious.) Anyway, now you get a picture of 2 shelves in my refrigerator instead.

Do you know what I love? Those articles in magazines that feature celebrities "revealing" what they have inside their purse. I know that a lot of times these lists are totally staged and edited, and that the pics don't even feature the actual things, but I'm still a sucker for that voyeuristic peek inside a stranger's life.

With that in mind, I thought that it would be fun to start including my own version of the "What's in my bag" feature by spilling the contents of my grocery bag (figuratively, that is; I don't want any eggs on the floor). It's supposed to be fun, but I also want to give you a little more insight into the way that I (we) shop and eat around here on a daily basis, and what I do with ingredients beyond what makes it onto the site.

So here it is. The contents of this week's grocery bag (I've also included notes on what I plan to do with each of the ingredients.)

Dairy
1/2 lbs of Parmigiano-Reggiano, aged 2 years (to shave over salad and soup, use in pesto)
2 17.6 oz cartons of Fage TOTAL Plain Whole Milk Greek Yogurt (that's the full-fat kind; I use this in and on everything…fish tacos, on soup, to make dipping sauces and dressings and lassi, on potatoes, in baking.)

Seafood

3 Wild Soft-Shell Crabs (Hello, lover! One for Eugene; TWO for me!)
1 bag Shell-Off Medium Farm-Raised Uncooked Shrimp (frozen; don't have specific plans for these right now, but they were on sale and they're always great to have on hand for quick meals)
10oz Wild Caught Mahi Mahi Fillets (also on sale and frozen; I'm going to make fish tacos with these)

Meat and Poultry
9 lbs Boneless Skinless Chicken Breasts (these were on major sale, hence the huge quantity I purchased; I will separate it and most will go in the freezer for future meals. Some will become chicken paillard.)
1 1/2 lbs Organic Grass-Fed Lean Ground Beef (this will become meatballs)

Fruit
5 Hass Avocados (I love having plenty of avocados around for sandwiches, tacos, salads, and guacamole)
4 Lemons (we go through lemons like crazy in this apartment; these won't even make it to Friday. I use them for salad dressing, baking (the zest & juice), my morning water, and Eugene's nightly tea)
2 Red Grapefruits (I'd like to broil these with raw brown sugar on top but the reality is that Eugene will probably get to it first. He likes them plain.)
4 Organic Pink Lady Apples (for snacking along with cheese and to put in salads; I already made an arugula and apple salad with one of these; stay tuned...)

Vegetables & Herbs
1 bunch Organic Broccolette (sauteed with olive oil and garlic, then tossed with whole wheat pasta and the Parmigiano-Reggiano)
3 Organic Garnet Yams (diced and roasted with sage; will probably serve with chicken)
1 bunch Organic Scallions (for eggs and mashed potatoes; also for cream cheese if I end up making bagels)
1 lb Local Asparagus (roasted with olive oil and a LOT of black pepper (I may also make risotto with this and the parmigiano)
10 Baby Artichokes (trimmed, blanched, and sauteed with butter, olive oil, and garlic; baby artichokes are so much easier to deal with than their full-grown counterpart)
16 oz Brussels Sprouts (I will be making this with these)
6 Kirby Cucumbers (pickling these into half sours)
2 bunches Organic Lacinato Kale (for raw kale salads and soup)
4 stalks Rhubarb (rhubarb crostata or maybe compote)
5 lbs Russet Potatoes (mashed potatoes and potato skins)
10 oz Satur Farms Wild Arugula (salads with the avocado, apple, and some lemon juice; so simple and good)
Sage (for the yams)
Chives (for the mashed potatoes)
 
Grocery

1 box Arrowhead Mills Organic Quinoa (a side for chicken, as bulk and to replace breadcrumbs in the meatballs)
1 jar Roland Anchovy Fillets in Olive Oil (for pasta sauce and salad dressing)
1 package Fleischmann's Active Dry Yeast (3pk) (baking whole wheat bread and english muffins; maybe bagels)

0

Giveaway Winners: The Bake-Off

Thank you all for entering the giveaway to win a copy of the book The Bake-Off by Beth Kendrick. I just used Random.org to select two winners and the lucky two are:

#11 mischiefml "I love books, and books about food! I would probably make my double-chocolate cookies for a bake-off."
AND

#31 Toyiarenee "I would have to enter my roast garlic~rosemary~potato pizzas!" 

Congratulations to both of you! Please email me your mailing address so I can get your prize out to you.

And for the rest of you, be sure to subscribe to my newsletter or become a fan on Facebook so you can keep track of new giveaways. (Hint: I've got another one coming up this week!)

xo

Alejandra
0

Soy Sauce Vegetable Pickles

I mentioned recently that I've been playing around at home with Banh Mi style sandwiches. I gave you the recipe for the spicy chicken that I like to use in these, and now I'm going to share with you an easy way to make the homemade pickled carrots and pickled mushrooms that give this sandwich that tangy crunch. 

These pickles would also make a great addition to burgers or bbq pulled pork sandwiches; you can even add them to noodle soups!

The recipe is super quick and you can actually use the same batch of brine to make both the carrots and the mushrooms. This would also work with other vegetables like turnips, radishes, and parsnips, so feel free to improvise.


****
New to Always Order Dessert? Consider subscribing to my RSS feed, follow me on Twitter, become a fan on Facebook, or sign up to receive my once-a-week e-mail updates by filling in your address in the box on the right. And if you ever need any entertaining or cooking advice, please don't hesitate to e-mail me. Thanks for reading!


Soy Sauce Vegetable Pickles
Adapted from Momofuku by David Chang

Ingredients
1 cup sugar
1 cup red wine or white vinegar
2 cups water
3/4 cup low sodium soy sauce or tamari
1 2-inch knob of fresh ginger, peeled
2 cups assorted mushrooms, sliced into even sized pieces (such as shitake, oyster, trumpet, baby bella, etc.; can also use 2 cups julienned carrots, radishes, turnips, or parsnips.)

Combine the sugar, vinegar, water, soy sauce, and peeled ginger in a large, heavy pot. Add the sliced mushrooms and turn the heat to medium. Let simmer for 30 minutes, then let cool to room temperature in the pot.

Use a slotted spoon to transfer the mushrooms to a clean glass jar and top off with just enough of the pickling liquid to cover them. Cover and refrigerate. Will keep for at least 1 month. Brine can be immediately reused to pickle another batch of vegetables such as carrots, turnips, etc.
0

Bagged Lunch Ideas: Mediterranean Whole Wheat Pasta Salad with Basil Vinaigrette

I served a version of this pasta salad at the very first dinner party I ever hosted. I was 16.

I don't remember the exact occasion, but I'd invited a group of my nerdy high school friends over and we feasted on a Mediterranean inspired spread of homemade roasted garlic hummus, tzatziki, balsamic chicken flat-bread pizzas, bruschetta, crudite, and this salad. For dessert I made bread pudding with butterscotch sauce (two things I'd been obsessed with at that point in my life). There may have also been some Arbor Mist served, but we'll just forget about that part.

I remember that this salad was one of my favorites of all the dishes, and that I made so much of it that my family and I ate the leftovers for the rest of the week. It's one of those incredible dishes that just seems to get better by the day, as the pasta and cheese absorb more and more of the tangy fresh basil vinaigrette.

This is a great salad for lunch; you can keep it as-is or add some grilled chicken or cooked shrimp to round it out. It's also easy to adapt depending on the season. I've made it with sun-dried tomatoes in the winter and cherry tomatoes in the summer. I've added steamed broccoli florets when I had some in the fridge. You can play around with the cheeses or use tricolor rotini to make it a little more festive.

This also make a great salad for a picnic or outdoor barbecue since it's oil-based and will keep at room temperature for several hours.


****
New to Always Order Dessert? Consider subscribing to my RSS feed, follow me on Twitter, become a fan on Facebook, or sign up to receive my once-a-week e-mail updates by filling in your address in the box on the right. And if you ever need any entertaining or cooking advice, please don't hesitate to e-mail me. Thanks for reading!


Mediterranean Whole Wheat Pasta Salad with Basil Vinaigrette


Ingredients
12 oz whole wheat rotini (or other small whole wheat pasta such as penne)
1 cup roughly chopped kalamata olives (preferably not canned)
1 red bell pepper, diced
1 cup feta cheese, diced
1 cup fresh mozzarella pearls, drained (or diced fresh mozzarella)
1 cup cherry or grape tomatoes, sliced in half
1/4 cup red wine vinegar
3/4 cup extra virgin olive oil
3 garlic cloves, peeled
zest of one whole lemon
2 cups fresh basil leaves, washed and ripped off the stems
1/2 teaspoon sugar

Kosher salt
Black pepper


Directions
Cook the pasta according to box directions until al dente. Drain and rinse with cold water until cool to the touch. Drain and place in a large bowl.

Add the olives, bell pepper, feta, mozzarella, and grape tomatoes to the pasta and mix until evenly distributed.

In a blender or food processor, combine the vinegar, olive oil, garlic cloves, lemon zest, basil, and sugar. Process until smooth and emulsified (it will look almost a little bit creamy.

Pour the dressing into the salad and toss well to coat. Season with kosher salt and black pepper to taste. Let chill for at least 3 hours before serving (can be made up to 2 days in advance; will keep well in the fridge for about a week).
0

Whole Wheat Dark Chocolate Espresso Brownies

Whole Wheat Dark Chocolate Espresso Brownies

Last weekend, my mom, who is a psychologist and life coach and my brother's girlfriend, Caroline, who is a dance teacher in the Boston area, teamed up to host a one-day dance therapy workshop for women. The event was in New Jersey and as part of it, they hired me to cater the brown bag lunch for the group of women, and to speak briefly about real food vs. processed food and the effect that eating whole can have on our overall well-being.

I prepared a lot of fun things for lunch: grilled herb chicken and eggplant caponata sandwiches on freshly baked bread, a three-cheese whole wheat rotini salad with kalamata olives and red peppers in a basil vinaigrette, and for dessert, these rich, dark chocolate espresso brownies made entirely with whole wheat.

The point of the menu (besides keeping the women nourished during the high-energy day), was to show how whole foods can be delicious, easy to make, and even a little bit decadent. And these brownies in particular are certainly all of the above.

Whole Wheat Dark Chocolate Espresso Brownies


Based on Ina Garten's famous "Outrageous Brownies" recipe, I adapted it to use whole wheat flour, raw sugar, molasses, and real freshly brewed espresso. The combination of chocolates, molasses, and the deep espresso make for a rich, fudge-like treat perfect enough to satisfy any craving.

I know you're going to look at the recipe and freak out over the pound of butter that's listed front and center as the first ingredient. Some of you might freak out in a "heck yeah, Paula Deen, bring on the butter!" kind of way, and others might freak out more in a "oh holy heck, no way, can I substitute Smart Balance?" kind of way.

Here's the deal:

Paula Deen fans: carry on. The rest of you: No, you may NOT substitute Smart Balance. There is nothing smart about that 26-ingredient concoction stuff or anything else of that ilk. The entire point of this recipe is to go with the whole and real. You know what's whole and real? Butter. It's to point out that just a little bit of real indulgence (like butter) goes a long, delicious way farther than a lot of...well...Smart Balance. 

Note that this recipe makes a pretty HUGE batch; it's baked in a 12" by 18" by 1" half-sheet tray and can be cut into anywhere from 24 to 40 brownies, depending on how you cut. And the beauty of this recipe is that it keeps and travels well so you can share it with friends. Save 5 for yourself and bring the rest of the batch to the office or to the next party you attend. Or keep them all, but portion them out and put them in the back of your freezer to be doled out slowly over the next couple months when you're in need of something chocolate right now.

Also cool about this recipe? You can make them up to a week in advance (keep wrapped in plastic and stored in the fridge or freezer), which makes them ideal for entertaining.

Whole Wheat Dark Chocolate Espresso Brownies


****
New to Always Order Dessert? Consider subscribing to my RSS feed, follow me on Twitter, become a fan on Facebook, or sign up to receive my once-a-week e-mail updates by filling in your address in the box on the right. And if you ever need any entertaining or cooking advice, please don't hesitate to e-mail me. Thanks for reading!


Whole Wheat Dark Chocolate Espresso Brownies
Adapted from Ina Garten's "Outrageous Brownies"

Ingredients
1 pound (4 sticks) unsalted butter
1 pound semi-sweet chocolate chips
6 ounces unsweetened chocolate, chopped
1/2 cup freshly brewed espresso
6 large eggs
2 tablespoons pure vanilla extract
1 3/4 cups granulated raw sugar (such as "sugar in the raw")
1/4 cup molasses
1 cup whole wheat flour
1/4 cup whole wheat pastry flour
1 tablespoon baking powder
1 tablespoon Kosher salt

Preheat oven to 350 degrees and line a 12x18x1 inch baking sheet with parchment paper that overhangs on the sides.

Place the butter in a medium saucepan and melt over medium heat.

While the butter melts, combined the pound of chocolate chips and the chopped unsweetened chocolate in a large glass bowl. Melt in the microwave for 1 minute, then stir, and return for 30 second intervals until melted (stopping to stir each time). It's OK if a few unmelted chocolate pieces remain.

Pour in the melted, hot butter and use a whisk to combine the melted chocolate and butter until smooth. Add the freshly brewed espresso, stir, and set aside to cool slightly.

In a separate extra-large bowl, combine the 6 eggs, vanilla, sugar, and molasses, stirring until well combined. (Don't whisk; you don't want to incorporate air into this batter.)

Pour the cooled chocolate mixture into the eggs and stir well until evenly combined. In a separate bowl, whisk together the whole wheat flour, pastry flour, baking powder, and salt, then add to the chocolate egg mixture. Stir just until completely combined, then pour into the prepared baking sheet, spreading it out thoroughly.

Bake in the preheated 350 degree oven for 30 to 35 minutes, or until a toothpick inserted in the center comes out clean.

Once ready, let cool completely in the pan, then cover with plastic wrap and let chill in the fridge for 3 hours to overnight. These always taste best the second day!

Can be made up to one week in advance. These also freeze very well.
0

Giveaway: The Bake-Off by Beth Kendrick

I'm usually reading about 3 to 5 books at any given time. There is always one in my purse, a few on the nightstand, and others tucked around the apartment wherever I left them. I'm a quick reader, racing through both fiction and nonfiction (the latter usually food related, though I also have a thing for essay collections by Nora Ephron). I also admit to sometimes pulling all-nighters when the book is really good.

I usually prefer literary fiction (I'm at the heart of it all, a total nerd), but I do admit to having a VERY soft spot in my heart for cozy food novels that I can just escape right into without really having to think. You know what I mean--silly mysteries about poisoned chocolates or disappearing cakes, romances between chefs and cranky restaurant critics, and, like the book I'm giving away to you today, heartwarming stories about family brought together through the power of the kitchen.

The Bake-Off by Beth Kendrick is the sweet story (no pun intended) of two estranged sisters: Amy, a pretty suburban mom in need of a break, and Linnie, a former child prodigy still trying to figure out how to fit in.  Despite their complete lack of baking skills, the two are brought together to compete for a big prize in a national baking competition. It's an easy read, and a fun one, with a bit of romance, a few clever lines, and just a touch of intrigue--all the ingredients you need to make a sweet story. (Also pie--lots and lots of pie, and an accompanying recipe so you can enjoy it while you read along.)

I breezed through it quickly and thoroughly enjoyed the story of these girls and their grandmother. I think the only thing that drove me a little crazy about the book (without giving anything away) is the way Linnie chose to deal with the theft that got her into the whole situation. Maybe it's just the New Yorker in me, but I would have called the cops on that guy so fast, regardless of his sob story. Although I suppose had she done that there would have been no plot.

Anyway, you'll have to read the book to let me know how you would have reacted...

The Giveaway
I have two copies of the book to give away today!  

To enter: leave a comment below telling me what dish you would make if you were forced to enter a cooking or baking competition. 

You have until 11:59 PM EST on Tuesday, May 10 to enter. One entry per person. US residents only. Two winners will be randomly selected using Random Number Generator and announced on the 11th.


Good luck!!


xoxo
0

Semolina-Crusted Soft-Shell Crab BKT Sandwiches

DSC_1321

The soft-shell crabs got me again this year! They are my favorite, and I look forward to them each year in such a way that I can tell you exactly what I was doing last year the first time I ate them for the season.

Soft-shell crabs are generally in season from about late-April through July; just in time to signify the beginning of good weather days--of warm outdoor meals and sunny afternoon walks. It's glasses of cold white wine, sweet berries, and long, lazy evenings spent sitting outdoors until long after the sun goes down.

I squealed when I saw them in stock at the store, excitedly messaging Eugene to tell him the good news. I immediately bought four, visions of overflowing soft-shell crab BLT sandwiches floating in my head.

raw soft-shell crabs


I love being surprised by seasonal food. I love that feeling of walking into a market or opening up a restaurant menu and suddenly seeing that dish or ingredient that I love but haven't been able to eat all year. It's one of the best things about eating seasonally--that sense of real joy and appreciation that we completely miss by forcing food to conform to our whims and cravings, rather than the seasons laid out by God and nature.

I was explaining this to a friend recently and I compared the excitement to the one we feel in the beginning of Spring or near the end of Summer in the parts of the world where the seasons change; where you can feel  the bright heat of summer and the biting cold of winter. As harsh and difficult as it can be to deal with the changes, I welcome them. After a long hot summer, I look forward to pulling out the thick sweater dresses and tall boots. And in the spring, I anxiously await the moment when I can run outside in little more than a pair of flip-flops and a breezy dress.

frying soft-shell crabs


We may have found a way to control our food by flying and trucking it in from far away, but the weather is something that we have little dominion over--even in the more temperate of climates. We can predict it, but we can't change it or mold it. We can't package sunshine and ship it across state lines. We can't bottle up rain clouds and sell them to a country in need of rain. And we can't, no matter how often we may joke about it, bring good weather back with us as a vacation souvenir.

But I like that. I like that there are some things we're forced to recognize are out of our control. That no matter how hard we try, we're ultimately not the boss of this Earth, but rather the other way around.

I like to pan-fry my soft-shell crabs. A quick drench in buttermilk and semolina flour then fried to a crisp in a bit of olive oil and bacon fat is the perfect way to bring out the natural flavors and textures. They're wonderful this way on their own with little more than a squeeze of lemon, but I also love to layer them into a sandwich using the best of everything--freshly baked ciabatta sandwich rolls spread generously with mayonnaise, thick slices of crispy Black Forest bacon, a few sliced tomatoes, and (the surprise) big pieces of leafy kale.

raw kale


I really recommend replacing lettuce with fresh kale in your sandwiches. Kale--hearty and packed with nutrients--works beautifully in sandwiches. It holds up well, looks gorgeous, and adds great texture and flavor. It's inexpensive too, and will keep much longer in the fridge than regular lettuce. Try it on your next sandwich or burger, and let me know what you think!

I served this sandwich for lunch last weekend, along with a basket of homemade tortilla chips and a bottle of chilled Vinho Verde. The entire meal (chips included) took about 40 minutes to put together and cost around $20 for the two of us, wine included. (And we never even had to change out of our pajamas!)

soft-shell crab sandwich


****
New to Always Order Dessert? Let's connect so you can find out the next time I post! Follow me on Twitter, Instagram, or Pinterest, become a fan on Facebook, or sign up to receive my once-a-week e-mail updates.

Thanks so much for reading!
!


Semolina-Crusted Soft-Shell Crab BKT Sandwiches
Fresh raw kale leaves replace the traditional lettuce in this variation of a BLT
Serves 4

Ingredients
4 soft-shell crabs, cleaned
8 strips of thick-cut bacon
2 cups buttermilk
2 teaspoons black pepper, divided
2 teaspoons Kosher salt, divided
2 cups semolina flour (can replace with cornmeal or regular all-purpose)
2 tablespoons olive oil
4 sandwich rolls, sliced in half (use a hearty roll such as ciabatta)
Mayonnaise
4 leaves of kale, rinsed and patted dry
1 large tomato, sliced thinly

Directions
Rinse the the cleaned soft-shell crabs and pat dry (Note: cleaning will typically be done by the fish monger upon purchase--it entails cutting off the "face" portion of the crab, among other things.).

Cook the bacon in a large skillet until crisp and remove to a towel-lined plate to drain, leaving the bacon fat in the skillet.

Combine the buttermilk, pepper, and salt in a shallow bowl. Pour the flour into a separate shallow bowl and season with the other teaspoon each of black pepper and salt. Whisk to combine. Dip each crab into the buttermilk and coat completely, then dredge in the flour mixture until full coated. Tap off the excess flour and set on a tray while you repeat with the rest of the crabs.

Add the 2 tablespoons of olive oil to the skillet with the bacon fat and heat over medium high heat. When hot, cook the crabs, two at a time about 3 minutes on each side or until golden brown and crisp. (Watch out because the crabs may spit once in the hot oil.) Let the cooked crabs drain on a towel-lined plate.

To assemble:
Spread mayonnaise to taste on one side of the split ciabatta loaves. Top each sandwich with one slice kale, one crab, two slices of bacon, and the tomatoes. Top with other half of roll and serve immediately.

0
Back to Top