True mercury glass pieces are expensive, but faux versions are just as beautiful and widely available. I quickly grew obsessed with the idea of having a couple hundred mercury glass votives sparkling around the room and on the dinner tables at our reception. Unfortunately, I found that at 2 to 5 dollars a piece, even the faux versions were out of my decorating budget.
So I decided to make my own!
I scoured websites looking for tutorials on how to make my own mercury glass, but I was mostly disappointed with the results. The most popular method around the web is one from Martha Stewart, but all the posts I read about it reported less than stellar results. Her method, which calls for spritzing glass pieces with water before spraying with silver mirror paint, results in a streaky mess. Finally, I just devised my own method.
Once you get the hang of it, the process is simple and goes by quickly--necessary when you're making these in bulk. I was able to complete approximately 200 DIY mercury glass votives in just a few afternoons. My total cost for the project? About $125. Here's what I did:

1. Krylon Looking Glass mirror-like spray paint
2. Acrylic craft paint in shades of glossy black and metallic brown. You can use any brands, but I specifically used Apple Barrel Gloss Acrylic paint in Black and DecoArt Dazzling Metallics Elegant Finish paint in Rich Espresso. One small tube of each is fine and will go a long way. (I bought these at Michael's for less than 2 dollars each. They're also available online.)
3. Sea sponges. I bought two of these. Available at craft stores and in the bath section of drug and beauty supply stores. In a pinch, you can use a small piece of loofah. Don't use a regular kitchen sponge; you want the irregular natural pattern.
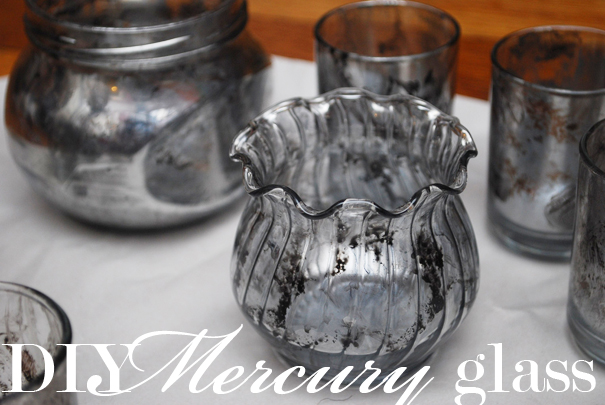
4. Clear glass votives, hurricanes, clean jam jars, or other objects of any size or shape. I used about 140 plain clear glass votives, and another 60 decorative ones with ridges. Both work equally well. (I got mine at Michael's, but also check online shops for bulk discounts if you're buying a lot.)
You'll also need:
a dropcloth (I cut a trash bag open), a small dish of water, and a well-ventilated area. (I live in an apartment and it was the middle of winter so I just opened the windows wide, turned on a fan, and took copious breaks. Not recommended unless you want a fierce headache.)
Method
Step 1. Prepare your materials: Use scissors to cut a small piece of the sea sponge. Make sure that it is small enough to hold in your fingers and dab inside the votive. Squeeze about a tablespoon each of the black and brown paints onto a plastic plate. This will be your palate.
Step 2. Dab the sponge lightly into the black and brown paint, and then blot gently inside and around the votive. Use a light hand, and only make a few spots in each. You don't want to coat the votive with paint, you just want to make a few smudges on the inside. Repeat with each of the votives and let dry for about 15 minutes.
Step 3. Shake the Looking Glass paint well and then, holding one of the votives in one hand, spray quickly and lightly INSIDE the votive. You will be doing a second coat so don't worry if it looks thin. Set the votive aside right side up (the same way you would place it on a table if you were using it), and let it dry. Some paint will pool on the inside bottom, but that's OK. Don't move it around too much to avoid streaks. Repeat with the rest of the votives, then let them all dry about 15 minutes. Repeat with a second coat of paint, then let them all dry overnight.
Step 4. If you'd like, you can add a 3rd coat of paint for a more silvered look.
Once the votives are completely dry, they're ready to use! I used these with real candles at my wedding, scattered along the dinner tables and on many other surfaces around the room. When the candle is lit, the flame gives the glass a warm antique glow. The same antiqued mercury glass effect for a mere fraction of the price!
NOTE: This technique also works well on clear glass vases to make gorgeous and inexpensive wedding centerpieces, but if you plan to fill with water, use another vessel or liner on the inside to hold the water as the paint is not waterproof. Note that this is also not food-safe, so you'll also need a liner if you want to use for a fruit bowl or other similar purpose. Once completely dry, it IS safe to use with real candles.
****
New to Always Order Dessert? Consider subscribing to my RSS feed, follow me on Twitter, become a fan on Facebook, or sign up to receive my once-a-week e-mail updates by filling in your address in the box on the right. And if you ever need any entertaining or cooking advice, please don't hesitate to e-mail me. Thanks for reading!


No comments
Hi there and thank you for reading! This blog is not currently active, so new questions are not being monitored. Please enjoy the archives.
Note: Only a member of this blog may post a comment.