Showing posts with label Chocolate. Show all posts

Meghan Markle's Banana Bread Secret

Meghan Markle's banana bread recipe is one of the most searched for recipes in the world right now. Her homemade banana bread, which she brought as a hostess gift to one of the stops on her Australia tour this month, is said to contain ginger and chocolate chips, and was a hit with the guests who got to try it. She is reported to have baked the bread herself at night in the kitchen of the Admiralty House in Sydney, Australia. The Admiralty house is the official residence of the Governor-General of Australia, and is where Harry and Meghan stayed during the first stop of their trip.

The Duchess has not shared her exact recipe (yet!), but Inside Edition asked me to appear on the show yesterday to bake this very similar Ginger and Chocolate Chip Banana Bread so that the producers could taste the royal combination themselves.

0

Basically a Brownie Cake

This one-pot deep dark chocolate cake is my favorite kind of cake. Simple. Elegant. Easy and unfussy, yet somehow dramatic, memorable, craveable. The recipe is essentially a brownie recipe (hence the name), though the results are a little more delicate than a proper brownie. Think of it as the ultimate, fudgiest brownie that is better eaten with a fork than straight out of your hand.

I think of this one as a perfect dinner party cake because it hits my three dinner party dessert requirements:

1. It's best made a day or two in advance (though you can certainly eat it a few hours after baking, too!).

2. It's unfussy to make, but incredibly easy to dress up into an elegantly impressive celebration dessert. Dust the top with some powdered sugar and sprinkle of edible flowers. Or add a sweep of creme fraiche and a mountain of fresh berries. If you really want a showstopper, bake two then layer with whipped ganache frosting.

3. And finally, it is rich in flavor, but still light enough to not overwhelm after a big meal.

What more could you ask for? 

0

Vegan Chocolate Banana Bread

This easy Vegan Chocolate Banana Bread recipe is a bit of a departure for me since, I'll be honest...vegan baking is usually not my everyday go-to. I love baking with butter. I love baking with eggs. I love baking with milk (or cream!). I use them liberally and think there is nothing wrong with that.

But...

I can also really appreciate the value of some great vegan baked goods like this Vegan Double Chocolate Banana Bread.

I bake and serve them to the vegan yoga groups I cook for up in Vermont. And I love having the recipes in my back pocket when cooking for vegan friends or those with egg allergies or dairy allergies.

Because at the end of the day, I just want everyone to be able to enjoy delicious things.

I also really love vegan recipes on those days when I'm totally out of eggs or milk or butter, and need alternatives that will let me stick to the stuff in my pantry.

(Especially during the winter when I will do EVERYTHING in my power to not have to leave the house.)

This recipe is perfect for those days when you have ripe bananas, but no eggs.

Mashed bananas can often be used successfully as an egg-replacer, and they work especially well in quick breads like this one.

It's just one of those super forgiving recipes that will let you mix up, bake, and serve a sweet treat without much fuss and making use of stuff you already have on hand.

This extra-chocolatey vegan banana bread gets a double-dose of goodness from cocoa and dark chocolate chips. Note that if you want this to be truly vegan, you should make sure the chips have no dairy added (some brands do; some brands don't).

This produces a rich and moist cake that's not too sweet and perfect for breakfast or brunch or a late-afternoon snack.

(And hey...if you want to toast it up and spread it with a bit of butter or cream cheese...I'd be totally OK with that, too.)

****
Loved this recipe? Here are three other vegan recipes you might like:

And let's connect so you can find out the next time I post! Follow me on Twitter, Instagram, or Pinterest, become a fan on Facebook, or sign up to receive my once-a-week e-mail updates.

Thanks so much for reading


Vegan Chocolate Banana Bread Recipe
Makes 1 9x5” loaf

Ingredients
3 medium overripe bananas, mashed until smooth
1/3 cup oil (use vegetable, peanut or a light olive oil. coconut oil works, too, but keep in mind that it will add slight coconut flavor to the bread.)
3/4 cup brown sugar OR coconut palm sugar
1 teaspoon vanilla extract
1 cup non-dairy milk (coconut, almond, cashew, etc.)
1 1/2 cups flour
1/4 cup unsweetened cocoa powder (not dutch)
1 teaspoon baking powder
1/2 teaspoon baking soda
1/2 teaspoon kosher salt
1 cup semisweet chocolate chips*

Directions
Preheat oven to 350 degrees F. Grease a 9x5” nonstick loaf pan with baking spray or vegetable oil, and set aside.

In a large bowl, beat together bananas, oil, sugar, vanilla, and milk until smooth. In a separate bowl, whisk together flour, cocoa powder, baking powder, baking soda, and salt. Add the dry ingredients to the wet and mix until smooth. Fold in chocolate chips, then pour into prepared pan.

Bake about 45 to 55 minutes, or until cake has risen and is slightly cracked, and a toothpick comes out clean.

Let cool in pan 10 minutes, then run a knife around the edges to loosen and remove from pan. Transfer to a rack to cool completely.

*note that not all chocolate chips are vegan, so be sure to check out the ingredients
0

Chocolate Chip Fig Cake with Saffron

This Chocolate Chip Fig Cake is the autumnal version of my Simple Summer Cake. (So I guess that makes this a Simple Fall Cake?) A moist and not-too-sweet yogurt cake with hints of almond and saffron studded with ripe fresh figs and tons of chocolate chips.
0

Thin Chocolate Bark with Coconut, Almonds & Smoked Salt

Have you ever tried barkTHINS? I added them to my grocery basket the other day all the while fully knowing it was probably a mistake.

I generally avoid store-bought treats and snacks (OK...OK...apart from the occasional bar of dark chocolate or pickle-flavored potato chips) in an effort to protect myself from my own lack of self-control.

My job involves making lovely decadent things (like cake!) and going to events and trips where they serve lovely decadent things (like cocktails!) AND it also involves going on television, where I naturally want to look my best.

I mean...I'm not a skinny girl. I never have been, nor have I ever wanted to be. I dig my curves, but I also fully understand the point where I look best. For me, sticking to that point generally involves saying no to the bread basket, and avoiding bags filled with crunchy snacking chocolate thins.

But whatever. I bought those damn barkTHINS "snacking choclates" anyway, and sure enough. They are amazing!

It's basically just thin chocolate bark (duh) filled with different things. The ones I got were filled with almonds and sea salt. They are good, though I did want more salt. (I always want more salt.)

And maybe more almonds.

And I remembered that the store also had a version made with coconut, but the coconut was sweetened which meant the carb count was higher, so I didn't buy them, but in my head I was totally like "I'M GOING TO MAKE THIS MYSELF WITH UNSWEETENED COCONUT!"

And so I did!
0

Keto Mint Chip Protein Shake

When I was in college, my friend Matt and I would regularly spend an evening working our way through an entire pint of Haagen Dazs mint chip ice cream. That and a movie was our idea of a pretty great night in. My ice cream consumption is significantly less these days, but my love of all things mint chip continues.

That was the inspiration behind this Low Carb Mint Chip Protein Shake. I've seen versions of it around for a while (especially earlier this month around St. Patrick's Day), and have been meaning to try my hand at it.
0

Almond Yellow Cake with Whipped Chocolate Frosting

What is it about yellow cake with chocolate frosting that just makes it so damn perfect?

Growing up, my mom was never much of a baker. There were a few memorable cakes that she made, but for the most part, I knew that if I wanted cake, I would have to bake it myself.

0

Spicy Tabasco Brownies

I can't believe it's taken me this long to post a recipe for spicy brownies on this blog. I make them all the time, but it wasn't until recently when a friend asked for the recipe that I realized that I hadn't actually ever shared it here.

0

Chocolate Coca-Cola Quick Bread + 5 Make-Ahead Christmas Breakfast Tips

The holiday season usually brings along a bevy of overnight guests and party invitations, for which a recipe like this Chocolate Coca-Cola Quick Bread will most definitely come in handy.

This moist and not-too-sweet bread is rich with hints of chocolate and a touch of classic Coca-Cola flavor. It's lovely on its own with a mug of your morning coffee, or toasted with a spread of jam or cream cheese as a quick snack later in the afternoon.

It's one of those snacky cakes that can be left on the counter all day for enjoying as you wish.

0

Frozen Dark Chocolate Banana Pops

These candy-related holidays are dangerous. I walk into the drugstore because I need hair gel or a new toothbrush or something else TOTALLY innocent.

And...I walk out with a bag filled with candy.

How does that happen?! No self control. That's how.

I teamed up with FreshDirect (my favorite online grocery store that I've mentioned on this site 8 billion times) for a fun Halloween game on Instagram. A virtual trick or treat where you "knock" on their door and then they send you over to my page (or other bloggers pages) for the treat.

Whether you also totally lack self control or you're just looking for a way to use up the 50 pounds of candy your kid will be bringing home this weekend, these candy-covered frozen dark chocolate bananas are a good way to use the candy.

You get a hint of the awesome, but tempered with banana (aka fruit!) and dark chocolate.

It's how grown-ups do Halloween.


(Though kids are totally into these pops, too.)

To make, you simply cut bananas in half and skewer with a wooden stick (I got these at the craft store).

Melt the chocolate chips with a bit of coconut oil (this keeps it smooth), then dip and coat evenly. Sprinkle the chocolate with your favorite crushed candy.

(My favorite crushed candy is Butterfinger. Yum. But obviously any kind of candy would work.)

I mean...I guess most kinds of candy.

Some might be weird, but I'm trying to think of ones that would be weird and all the combinations in my head just sound awesome. (M&M's! Gummy bears! Malt balls!)

Can you think of a combo that would not work?  (Maybe Junior Mints? Maybe?)

Anyway...you get the picture.

And then freeze!

I mean...if you have no patience, you can eat them all gooey and not frozen, too. Also freaking good.

Here is my awesome chef friend Melissa hand modeling a gooey one for me. This cool lady can't even eat peanuts (hence, no Butterfinger), but withstood the torture because she's an amazing lady.

(Plus, I made her dinner afterwards.)

Happy Halloween, my friends!

Some Disclosure Action: Fresh Direct provided me with a gift card for ingredients to create this treat, though I've been using Fresh Direct for years and will continue to do so until my dying day. Because I freaking love them. They have not paid me to say that. Nestle is not at all related to this post (they'd don't even know I'm writing this), but separately sent me some free candy to try and I ended up using it in this recipe. But I'd buy Butterfingers anyway. Because they're delicious.


Frozen Dark Chocolate Banana Pops
Makes 4 pops, multiply as needed

Ingredients
2 large bananas, peeled and cut in half
1 cup dark chocolate chips
1 teaspoon coconut oil or shortening (like Crisco)
1 cup crushed candy of your choice (I used Butterfinger)

Directions
Skewer each half of the banana with a wooden stick (like a popsicle). Combine the chocolate and coconut oil in a microwave safe bowl and microwave for 30 seconds at a time, stirring each time, until smooth and melted.

Dip the bananas about 3/4 of the way, then sprinkle on all sides with the crushed candy.

Place on a wax paper lined plate, then pop in the freezer for at least two hours or until frozen solid.

Eat immediately or store in the freezer up to 3 days.

0

Vegan Chocolate Chip Banana Bread

This simple Vegan Chocolate Chip Banana Bread recipe is a variation of my Vegan Double Chocolate Banana Bread, which is full-on chocolate throughout. This one is for those days when you want a bit more banana flavor, with a hint of chocolate.

(I think a hint of chocolate is kind of a must, always.)

And you definitely do NOT have to be vegan to enjoy this recipe.

(I certainly am not!)

I love vegan recipes because they're the perfect solution when you want to bake, but suddenly realize you're out of eggs or butter or milk (or all of the above because it's raining and cold and you don't want to put on pants to go to the store).

This banana bread recipe is super flexible, too! Choose any kind of oil you'd like, and any kind of dairy milk. You can substitute regular granulated sugar for the brown, or even use something like coconut palm sugar.

The tiny bit of acid (to help with the rising) can be swapped for lemon juice or any kind of plain vinegar (apple cider, white, wine, etc.). No balsamic though, please. That would be weird.

I think 1 1/4 cups is the perfect amount of chocolate chips for an even distribution, but feel free to pump that amount up if you'd like.

You do you, OK?

****
Loved this recipe? Here are three other vegan dessert recipes you might like:


And let's connect so you can find out the next time I post! Follow me on Twitter, Instagram, or Pinterest, become a fan on Facebook, or sign up to receive my once-a-week e-mail updates.

Thanks so much for reading


Vegan Chocolate Chip Banana Bread Recipe
Makes 1 9x5” loaf

Ingredients
3 medium overripe bananas, mashed until smooth
1/3 cup oil (use vegetable, peanut or a light olive oil. coconut oil works, too, but keep in mind that it will add slight coconut flavor to the bread.)
3/4 cup brown sugar
1 teaspoon vanilla extract
1 cup non-dairy milk (coconut, almond, cashew, etc.)
1 teaspoon lemon juice or apple cider vinegar
1 3/4 cups flour
1 teaspoon baking powder
1/2 teaspoon baking soda
1/2 teaspoon kosher salt
1 1/4 cups semisweet chocolate chips*

Directions
Preheat oven to 350 degrees F. Grease a 9x5” nonstick loaf pan with baking spray or vegetable oil, and set aside.

In a large bowl, beat together bananas, oil, sugar, vanilla, milk, and lemon juice until smooth. In a separate bowl, whisk together flour, baking powder, baking soda, and salt. Add the dry ingredients to the wet and mix until smooth. Fold in chocolate chips, then pour into prepared pan.

Bake about 45 to 55 minutes, or until cake has risen and is slightly cracked, and a toothpick comes out clean.

Let cool in pan 10 minutes, then run a knife around the edges to loosen and remove from pan. Transfer to a rack to cool completely.

*note that not all chocolate chips are vegan, so be sure to check out the ingredients
0

Pop Bark! (Corn Nut & Popping Sugar Chocolate Bark)

Have you ever tried quicos?

They're toasted and popped dried corn kernels that are served salted as a bar or party snack. Commercially, they're sold as "Corn Nuts," though the good ones are the kind you can buy at gourmet markets or in the cheese section at Whole Foods, which taste fresher and miles better.

It's a Spanish snack, and absolutely wonderful if you're the sort of person who loves salty, crunchy, toasted corn-flavored things.

Sometimes quicos are also sold covered in chocolate and rolled in cocoa, and that's when I go absolutely wild for them.

Because salt + chocolate? Best thing ever.

I've been wanting to do something with quicos on this blog for a while now, and it wasn't until this past week that I figured it out.

Meet my Pop Bark! A dark chocolate bark filled with crushed quicos (or corn nuts) and sprinkled with popping sugar (ahem...also known as Pop Rocks).

Crunchy, toastey, salty, sweet, and POPPING!

Ahh...so fun. A few notes...

If you can't find the popping sugar or Pop Rocks...just skip them. It's good with just the corn, too. If you want, though, you can totally find the popping sugar (sometimes called popping crystals) on Amazon. Link is in the recipe below.

You can use whatever chocolate you prefer, but the darker stuff just seems to work nicely with the salty corn.

You can get quicos or corn nuts at Whole Foods and online (Amazon carries them, but other places do, too). You can also just use the original flavor Corn Nuts that you can probably find at the grocery store.

This is super fun snacky treat food.

This is movie-watching food.

This is friends over for a party food.

This is munch on while you wait for dinner to be ready food.

This is so-good-you-can't-stop-till-it's-gone-food!

****
Loved this recipe? Here are three other easy candy recipes you might like:

And let's connect so you can find out the next time I post! Follow me on Twitter, Instagram, or Pinterest, become a fan on Facebook, or sign up to receive my once-a-week e-mail updates.

Thanks so much for reading!


Pop Bark (Toasted Corn Nut & Popping Sugar Chocolate Bark)
Serves 6

Ingredients
2 cups salted toasted nuts (also known as quicos; buy them here)
2 cups bittersweet or semi-sweet chocolate chips
1 teaspoon flaky sea salt (such as maldon)
1 tablespoon popping sugar (unflavored Pop Rocks --you can buy it online here)

Directions
Line a baking sheet with parchment or wax paper.

Place corn nuts in a food processor and crush slightly (you can also place in a bag and crush with a meat tenderizer or rolling pin).

Place chocolate in a heat proof bowl, and microwave at 30 second intervals, stirring in between, until smooth and melted. Keep stirring to cool down slightly, then add the corn nuts.

Spread out on the prepared baking sheet, then let cool at room temperature for about 10 minutes before sprinkling with salt and popping sugar. Place in fridge and let chill until hard--about 20 minutes.

Remove from fridge and break into pieces. Serve immediately, or place in an air-tight container and store in refrigerator. (Keep chilled to keep it from melting.)


0

Strawberry Chocolate Chip Granita (the cheater version!)

I used to eat fruity ice pops for breakfast.

At the time, I was living in the former swamp known as Washington, DC, where the summers are thickly humid and impossibly hot. My office was about an 8-minute walk from my apartment, which doesn't sound too bad, but in that thick damp weather it was a challenge trying to find a way to get from my home to my desk without turning into a puddle.

I started out by styling my hair up and wearing the lightest clothing possible. I would forget about putting on make-up until I arrived, since it would all melt off en route anyway. And, instead of coffee, I'd grab an ice pop for the road...enjoying the icy coolness while I walked down the street.

I no longer eat them for breakfast, but as the days heat up, ice pops have become a favorite snack around our home.  A few years ago, I did a sponsored post for Outshine Fruit Bars featuring some fun ways to serve them, and since then, they have become a mainstay in our freezer.

Made with real fruit juice and minimal amounts of additional sugar, they're light and refreshing to cool down at any time of day. Eugene, especially, is a big fan, asking for them the minute there is a hint of warm weather. When I was given the opportunity by Nestlé and ElMejorNido.com to work with them again this Spring, I jumped at the chance.

The only challenge? Keeping Eugene away from the freezer until I could finish my recipe and photographs. I was actually working in LA last week, during which I kept checking in with him via FaceTime.

"You haven't eaten the Outshine bars, right?"

"Ugh...no. They're still there."

While awesome served as-is, I also came up with a fun idea for this summer. Whisked up in a food processor with a few ice cubes, they make for an easy "cheater" version of granita that can be enjoyed with a spoon while watching TV or hanging out in the sunshine.

I stirred in a few of my favorite mini chocolate chips for a chocolate-covered strawberry feel, though you could totally have fun with your favorite mix-ins and flavors. Maybe mango with grated coconut? Or tangerine with chopped pecans.

So many things you can do. Have fun it's (almost!) summer.

GIVEAWAY!
To give you a head-start on your summer fun planning, I'm also giving away a $50 VISA gift card to cover ingredients.

To enter to win, leave a comment below telling me your favorite thing about summer.

Contest ends at 5PM EST on June 1, 2015. US residents only. No purchase necessary. One winner will be randomly selected via random.org, and notified via email.

For additional optional entries (leave a separate comment for each extra entry):

1. Follow me on Instagram (@alwaysalejandra) and leave a comment here saying you did.

2. Share this contest on Twitter, and leave a comment here saying you did. Sample text: "Giveaway! Enter to win a $50 VISA gift card from @nandita and @elmejornido: http://bit.ly/1FdscAC"
3. Share this contest on Facebook, and leave a comment here saying you did.
 4. Pin one of the images from this post to Pinterest, and leave a comment here saying you did.

This post is sponsored by Nestlé and ElMejorNido.com, but all recipes and opinions are 100% my own. For more great recipes and ideas, visit ElMejorNido.com.

0

Pig Candy Popcorn w/ Bacon & Chocolate

bacon chocolate popcorn recipe
Some of you may have seen me post a preview snap of this tempting Bacon & Chocolate Popcorn on my instagram a few days ago, and I'm excited to finally share it with you.

This past weekend, I went up to Vermont to co-host a food and wine retreat with a few chef friends. We ate amazing food, went on local excursions, relaxed in the hot tub, and stayed up late into the night sipping wine and eating s'mores by the bonfire.

Well...at least the guests did. I was in charge of making lunch and brunch each day, after which I usually hung out in the kitchen mixing up cocktails and helping the other chefs with dinner prep.

(Though I did get to sneak away for a couple massages and some much-needed hot tub time, so it wasn't all work!)

bacon chocolate popcorn recipe
I was also in charge of snacks for the ride up to Vermont from NYC. There were 11 of us traveling together in a small private charter bus, and I wanted to make sure all were well-fed for the 6-ish hour drive.

I made several gallons of super boozy daiquiris, baked brownies, whipped up a creamy black bean dip, and popped up a huge batch of this totally addictive Pig Candy Popcorn with Bacon, Chocolate, and Spices.

Homemade popcorn with fun additions is one of my favorites for big groups. This was the hit of the trip, with all the guests passing the tin around the bus. I made about 30 cups of it and it all disappeared by dinnertime.

And no wonder why! The popcorn is popped in rendered bacon fat, then tossed with the crispy bits of bacon, smoked paprika, a bit of cayenne, salt, pepper, and chocolate chips. I like to add the chocolate when the popcorn is still warm so that it melts a bit.

bacon chocolate popcorn recipe
This is messy good deliciousness, and just the thing for summer movie nights or casual parties (seriously...this + champagne is SO perfect together!).

****
Loved this recipe? Here are three other snack recipes you might like:

And let's connect so you can find out the next time I post! Follow me on Twitter, Instagram, or Pinterest, become a fan on Facebook, or sign up to receive my once-a-week e-mail updates.

Thanks so much for reading!


Pig Candy Popcorn with Bacon & Chocolate
Serves 4-6

Ingredients
1 tablespoon vegetable or olive oil
6 slices bacon
1/3 cup popcorn kernals (unpopped)
1 teaspoon smoked spanish paprika
1/4 teaspoon ground cayenne (optional)
1/2 teaspoon ground black pepper
Kosher salt
1 1/4 cups mini semi-sweet chocolate chips

Directions
Place a large and deep heavy-bottomed saucepan over medium-low heat. Add the oil and the bacon and cook for about 7-10 minutes until all the fat is rendered and the bacon is crisp (but not burned). Remove bacon to a paper towel-lined plate and let cool, reserving the fat in the pan.

Raise the heat to medium-high, and add 5 popcorn kernels to the pan. Cook for a minute or two until they pop, then add the rest of the popcorn kernels. Cover and cook, shaking the pan constantly until the popcorn stops popping. (Don’t be tempted to peek while the popcorn is popping—you’ll end up with popcorn everywhere!)

Transfer the popped corn to a large bowl and add the paprika, cayenne, and black pepper. Crumble or chop the cooled bacon, and toss that in, too, along with some season to taste. Toss to coat all the kernels evenly, then add the chocolate chips. Some will melt a bit because of the heat—this is good!

Serve immediately, or let cool and store in an air-tight container for up to 24 hours. (Longer than that and it tends to get a bit stale.)

0

Chocolate Honey Layer Cake with Salted Honey Flour Buttercream & Raw Cocoa Nibs

Chocolate Honey Cake with Honey Buttercream & Raw Cocoa Nibs
My husband Eugene is in a cake club at work. He and a group of other guys in his office pool together money that they then spend on monthly birthday cakes celebrating the guys in the group. The bakery options near his office are kind of limited, so they usually end up buying cakes from a popular financial district bakery called Financier, cleverly named for both the delicious little golden cakes, and their Wall Street clientele.

This month, the birthday boy (David) announced that he was tired of the options at Financier, and so Eugene offered to bring a cake from one of the bakeries in our neighborhood.

While he asked me about the options near us, I noted that if he wanted, I could actually just make them the cake myself. David agreed and sent over a short list of his favorite flavors, including chocolate and honey.

I decided to make a chocolate honey layer cake with honey flour buttercream.

The flour-based frosting is actually one that I'd been wanting to try for a while, and the thing that inspired the recipe. It's kind of an amazing thing as the process is totally different than regular buttercream. Instead, a flour-thickened pudding is made as the base, then cooled and whipped with butter until light and fluffy.

The result is a a super creamy and buttery frosting that's much less sweet than the typical powdered sugar concoctions. Another benefit of the flour buttercream is that it lets you play around with different flavors and infusions.

The original recipe for this honey buttercream came from the Baked cookbook, but, with only 3 tablespoons of honey, I didn't think their recipe had enough honey flavor. I ended up substituting 1/2 cup of the sugar with more honey just to make it super...um...honey-er?

Whatever the word, the results are awesome! If you're a honey-flavored dessert lover, you'll be very much into this frosting.

One other thing I noted is that the flavor actually tastes best at room temperature, so if you refrigerate it, let it warm up on a counter for at least 2-3 hours before serving. It honestly makes a WORLD of a difference.

I also urge you not to skip the finishing touches! The crunchy cocoa nibs work beautifully against the honey flavors of the buttercream and the sprinkle of flaky salt (I love maldon) gives it an added level of flavor reminiscent of salted caramel.

All around, seriously good stuff!

****
Loved this recipe? Here are three other birthday cake ideas you might like:


And let's connect so you can find out the next time I post! Follow me on Twitter, Instagram, or Pinterest, become a fan on Facebook, or sign up to receive my once-a-week e-mail updates.

Thanks so much for reading!


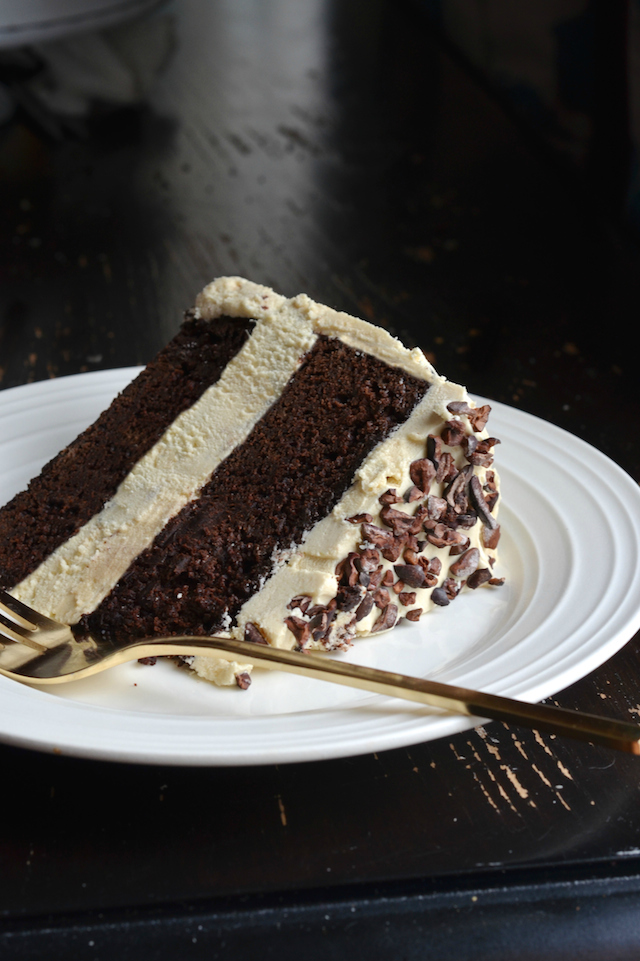
Chocolate Honey Cake with Salted Honey Buttercream & Raw Cocoa Nibs
Makes 1 10-inch layer cake (12-15 servings)

Cake recipe adapted from Epicurious. Buttercream recipe adapted from Baked Expolorations via O Magazine

Ingredients
1/3 cup semi-sweet chocolate chips
1 1/2 cups hot brewed coffee
2 1/2 cups granulated sugar
2 1/2 cups + 1 tablespoon all-purpose flour
1 1/2 cups unsweetened cocoa powder
2 teaspoons baking soda
3/4 teaspoon baking powder
1 1/2 teaspoons kosher salt
3 large eggs, room temperature
1/2 cup honey
3/4 cup butter, melted
1 1/4 cups buttermilk
2 teaspoons vanilla extract

For the frosting

1 cup granulated sugar
1/2 cup all-purpose flour
1/2 cup honey + 1/4 cup honey, divided
1 1/2 cups whole milk
1/3 cup heavy cream
1/2 teaspoon kosher salt
1 teaspoon vanilla extract

Cocoa nibs and flaky sea salt, for garnish

Directions

Make the cake:
Preheat oven to 300 degrees. Grease and line two 10" round baking pans with parchment paper.
In a small bowl, whisk together chocolate chips and coffee. Set aside.

Whisk together sugar, cocoa powder, baking soda, baking powder, and salt until evenly combined.

In the base of an electric mixer beat eggs for 3 minutes until light. Mix in 1/2 cup honey, melted butter, buttermilk, and vanilla, followed by the chocolate and coffee mixture.

Add the dry ingredients and gently mix in just until completely combined. Divide the batter into the prepared pans and bake about 50 minutes to 1 hour, or until a tester inserted in center of cake comes out clean.

Cool layers in pan for 15 minutes, then invert onto racks to cool completely.

Make the frosting:
In a heavy saucepan, whisk together sugar and flour. Add the honey, milk, and heavy cream, and set over medium heat, stirring until ingredients are smooth and evenly combined. Continue to cook over medium-high heat, stirring continuously until sauce thickens and becomes pudding-like (about 12 minutes). Lower heat to low and continue to stir and cook for an additional 2-3 minutes. Remove from heat and stir in the salt and vanilla. Let cool completely at room temperature (about 1 hour).

Once the flour mixture is cool, place the 1 1/2 cups butter in a stand mixer and beat until light and creamy. With the mixer still running, slowly pour in all the flour mixture and continue to beat until it is fluffy and smooth. Add the remaining honey and beat a bit longer until evenly incorporated.

Frost the cooled cakes with the honey buttercream, then decorate the tops with cocoa nibs and garnish with flaky salt. Serve the cake room temperature or store, covered, in the refrigerator. Remove from refrigerator at least 2-3 hours before serving so cake has a chance to reach room temperature (it tastes best at room temp!). Cake can be left unrefrigerated for up to about 6 hours.
Note: Both cake and frosting can be made in advance and refrigerated. Let frosting come back to room temperature before assembling cake.

0

Nigella's Flourless Chocolate Orange Cake

In an interview a few days ago, the reporter asked me if I think of my blog as being more savory or sweet. Because of the name, people always assume it's a dessert blog, but it is not! It's everything. It's savory and sweet and parties and occasionally I'll even give you tips for how to store your jewelry. That whole Always Order Dessert thing is my life philosophy, but it's not the rule.

So I said that technically the blog is actually more savory than sweet. But lately? Lately there has been a whole lotta baking going on around these parts.

Because I'm cold.

I'm SO COLD, you guys. SO cold. I can't deal with winter. It's mean, and it hurts my soul more and more each year. I dream about spending my winters in Miami like old people do, except that I noticed that even in Miami the high today is only about 55 degrees, which isn't even very good.

So I just keep baking, because baking means I can crank up the oven and warm things up a bit. I'm also making lots of soups and braises and things like meatballs in steamy tomato sauce. I can't even handle salad. I've just been pureeing everything. (Arugula soup is a thing and it is good.)

This rich Flourless Chocolate Orange Cake is also a thing and it is also very good (better than arugula soup, if you can imagine). It is the darker, sexier, richer brother to my other favorite Nigella Lawson cake--the clementine almond cake. The recipes are similar, though this one is made with small-ish navel oranges instead of clementines, and (obviously) adds chocolate.

If you're a fan of chocolate + orange together, this is definitely the cake for you.

It comes together easily--you basically just boil the navel oranges for an hour, then puree them (yes, whole--skin and all!) with the rest of the ingredients. Into the pan and the oven, and it's not long before the cake is ready to be served.

I seriously love recipes that can be made almost entirely in a blender or food processor--there's practically no mess, and the whole thing takes minutes. Technology is awesome.

(Well...after the boiling oranges part, but that's a pretty hands-free process in itself.)

Rich and moist, it's a fantastic treat that's just at home ceremoniously placed on the table after an elegant dinner party as it is enjoyed with a mug of afternoon coffee curled up on the couch.

You just can't go wrong with this baby.

Note that a springform pan is important for this recipe. It will make your life MUCH easier. If you don't have one, get one! (This is the one I have.)

There are dozens of springform recipes on this site, so I'll make sure you get lots of use out of it. Promise!


****
Loved this recipe? Here are three other flourless cake recipes you might like:


And let's connect so you can find out the next time I post! Follow me on Twitter, Instagram, or Pinterest, become a fan on Facebook, or sign up to receive my once-a-week e-mail updates.

Thanks so much for reading!


Flourless Chocolate Orange Cake
Adapted from Feast: Food to Celebrate Life by Nigella Lawson

Ingredients
2 small navel oranges
6 large eggs
2 teaspoons vanilla extract
1 cup granulated white sugar
2 cups almond flour (ground almond meal)
1/2 cup unsweetened cocoa powder
1/2 cup semi-sweet chocolate chips
1 teaspoon kosher salt
1 teaspoon baking powder
1/2 teaspoon baking soda
Powdered sugar, for garnish

Directions
Place the oranges in a large pot and cover with water by at least 2 inches. Bring to a boil, then reduce heat and let simmer for 1 1/2 hours, or until the oranges are soft. Remove from water, chop into quarters and place in a food processor or blender.

(Note that navel oranges don’t have seeds; if you use a different kind, you’ll first have to remove the seeds. Everything else—skin, pith, pulp, etc. will go into the recipe.)

Add the eggs, vanilla, sugar, almond flour, cocoa powder, chocolate chips, and salt to the food processor or blender, and puree until very smooth (about 1-2 minutes). Add the baking powder and baking soda, and puree again for 20 seconds or until evenly distributed.

Pour batter into prepared pan, and bake 45 minutes to 1 hour, or until cake is set and a toothpick inserted into center comes out clean.

Let cool in pan for 15 minutes, then run a knife around the edges and remove the sides. Let cake cool completely before transferring to a serving dish.

Sprinkle with powdered sugar before serving, if desired.

0

Lemon Curd Cupcakes + Chocolate Frosting

I'm not sure why the combination of lemon + chocolate doesn't get as much attention as some other chocolate marriages. It's one that I fell in love with a few years ago when reading a novel called The Particular Sadness of Lemon Cake. Not that you asked, but I hated that book with a passion, and I don't recommend it (and am not even going to link to it), but was ultimately thankful to have read it because it got me in the kitchen playing around with chocolate-frosted lemon cake recipes, and that was a very good thing indeed.

It's a surprising mix, that bright tartness of lemon with the deep, sensual bitterness of chocolate. It's two sharp, bold flavors crashing together in a beautifully challenging way. I get that it may not be for everyone, but it definitely is for me.

It's what I had in mind when I made these Lemon Curd Cupcakes with Whipped Chocolate Frosting. I wanted to do something for Valentine's Day, but I was tired of the usual flavors. Chocolate, red velvet, strawberries...all classics, yes, but honestly?

They bore me.

So if you're looking for something a little bit different or more exciting--for the holiday or any other day--give this combination a try.

The cake gets it's flavor and color from lemon curd baked right into the batter. I made my own, but you can easily buy it. It's what I would have done had I not been in a bit of a curd-making binge last week.

It's not swirled or dolloped in, instead it's just stirred right into the batter, making it extra moist and rich. When choosing a lemon curd, go for an opaque buttery one.

Check the ingredients on the label and make sure it's just things like like eggs, butter, lemon juice, and sugar. Skip the ones with cornstarch or weird additives. You want something that tastes tart, not eggy.


For our frosting, we're doing a basic whipped ganache. It's just heavy cream, dark chocolate, and a bit of salt, heated until glossy, then cooled and whipped into fluffy bittersweet submission.

This isn't your usual buttercream, kids.

I added a few heart sprinkles and used red liners because I'm not totally contrarian. Skip them if you are.

****
Loved this recipe? Here are three other lemon recipes you might like:

And let's connect so you can find out the next time I post! Follow me on Twitter, Instagram, or Pinterest, become a fan on Facebook, or sign up to receive my once-a-week e-mail updates.

Thanks so much for reading!  
 

Lemon Curd Cupcakes with Whipped Chocolate Frosting
Yields 12 cupcakes

Ingredients
3/4 cup butter, softened
3/4 cup granulated white sugar
3 large eggs, room temperature
1 cup lemon curd (homemade or store-bought—use a creamy version made with only lemon, butter, eggs, and sugar—no cornstarch)
1 tablespoon fresh lemon zest
1 1/2 cups all-purpose flour
1 teaspoon baking powder
1 teaspoon kosher salt

For the frosting
1 cup heavy cream
3/4 cup semisweet chocolate chips
1/2 teaspoon kosher salt

Directions
Preheat oven to 350 degrees. Line a 12-cup cupcake pan with paper liners.

Cream butter and sugar in an electric mixer 3 minutes. Add the eggs, one at a time, until light and fluffy. Stir in the lemon curd and zest.

In a separate bowl, whisk together flour, baking powder, and kosher salt. Gently stir into batter, just until completely incorporated. Divide batter into cupcake pans and bake 20-25 minutes, or until a tester inserted in center comes out clean.

Remove from pan and let cool completely on a rack.

Make the frosting: combine cream, chocolate chips, and salt in a saucepan over medium-low heat, stirring continuously until smooth and silk. Remove from heat and let cool completely to room temperature. Transfer to an electric mixer, and whip until light and fluffy and doubled in volume (about 2-3 minutes).

Frost cooled cupcakes and decorate as desired.


0
Back to Top