Passion Fruit and Vanilla Bean Pate de Fruit

DSC_0784
In Florence, during the warm months, the chocolate in the candy shop windows is replaced by piles of tiny multi-colored jewels called pate de fruit. These fruit candies--made with fresh fruit puree and soft scoops of shimmering white sugar--are the livelihood of the candy makers who have to find something else to make when the days grow too hot and heavy for chocolate.

My confections instructor, a master chocolatier who cared for little else, would dismiss these gems with a toss of his head, "In the summer, when it is too hot, we make pate de fruit or little shapes of marzipan. It doesn't melt. The tourists buy it. But it is not serious."

And with that verbal sneer, he'd move on to yet another lesson on tempering, pouring out rivers of melted chocolate on the marble work slab, for us to push and scrape and push until it was smooth, shiny, just a shade warmer than the inside of our lip.

DSC_0820


The chocolate was fine, but it was the silly not-serious fruit candies, the ones our instructor had little interest in, that captured my attention. I used to stare at them in the shop windows, and would use any spare dollars I had (not many during those very lean culinary school days) to buy myself a treat or two.

Back home, I've continued the habit of purchasing a few whenever I found them on sale, but I soon grew obsessed with the idea of making them myself. I spent hours researching and comparing recipes, only to discover that there are as many different recipes as there are flavors. I was totally confused, but could wait no longer and decided to just start experimenting. It took a bit (I ran out of sugar twice!), but I finally figured it out.

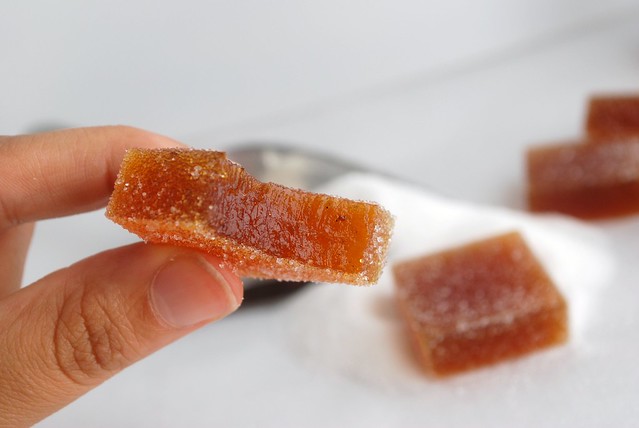
You may already have a favorite, but this is the one that I've found has worked best for me. It produces a candy with the perfect combination of sweetness and acidity, with a chewy, but not sticky texture.

DSC_0810


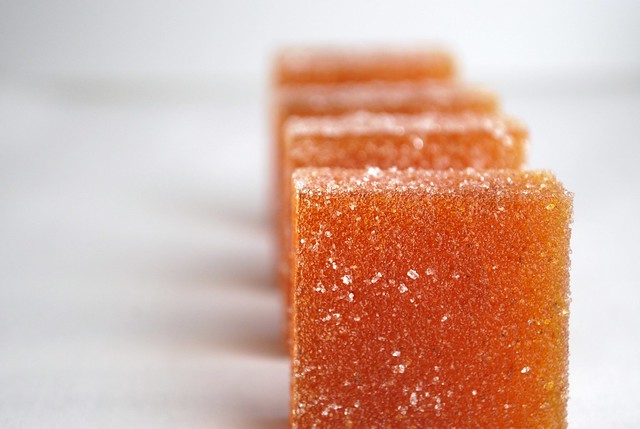
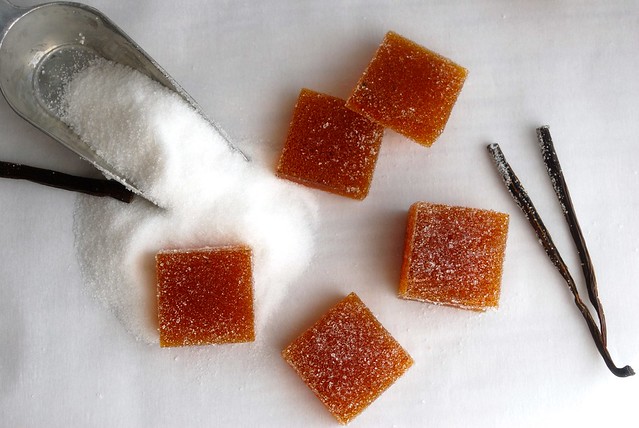
Pate de fruit is essentially a sophisticated gummy candy. A Chuckle, made serious and elegant with pride and natural ingredients, and with a fresh, fruity flavor that far exceeds anything available on the drugstore shelves.

I'll admit right now that it isn't the easiest of confections--like most preserves, it's hot and sticky work, and your arms will feel like jelly long before you're done; Eugene actually stepped in for a few minutes for me, stirring while I did a few stretches and took a quick break. But I don't mean to scare you off as with a bit of patience and a few quirky ingredients, I guarantee you'll be delighted with the results. Considering that in the shops these often go for a dollar or so a piece, they are more than worth the effort. (Plus, hey…it's a free arm workout!)

DSC_0793


I used a kitchen ruler and a rolling cutter to get even squares, but a sugared cookie cutter would also be fun if you'd like to make shapes instead. Or try tipping these in melted tempered chocolate for an even more amazing treat. And if you'd like these extra tart (think sour patch kids kind of tart), you can sift in a bit of citric acid with the sugar you use to coat them in.

It goes without saying that pate de fruit make a fantastic gift or favor; tuck a few into a small box and present tied with a ribbon for a gift that will impress. I haven't met a single person who didn't squeal with excitement upon opening a box of these (my dad included).


****
New to Always Order Dessert? Consider subscribing to my RSS feed, follow me on Twitter, become a fan on Facebook, or sign up to receive my once-a-week e-mail updates by filling in your address in the box on the right. And if you ever need any entertaining or cooking advice, please don't hesitate to e-mail me. Thanks for reading! 


Passion Fruit and Vanilla Bean Pate de Fruit
Most pastry chefs swear by Boiron, a high-quality, albeit expensive, brand of fruit puree available online and in various specialty markets. But I'll let you in on a little secret--you can find frozen fruit purees for just a couple dollars a pack in the freezer section of your grocery store or Latin market. I made this batch pictured here with Goya brand purees. For passion fruit, look out for packages labeled "maracuya" or "parcha."

Ingredients
900 grams frozen passion fruit puree, thawed (such as Goya)
1 whole vanilla bean
1/3 cup plus 2 teaspoons powdered apple or yellow pectin (do not use citrus pectin)
1 cup plus 4 cups granulated white sugar, divided
2/3 cup liquid glucose OR light corn syrup
2 tablespoons lemon juice
Special equipment: candy thermometer

Directions

Line a 12x17" sheet or jelly roll pan with parchment paper (do not use a flat plan; use one that has at least 1" sides on all 4 sides).

Combine the pectin and 1 cup of sugar in a bowl and whisk together thoroughly.

Attach a candy thermometer to a heavy bottomed and nonreactive pot (such as an enamel-coated dutch oven) and place over medium-high heat. Combine the passion fruit puree and vanilla bean in the pot, and bring to a simmer for 3 minutes. Remove the vanilla bean and use a knife to scrape in the vanilla seeds, discarding the pod.

Whisk the vanilla seeds into the puree along with the pectin and sugar mixture, followed by the rest of the sugar and glucose/corn syrup. Whisk continuously until mix reaches 226 degrees F (about 15-20 minutes).

Remove from the heat and stir in the lemon juice. Pour into your prepared mold and let set for 6 to 8 hours.

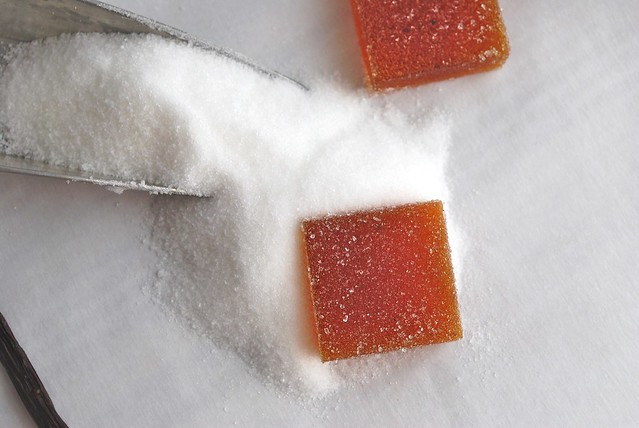
Once set, unmold, cut, and toss in granulated sugar before storing or serving.
Store pate de fruit at dry, room temperature or in the fridge in air tight containers separated with sheets of parchment. If you live in a humid climate you'll find that your candy will start to "sweat" a bit; this is OK and doesn't ruin it. Just dust with more sugar before serving.
These last for about 6 months if stored properly.
0

Homemade Coconut Marshmallows

DSC_1159

Homemade marshmallows are a SUCH a great weekend project (so great that I'm probably going to be tackling another batch on Sunday). They take less than an hour to make--much of which is inactive time spent leafing through a magazine while your stove or mixer does all the work--and then just need a few hours to set.

I'd avoided making them for years because I was terrified that they would turn my kitchen into a sticky, sticky mess (something which I am handily able to accomplish myself without the addition of boiled corn syrup), but I was happily surprised to find that was not the case.  All you really need is one pot, one mixer bowl, and a pan.

Eugene did ask me to point out that our dining table looked like a cocaine lab due to the puffs of confectioner's sugar I kept spilling everywhere during the cutting and photographing process, but that's nothing a damp cloth can't clean up!

And the results...oh the results are SO worth it!

I readily admit that marshmallows are one of my favorite things to eat. As much as I try to avoid packaged and processed foods, marshmallows are the one thing that I will likely never give up--those soft little pillows of vanilla and sugar and sweetness are absolute perfection. I love them a little melted, speared on a fork and held over the flame on my gas stove for a few seconds until they blow up fat and charred. Eugene rolls his eyes when he comes home from work on an average Wednesday to find me, sticky marshmallow in hand, the air in our apartment sprinkled with that faint hint of burnt sugar and summer.
DSC_1127


And then there are times when during a commercial break I drop a few into a mug and pop them in the microwave, watching with fascination through the glass as they blow up five times the size then deflate slowly. I squash them between graham crackers and melty chocolate chips and bring them back to the couch.

The key to making good homemade marshmallows is to start with good ingredients. Vanilla is the star here so you need to make sure it's the good stuff--cheap, artificial vanilla is going to taste exactly like that. Spring for the quality stuff (or better yet, make your own!) and it will definitely pay off. You also need a candy thermometer to make sure the syrup reaches the right temperature; this isn't something you can just eyeball. Candy thermometers are usually just about $10 at the store and can also be used for measuring oil when frying so they're a handy and important kitchen tool to have. (Seriously, if you start frying with a thermometer at hand you'll find your food comes out MUCH better.)

Though the original recipe called for regular old coconut flakes, I used unsweetened dessicated coconut (like this kind, which I get at Whole Foods) with these marshmallows because I think they're sweet enough that they don't need the added sugar. I think the fine texture also worked perfectly and gave it just the right hint of coconut flavor.

DSC_1136


Tip: To cut these, I love to use a pair of sharp and clean kitchen scissors. It snips right through them perfectly without a lot of fuss.

****
New to Always Order Dessert? Consider subscribing to my RSS feed, follow me on Twitter, become a fan on Facebook, or sign up to receive my once-a-week e-mail updates by filling in your address in the box on the right. And if you ever need any entertaining or cooking advice, please don't hesitate to e-mail me. Thanks for reading! 


Homemade Coconut Marshmallows
Adapted from a recipe by Ina Garten

3 packages unflavored gelatin (such as Knox)
1/2 plus 1/2 cup cold water, divided
1 1/2 cups granulated white sugar
1 cup light corn syrup
1 teaspoon kosher salt
1 tablespoon pure vanilla extract (do not use artificial)
1 cup ground unsweetened desiccated coconut
1/2 cup confectioners sugar
1/2 cup cornstarch

To make:

Combine the gelatin and 1/2 cup cold water in the base of an electric mixer and let dissolve. Prepare an 8x13 inch pan by lining the bottom with the dried coconut.

Meanwhile, combine the rest of the water (1/2 cup), sugar, corn syrup, and kosher salt in a medium saucepan with a heavy bottom and high sides. Insert a candy thermometer and let cook over medium heat until the sugar dissovles and the syrup reaches 240 degrees (about 10-15 minutes depending on your stove).

Once the syrup reaches the right temperature, turn the mixer onto low speed and pour the sugar syrup in slowly until it's all in. Raise the mixer to high and let beat for about 15 minutes, or until the mixture is very thick and doubled in volume. Pour in the vanilla extract and mix in thoroughly.

Spread the marshmallow into the prepared pan and used your hands dipped in cold water to spread it evenly. Whisk together the confectioners sugar and the cornstarch and sprinkle over the marshmallows evenly. Let set for at least 4 hours ( I always leave overnight) then cut into cubes using clean and sharp kitchen shears. Dust with more confectioner's sugar and cornstarch and keep in an air-tight container at room temperature.
0

Food and Media Literacy

I was interviewed by The LAMP (Learning About Multimedia Project) about food blogging, social media, and the very important connection between food and media literacy. It's a topic about which I'm very passionate, and was glad to be able to discuss it. I'd love to hear your thoughts on the subject!

I'm going to be co-producing the Best Desserts charity bake-off to benefit The LAMP again this summer, and so you'll definitely be hearing more about them and the important work they're doing in the community over the coming months.

Click here to read the full interview.
0

Bagged Lunch Ideas: Cold Sesame Soba Noodle Salad

DSC_1126
On Friday night, I made a big bowl of this cold soba noodle salad. Seasoned with toasted sesame oil, ginger, garlic, and spicy sriracha, it's a quick and easy dish that can be eaten as a side or as a main course. Soba is a great healthy alternative to standard wheat spaghetti. These Japanese buckwheat noodles are loaded with protein, vitamin B1 and B2, and rutin, a bioflavanoid similar to that found in green tea and red wine--not bad for a huge bowl of pasta!

I personally think that soba tastes best cold, which is perfect because it means you can make it in advance and leave in the fridge for a quick meal whenever you need it. Eugene and I spent most of the weekend digging our fork into the bowl in the fridge, and last night I split the leftovers into two containers so that we could each eat the rest for lunch today.

DSC_1127


This is just a basic recipe for the noodles, but you should use it as a template and spice it up however you'd like. Add pieces of cold chicken or shrimp to make it a heartier entree, or toss in some crisp green beans, sliced almonds, or water chestnuts for added crunch. A shower of minced cilantro would also work nicely here. If you love spice, add a little extra sriracha to the dressing and up the kick (totally what I did!).


****
New to Always Order Dessert? Consider subscribing to my RSS feed, follow me on Twitter, become a fan on Facebook, or sign up to receive my once-a-week e-mail updates by filling in your address in the box on the right. And if you ever need any entertaining or cooking advice, please don't hesitate to e-mail me. Thanks for reading!


Cold Sesame Soba Noodle Salad
Serves 4-6 as lunch entree or side

12-13 ounces soba noodles (Japanese buckwheat noodles)
2 tablespoons sesame seeds
3 tablespoons sesame oil
1 tablespoon low sodium soy sauce
2 teaspoons sriracha or other chili paste
1 teaspoon honey
1 teaspoon fresh ground ginger
1 garlic clove, finely minced
Kosher salt
Black Pepper


Bring a pot of salted water to a boil and cook soba noodles for 5 minutes. Drain and rinse with cold water until cool. Place in a large bowl.

While the water boils, place a skillet over medium-high heat and add the sesame seeds. Toast gently over the heat, moving constantly to keep from burning. Will be golden brown and smell nutty when ready; 1-3 minutes. Remove from heat and set aside.

In a separate small bowl, wisk together the sesame oil, soy sauce, sriracha, honey, ginger, and garlic. Pour dressing over cooled soba noodles and toss to coat evenly. Sprinkle in the toasted sesame seeds, and season to taste with Kosher salt and freshly ground black pepper. Serve immediately or keep covered in the refrigerator for up to one week.


0

Giveaway Winners!

Thank you ALL for entering the Sweet Life in Paris book giveaway. You have no idea how much I loved reading your descriptions of your perfect "Sweet Life." My wish for you is that you all get a chance to experience at least some of what you wish for.

I used Random.org this morning to select three winners. They are:

#28 Susan: "My idea of the sweet life is to retire to the Southern coast of France, to Italy, or perhaps Spain. I lived in Europe for a total of six years of my adult life and would love the opportunity to return. In the meantime, I am taking courses in enology and viticulture, so that, if I were fortunate enough to obtain a property, I could tend a small vineyard and grow vegetables as my grandfather once did (though his garden was in SC, not southern Europe!"

#112 Farealafemme: "I think I already have a sweet life. Living in downtown Charleston with my boyfriend.  Hosting parties where everyone comes together for a relaxed evening of fun. Riding bicycles through the French Quarter in the spring and spending hours at the beach in the summer. And most importantly: learning to appreciate every sweet moment that comes my way."

#71 Andrea T: "My idea of the sweet life is living your passion...doing what you love with people you love that love you back around you."

Congratulations to the three winners! Email me your mailing addresses as soon as you can so that the publisher can send you your prize.

xo

Alejandra

Giveaway: The Sweet Life in Paris

Today I have a special giveaway for you!

I've been given the opportunity to give away three paperback copies of David Lebovitz's book The Sweet Life in Paris, which is a delicious food memoir about David's experiences as an American living and cooking (and eating!) in Paris.

Those of you who read David's food blog will be familiar with his clever prose and seriously (seriously!) awesome recipes. His book brings these together, making it the kind of book you can curl up with, but which will also make you want to get in the kitchen (or at least the nearest French restaurant!).

To win, all you have to do is leave a comment telling me what YOUR idea of living "the sweet life" would be. All entries must be in by 11:59 PM EST, Sunday, March 20th. (That's this Sunday) One entry per person.

On Monday I'll use random.org to pick three winners. Please be sure to use an email address when you comment so that I can easily contact you. The winners' info will then be sent to Broadway Publishers (who are sponsoring the giveaway) and you will receive your copy of the book directly from them. Your email and contact info won't be used for anything else except contacting you if you win.

OK, then...good luck!


****
New to Always Order Dessert? Consider subscribing to my RSS feed, follow me on Twitter, become a fan on Facebook, or sign up to receive my once-a-week e-mail updates by filling in your address in the box on the right. And if you ever need any entertaining or cooking advice, please don't hesitate to e-mail me. Thanks for reading!
0

Say it with cake

DSC_0613

"If you want it badly enough, and are willing to make some changes in your life to cause it to happen, you too can take over the world... or do anything else you really want to do. Yes, you really can have it all. The only things you’ll need to give up are assumptions, expectations, and the comfort zone that holds you back from greatness." Chris Guillebeau
Last week I brought a chocolate cake into work. Not so unusual in my world since I'm always bringing a chocolate something-or-other to the office, but this one was special—two round 10-inch layers of moist, dark chocolate cake filled with chocolate raspberry cream all encased within a thick layer of wavy cocoa frosting. I set it on top of the work station near my desk and sent a message out to everyone in our department letting them know there was cake available. In the email, I noted that the name of the cake was my "special announcement cake."

That got them alright.

Within a few seconds, nearly everyone had come by to find out the news. I pointed to the cake, on which earlier that morning I'd used my pastry bag to pipe out a buttercream message.

“I’m Leaving HMI,” the message said. HMI being short for Hearst Magazines International, where for the past four years I’ve worked as a magazine editor.

My coworkers were surprised—some laughed, some were sad that I was leaving, some took photos with their iPhones. All were excited about the announcement and (naturally) the “paper” on which it was printed. As we sliced the cake, I told them about my plans. I summed them up easily. I simply said, "I'm going to focus on my food thing."

No explanation needed. Everyone seemed to know. And of course! For they've stood by for the past four years, eating my cakes, reading my blog posts, granting me days off so that I could moderate panels at food blogger conferences, attend special tapings of the Martha Stewart show, and get my photo taken for magazine articles about me. They've sent me links to Food Network casting calls, and asked me for help with meatloaf recipes. And when I told my bosses (a couple days earlier with a proper meeting and computer-typed letter, not just cake frosting), they guessed before I said it and were supportive, understanding, and not the least bit surprised.

DSC_0610


So now you're the only ones left to tell. (And, I have to say, the ones I've been most excited to share this with.) Starting around 5:01PM on April 1st, I will officially make the move to self-employment, exchanging the security of a steady paycheck and fancy job title for the opportunity to pursue the dream that’s been slowly growing and forming and crystallizing in my head for the past several years.  I'm leaving the comfort zone (which, less face it, has grown increasingly less comfortable the more I realized what I really wanted out of life) and am going for greatness.

When I started this blog a little over three years ago, I had an inkling. I knew my passion and I knew that there was something else, something more, that I was meant to be doing.  I didn’t realize it at the time, but starting this blog was the thing that ultimately helped me figure this out. Through this blog I’ve found my voice, I’ve developed my skills, and I’ve met people and received opportunities that have now made this next step possible.


My plan for now is this: As of April 4th I’ll be blogging 5 days a week, Monday through Friday, here on Always Order Dessert. The focus will continue to be original recipes, but with added content—entertaining ideas, inspiration boards, bagged lunch ideas, cookbook reviews, and video tutorials (and lots of other things I dream up along the way).  Instead of a part-time hobby, I'll be treating this blog like a full-time job; I'll be spending my days developing and testing recipes, improving my photography skills, writing, editing, and constantly bringing you new and inspiring content. A few months ago, I was talking about my blog with someone who had asked me about my traffic. I responded with my not-so-shabby numbers and added, “imagine what they would be if I could do this full-time!” With this move, I plan to find out.

Along with the blogging, I’ll be freelancing for both print and web with a focus on food and lifestyle article. I have a few things already in the works, but am of course open to more. (If you have any opportunities or ideas, please send them my way!)

I'm also going to finally (!!!) finish that book proposal that I have started and thrown out and restarted at least half a dozen times over the past two years. I sometimes kick myself that this has taken so long, but I’m also a very big believer in timing and I know that the only reason why I haven’t felt completely satisfied with what I’ve written yet is because the time has not been right. Each time I go back and revise or start totally from scratch, I get a little closer to finding my book--the one I'm meant to share with you.

And (as if that weren't enough), I'm also working on a couple special projects that I'll be sharing with you all in the coming weeks.

It's a lot, and I know I'm going to be working longer and harder than I ever have before in my life, but it's the work that I want to do, and I know that it will ultimately pay off.

I have so much more to say about this change. So much to say about the people who inspired me to just go for it, the ideas that I've been working on, and the people who have made this possible, but I think that all deserves its own post.

Stay tuned, and for now, have some cake.


****
New to Always Order Dessert? Consider subscribing to my RSS feed, follow me on Twitter, become a fan on Facebook, or sign up to receive my once-a-week e-mail updates by filling in your address in the box on the right. And if you ever need any entertaining or cooking advice, please don't hesitate to e-mail me. Thanks for reading! 


Dark Chocolate Layer Cake w/ Chocolate Raspberry Filling
Adapted from Gourmet Magazine, March 1999 (via Epicurious)

Ingredients
For the Cake:
4 ounces bittersweet baking chocolate
1.5 cups hot brewed espresso
2 cups granulated white sugar
2.5 cups all-purpose flour
1.5 cups unsweetened cocoa powder (I used Hershey's)
2 teaspoons baking soda
3/4 teaspoon baking powder
1 tablespoon Kosher salt
3 large eggs, room temperature
3/4 cup grapeseed oil
1.5 cups light buttermilk
1 tablespoon vanilla extract

For the chocolate raspberry filling:
1/2 cup unsalted butter, room temperature
1/4 cup milk, room temperature
1 teaspoon Kosher salt
1 teaspoon vanilla extract
1 pound confectioners sugar
3 oz semi-sweet chocolate
1/2 cup seedless raspberry preserves

For the frosting:
3 cups confectioner's sugar
2/3 cups unsweetened cocoa powder
1/2 cup unsalted butter, room temperature
6 tablespoons whole milk
1 teaspoon Kosher salt
2 teaspoons vanilla extract


Directions:

First make the cake:
Preheat oven to 300°F. Grease and flour two 10" round pans
  
Finely chop the chocolate and place in bowl. Pour hot espresso over the chocolate and stir until completely melted and smooth. Set aside.
  
Into a large bowl sift together the sugar, flour, cocoa powder, baking soda, baking powder, and salt. In another large bowl with an electric mixer beat eggs until thick and pale yellow. Add the oil, buttermilk, vanilla, and melted chocolate mixture to eggs, beating until combined. Add sugar mixture and beat on medium speed until just combined well. Divide the batter between pans and bake about 1 hour to 1 hour and 10 minutes or until a tester inserted in the center of the cake comes out clean.
  
Invert cakes onto racks and cool completely.

Make the filling:
In the base of a mixer, cream together the butter, milk, salt, vanilla extract and confectioners sugar until fluffy. Beat in the melted semisweet chocolate. Fold in the raspberry preserves until evenly distributed. Cover with plastic wrap and let chill until ready to use (rewhip if necessary before filling cake).

Make the frosting:
In the base of a stand mixer fitted with the paddle attachment, beat together about half of the confectioner's sugar, the 2/3 cups cocoa powder, 1/2 cup butter, half of the milk, the salt, and the vanilla extract until fully combined and creamy (about 5 minutes). Slowly beat in the remaining confectioner's sugar and milk, and continue to beat for about 5 more minutes until smooth and fluffy. Use immediately to frost cooled cake, or cover tightly with plastic wrap

To Assemble:
Place one layer of the cake on a serving dish. Use a pastry bag or zip-loc with the end cut off to pipe a one-inch ring of frosting around the cake. Fill the center with the filling (you may have extra). Top with the second layer of cake. Frost the cake entirely. Keep cake chilled before serving and store leftovers in the refrigerator.
0

Bagged Lunch Ideas: Black Bean, Corn, and Red Pepper Salad Wraps

DSC_0631
At Monica's engagement party in Baltimore the other day, I fell in love with a wonderful black bean, corn, and pico de gallo dip made by Monica's cousin Danielle. This thing was so good that I seriously I parked myself near the table and spent most of the night shamelessly scooping it up with salty tortilla chips. I ate about 1/2 the bowl when I had to stop since the chips had run out.

Ever since we got back to New York, I've had the combination on my mind and knew that I wanted to recreate something similar  I could eat for lunch at my desk.  I came up with the idea of turning the dip into a wrap that can be easily constructed right at my desk.

DSC_0626
DSC_0632

As a bagged lunch, the concept is simple--first you toss together the filling--an easy bean salad that can be made in advance--and then you pack up a portion of it topped with a generous sprinkle of shredded cheese. A whole wheat tortilla or wrap is rolled up and brought along separately. Come lunch time, you simply place your container of bean salad and cheese in the microwave for 30-45 seconds--just long enough to melt the cheese--and then scoop it all into the tortilla. Roll and enjoy at your desk or wherever you normally eat lunch. Preparing it this way protects the integrity of the tortilla, keeping it so that it doesn't get soggy sitting in your lunch bag all day.

I actually also eat this for breakfast sometimes--it's a great way to get a little protein in the morning when you're sick of eggs. The salad can, of course, also be eaten on its own, or served for dinner along with accompanying garnishes.

DSC_0622

A few notes about this recipe:
  1. Since it's winter, I used frozen bagged corn that I steamed before adding to the salad. But when corn is in season in a few months, I will definitely take advantage of the amazing fresh corn available and use that. Just know that both options are OK. (I wouldn't recommend canned; canned corn always tastes metallic to me--not good ever, but especially not when it's the star player.)
  2. Be sure to rinse your canned beans well before using; it gets rid of excess sodium and that stinky sludge at the bottom of the can. I just toss mine into a mesh strainer and run under cold tap water for a minute or so until the beans are clean without any of that inky sauce left on them.
  3. The southwest influences in this recipe scream for black beans, but if you don't have any or need to use up another variety! I bet navy, pinto, or even black-eyed peas would be awesome in it! 
DSC_0630


Click for more original Bagged Lunch Ideas!

****
New to Always Order Dessert? Consider subscribing to my RSS feed, follow me on Twitter, become a fan on Facebook, or sign up to receive my once-a-week e-mail updates by filling in your address in the box on the right. And if you ever need any entertaining or cooking advice, please don't hesitate to e-mail me. Thanks for reading!


Black Bean, Corn, and Red Pepper Salad Wraps
Assembling these just before eating help the wrap from getting soggy. It's not required, but definitely recommended!

Ingredients:
2 cans low-sodium black beans, drained and rinsed well until water runs clear
2 cups cooked corn kernels (fresh or frozen is fine!)
2 small jalapeno peppers, seeded and diced
1 small yellow onion, diced
1/2 cup roasted red pepper, drained and chopped
2 cloves garlic, minced
3 tablespoons olive oil
Juice of two fresh limes (about 2 tablespoons)
1 teaspoon your favorite hot sauce (I recommend Chipotle tabasco--adds a great smokiness!)
Salt and pepper

For Serving:
flour tortillas (I like whole wheat)
shredded Cheddar or jack cheese
Fresh cilantro, washed with heavy stems removed, chopped coarsely


Directions:
In a large bowl, combine the rinsed and drained black beans, corn kernels, diced jalapeno, diced onion, and roasted red pepper. Toss to distribute evenly and set aside. In a small bowl, whisk together the minced garlic, olive oil, lime juice, and hot sauce. Pour dressing over bean mixture and toss to coat. Season with salt and black pepper. Store in an air-tight container in the fridge.

To serve, cover portion with shredded cheese and heat in microwave (or toaster oven) just until the cheese melts. Scoop into flour tortilla and top with fresh cilantro.
0

5 Incredible Pancake Recipes for Pancake Day


Forget Mardi Gras! Did you know today is also known as National Pancake Day
 
Pancakes became popular on this day as people found they were the perfect way to use up butter, eggs, milk, and other rich and fatty foodstuffs that couldn't be consumed during the Lenten season. This pancake eating tradition is still alive and well in the UK and other parts of the world, and I can't think of a more delicious holiday!

This definitely calls for a celebration so whip out your griddles and try one of these five delicious and original pancake recipes for dinner tonight:

  • Some might say Blueberry Buttermilk Pancakes are the queen of the pancake kingdom. Kicked up with hints of citrus and almond, these are fluffy, sweet, and bursting with juicy berries. Add some bacon and you've got a meal fit for royalty. Plus troubleshooting tips and advice to make sure your pancakes come out perfect every time! 
  • Whole Wheat & Cinnamon Hotcakes are not only a great source of whole grains; they also rise up like no other pancake recipe I've ever made and are practically foolproof! Serve them up with a side of sauteed apple slices for a tasty Pancake Day treat.
  • Orange Ricotta Pancakes give a whole new spin to the usual savory cheese. Combined with orange zest, stiffly beaten egg whites, and a minimal amount of flour, these pancakes puff up like little souffles and are sure to give your favorite cheese danish a run for her money. (These are my favorite!)
  • Serve a crowd with this fluffy Dutch Baby Pancake topped with Cinnamon Orange Syrup. I call these "lazy pancakes" as all you have to do is pour the batter in a skillet and let the oven do the work. Finally! A pancake that the cook can enjoy with the rest of the family! ;)
  • Or go international with a batch of delicious Danish filled pancakes known as Aebleskiver! My recipe for Cream Cheese Aebleskiver is delicious as breakfast or a snack. And if you don't like cream cheese, you can substitute jam, dulce de leche, applesauce, or any number of delicious fillings!

Happy Pancake Day, everyone!


****
New to Always Order Dessert? Consider subscribing to my RSS feed, follow me on Twitter, become a fan on Facebook, or sign up to receive my once-a-week e-mail updates by filling in your address in the box on the right. And if you ever need any entertaining or cooking advice, please don't hesitate to e-mail me. Thanks for reading! 
0

On My Cookbook Shelf

Today I want to share a handful (really more of a stack) of cookbooks that I’ve been loving over the past few months. Some are old and some are new, but they’re the ones that I’ve been referring to (or simply reading for enjoyment) the most lately.

Miss Dahl’s Voluptuous Delights
Girly pink and filled with lush food photos and a seasonal narrative about Sophie Dahl’s rise as a curvy model (and consequent battle with food and diet), this book became an instant favorite. The recipes are healthy without hitting you over the head about it, which is always a relief as I don’t ever like being told what to do (especially not by former models). Instead, they are just so good that you can’t help but run out to the market to fill your grocery basket with vegetables and nubby whole grains. The book is divided into seasons, with dishes that perfectly match the days and weather—exactly my kind of eating.


A Year in My Kitchen
I got back from my honeymoon to find a review copy of this book sitting on my desk. I’m so glad the publicist decided to send it to me as it’s definitely not one I would have thought to pick up on my own, but which I certainly would now that I know about it. Reminiscent of Nigel Slater’s The Kitchen Diaries, but a bit cleverer and practical, A Year in My Kitchen is a toolbox of dreamy simple recipes, techniques, and flavorings that the author combines over and over again in a multitude of unexpected ways. It’s reflective of the way we really cook—with a handful of flavors and tricks that never fail, but which can become something surprising when combined in a new way.


Good to the Grain
After seeing this book written just about everywhere for months, I finally went out (Borders 40% off coupon in hand) and got myself a copy. This book is a treasure-trove for those of you looking to incorporate more whole grains into your diet—or simply curious about how to use some of the more unusual flours available out there. (Amaranth? Teff? Spelt?) I’ve been guilty of causing a traffic jam in the baking aisle at Whole Foods on many occasions—I stand there mesmerized by the flours, restraining myself from buying them all. (I also often fantasized about one day being gifted a dozen “flours” like in the movie Stranger than Fiction—Eugene, take note!). And don’t worry; it’s not JUST weird flours—there are plenty of recipes for whole wheat, rye, and corn.


The Comfort of Apples
A cookbook filled solely with apple recipes seems like it would grow old quickly, but this one is a keeper! Filled with sweet and savory ideas for all parts of the meal (garnishes, sauces, and drinks included!), I found myself excited to pick up a huge batch at the farmer’s market and get to work. One of my favorites in the book is the apple tzatziki—an idea so clever it literally made me angry that I hadn’t thought of it first.


How to Repair Food 
This cleverly written little volume lives up to its name. No matter what ill befalls your recipe, this book will help you fix it (and better yet—prevent it next time). More than just a reference manual, it’s written in an amusing and colloquial tone that will make you want to sit and just read the whole thing right through. Smaller than a drugstore paperback, it’s the perfect size to tuck on the counter right next to the salt and pepper. Keep it close at hand and never worry about ruining a recipe ever again.


The Farmer’s Wife Slow Cooker Cookbook
I pulled this from the $2 bargain bin at a discount store a few months ago and am so glad I did (even though Eugene totally gave me one of those “Really, Alejandra?” kind of looks when I hopped out of the checkout line to grab it). It’s seriously the coolest concept—vintage recipes from the old Farmer’s Wife magazine (dating back to the late 19th and early 20th century) revamped to be made in a modern-day electric slow cooker. Awesome, right? The book is laced with little stories and clips from the vintage magazines, and each of the recipes is attributed to the farm wife who submitted it oh-so-long ago. I own several slow cooker cookbooks, but this is seriously the only one that gets me excited to pull out that dusty old thing.


Your turn! Any lovely cookbooks been gracing your kitchen lately?

****
New to Always Order Dessert? Consider subscribing to my RSS feed, follow me on Twitter, become a fan on Facebook, or sign up to receive my once-a-week e-mail updates by filling in your address in the box on the right. And if you ever need any entertaining or cooking advice, please don't hesitate to e-mail me. Thanks for reading! 
0

From Scratch Rum Cake Recipe (Homemade Tortuga Rum Cake Copycat)

From Scratch Rum Cake
My recipe for Homemade Rum Cake started with a shopping spree at TJ Maxx. See...sometime back in November I made the mistake of buying a tiny box of Tortuga rum cake that I saw on sale at our nearby store. It looked tempting, so I brought it home and opened the box for a small taste of cake before dinner.

And it was incredible!

Eugene witnessed my minor freak-out as I raved over the moist, golden rum cake studded with a tiny sprinkle of crushed walnuts. Before I knew it, I had eaten the entire cake and was walking around the room with a happy buzz.

Homemade Scratch Rum Cake Recipe
The next day after work, I returned to TJ Maxx and bought two more rum cakes--full-size this time. I proceeded to spend the next few weeks eating rum cake every night, returning to TJ Maxx regularly to replenish my supply. On one visit I finally realized that it would make more sense to just buy every cake they had left in stock (yes, this "made sense" to me)...so I did. I was so excited about the prospect of bringing home all these cakes that it didn't even occur to me to be embarrassed as I walked to the register with a tower of 8 rum cakes balanced in my arms.

"These are really, really good," I told the bemused cashier.

That was at the height of my wedding planning, and I credit a steady diet of nightly rum cake with helping me keep my sanity. (Miraculously, I still managed to lose quite a bit of weight pre-wedding; this may have to do with the fact that I was essentially replacing dinner with cake.)

Moist and golden homemade rum cake
When I got back in January, the first thing on my agenda was recreating this cake at home. I searched the Internet for recipes, but all the ones I found relied on a combination of boxed cake and pudding mixes.  I wanted to make rum cake from scratch, without bags of powdery substances. I finally found one recipe that was all from scratch except for the pudding mix (this, I’m sure you’ve guessed, is what led me to my recipe for homemade vanilla pudding mix). Not perfect, but definitely a start!

After a few trials and errors, I figured it out; I adjusted the original homemade rum cake recipe slightly, and then replaced the packaged pudding mix called for in the recipe with a cup of my own homemade pudding mix (essentially a combination of powdered milk and cornstarch). I pulled it from the oven, poured on the syrup, and waited anxiously until morning to see if it worked.

From Scratch Rum Cake Recipe
The results were brilliant!

The buttery rum syrup soaks evenly throughout the cake and leaves you with a moist, soft, golden cake speckled with flecks of vanilla bean. The texture of the cake is absolutely perfect—soft and springy without being spongy. Since the ingredients are all whole and from scratch, it lacks the artificial flavor undertones of the "semi-homemade" version.

The batter comes together easily, with not that much more effort than a cake mix, but the results are infinitely better.

The rum both in the cake and the syrup can be adjusted according to your tastes. If you’re trying to recreate the Tortuga cake (the one in those hexagonal yellow boxes found in the airports all along the Caribbean—and TJ Maxx), I recommend getting a bottle of Tortuga rum, which can be found in various places online.

You can also use infused or spiced rums such as Bacardi Coco or Captain Morgan’s, but I honestly prefer the simplicity and rich flavor of a good dark aged bottle (like Bacardi Anejo).
From Scratch Rum Cake Recipe

Want more Puerto Rican holiday recipes? Check out my eCookbook: The Puerto Rican Christmas Table with 40+ recipes and full-color photos. Click here to learn more!

****
New to Always Order Dessert? Consider subscribing to my RSS feed, follow me on Twitter, become a fan on Facebook, or sign up to receive my once-a-week e-mail updates by filling in your address in the box on the right. And if you ever need any entertaining or cooking advice, please don't hesitate to e-mail me. Thanks for reading!


From Scratch Rum Cake Recipe (Tortuga Rum Cake Copycat)

Recipe by Alejandra Ramos | AlwaysOrderDessert.com
A recipe for homemade from-scratch rum cake made with no boxed mixes. Similar to Tortuga Rum Cake. The best from-scratch rum cake recipe!

5 stars
Prep time: 10 minutes
Cook time: 55 minutes
Total time: 1 hour 5 minutes
Yield: 10 Servings
Ingredients
  • 1/2 cup crushed walnuts
  • 1 1/2 cups granulated white sugar
  • 1/2 cup unsalted butter
  • 3 tablespoons + 1/2 cup vegetable oil
  • 1 3/4 cups all-purpose flour
  • 1/4 cup cornstarch
  • 4 teaspoons baking powder
  • 1 teaspoon kosher salt
  • 1 cup DIY Vanilla Pudding Mix (Click here for my easy pudding mix recipe or substitute one 3.4oz box of store bought pudding mix)
  • 3/4 cup whole milk
  • 4 large eggs
  • 3/4 cup dark rum
  • 1 tablespoon pure vanilla extract
For the Rum Syrup:
  • 1/2 cup unsalted butter
  • 1/2 cup water
  • 3/4 cup granulated white sugar
  • 1 teaspoon kosher salt
  • 1/2 cup dark rum 
Directions 
1. Preheat oven to 325 degrees. Grease and flour a bundt pan, and drop crushed walnuts into the bottom of the pan. Set aside.

2. In the base of a mixer, cream the 1 1/2 cups granulated sugar and the 1/2 cup butter. Add the 3 tablespoons oil, flour, cornstarch, baking powder, and kosher salt combining until evenly distributed. (Mixture will look like fine crumbs.) Mix in the pudding mix.

3. In a separate bowl, whisk together the eggs, milk, rum, vanilla extract, and remaining vegetable oil. Add to the dry mixture and mix well until combined. The batter will be smooth, thin, and pour easily.

4. Pour into the prepared bundt pan and bake for 50 to 60 minutes, or until a tester inserted in the cake comes up clean.

5. Let cool in pan for 10 minutes, then invert onto a rack. Let cool for 20 to 30 minutes.

6. While the cake cools, prepare the rum syrup: In a large saucepan with high sides, combine the butter, water, granulated sugar, and salt. Cook over medium heat until the butter completely melts and the sugar dissolves. Let reduce slightly, keeping an eye on it so it doesn’t boil over. Remove from the heat and stir in the rum (it will bubble).

7. Wash and dry the bundt pan, then place over the cool cake and invert the cake back into the pan. Pour the hot rum syrup all over the cake and let soak for 8 hours (overnight). In morning, invert the cake back onto a serving platter.

Keeps covered for 1 week at room temperature.
0
Back to Top