Flourless Pistachio Oatmeal Muffins (Gluten-Free)

After a few weeks of heavy recipe testing for a client of mine, I ran out of all-purpose flour and sugar earlier this month. The large glass jars that usually sit on my counter have been empty for weeks, begging to be refilled, but for some reason, I've gone through three grocery orders, each time forgetting to get the flour and sugar.

I'm not sure why this is. Some kind of weird mental block, and instead of properly remedying it (you know...like by walking the three blocks to the grocery store), I've decided to use it as an opportunity to play around with flourless recipes like these amazing Flourless Pistachio Oatmeal Muffins.

All the better for you, my gluten-free friends!

This recipe actually does use a kind-of homemade oat "flour" made by grinding up some gluten-free oats in the food processor or blender. If you're sensitive to oats, you can replace this amount with something like rinsed and dried quinoa or a course cornmeal. I think dessicated shredded coconut could work, too, although that would add a bit of coconut flavor (not necessarily a bad thing!)

The base (and delicious intoxicating pistachio-y flavor) of these Pistachio Oatmeal Muffins comes from pistachio paste, which is one of my favorite baking ingredients (I used it to make these pistachio blondies, too!).

It's an ingredient that's similar to almond paste, but oilier, and comes in a can. It's made from pureed pistachio pralines, so it's already sweetened, and adds amazing flavor to just about any recipe.

Combined with eggs and oats, it makes for wonderfully moist and fragrant little pistachio cakes.

If you're a fan of desserts like financiers or dense chocolate tortes, I think you'll like these, too. I love that they're light enough to enjoy for breakfast as a muffin, but could also be dressed up with some powdered sugar or a dollop of whipped cream and berries for a really lovely dessert.

They are just the perfect amount of sweet for those days when you want a little touch of something decadent, but aren't in the mood to go full-out. It's weekday-decadent!

****
Loved this recipe? Here are four other flourless cake recipes you might like:

And let's connect so you can find out the next time I post! Follow me on Twitter, Instagram, or Pinterest, become a fan on Facebook, or sign up to receive my once-a-week e-mail updates.

Thanks so much for reading! 


Flourless Pistachio Oatmeal Muffins (Gluten-Free)
Yields: 6 giant or 12 standard muffins

Ingredients
1/2 cup gluten-free rolled oats
1 teaspoon baking powder
1 11oz can pistachio paste (such as Love n’ Bake; about 1 1/4 cups)
4 large eggs
1 teaspoon kosher salt
1/2 teaspoon almond extract (optional)


Directions
Preheat oven to 350 degrees. Generously grease a 6-cup “texas size” muffin pan, or a standard 12-cup muffin pan.

Grind the oats in a  food processor or blender until coarsely ground into a powdery “flour.” Whisk with baking powder, and set aside.

Combine pistachio paste, eggs, salt, and extract (if using) and beat in an electric mixer until smooth and evenly combined (about 5 minutes). Stir in the oats just until combined.

Divide batter into muffin tin, then bake 15-22 minutes, or until puffed, slightly brown around the edges, and completely set in the center. Remove from oven and let cool in pan 5 minutes before turning out. Let cool completely on rack or serve slightly warm.

0

A Fruity Winter Brunch

Over the past few years, I've found that January and February have become two of my favorite months for entertaining. The buzz and expectations of the holidays have died down, and created the perfect opportunity for relaxed and cozy gatherings with friends.

No need to worry about things like gifts or decorations or even elaborate recipes; it's now just about simple, good things to eat in the company of your loved ones. What could be better than that?!

It's also a great opportunity to reinforce new friendships or connections made during the holidays.

Did you, for example, meet a cool couple at a dinner party? Or chat with a colleague from a different department at the office holiday luncheon?

Why not reach out now and invite them over for a casual brunch at home? In the spirit of the New Year, it's the perfect time to create new experiences and relationships. It could mean the difference between creating an awesome new friend, or just fading off and never talking again.

(I KNOW you know what I mean!)

I was recently inspired to do just that, thanks to the help of Simply Beverages.

I've long been a fan of their lemonade and orange juice, so when they asked me to collaborate with them on a sponsored post featuring their new line of refreshing, all natural fruit juice drinks in three flavors (Mixed Berry, Tropical, and Fruit Punch), I jumped at the chance! I knew it would be the perfect start for a fun winter brunch party menu to share with all of you.

Since January is the time of year when many folks like to swear off alcohol or make other healthier choices, I used the juice drinks to create three beautiful and refreshing "mocktails," just by adding some fun and simple garnishes.

No need to be a fancy mixologist!

Made with real fruit juice, these drinks already taste fantastic on their own, which means all you need to do is pour them into a pretty glass, add a few simple touches, and you have something that looks gorgeous and elegant, with barely any additional effort!

Using the juice drinks as inspiration, I created an easy party menu celebrating bright, fruity flavors. Along with the beverages, I created a simple brunch spread featuring mini bite-sized quiches, fresh citrus and berries, croissants, and warm crusty cranberry walnut bread served with soft cheeses.

For dessert, I served a plate of pretty raspberry cupcakes garnished with sparkly sugar and fresh mint!

Instead of fancy decorations or flowers, I decorated the table with some simple succulent plants in small pots. Super easy, pretty, and the perfect wintery touch (don't they look almost like tiny pine trees?!) After the party, you can send each of your guests home with one of these, or keep them to decorate your home (they last forever and are SO easy to care for).

Simple, colorful, and the perfect backdrop to an afternoon of chatting and snacking with friends both old and new!

Below are tips on how I dressed up my beverages. Just because there isn't any alcohol, doesn't mean you should skimp on the special touches! A simple, delicious juice + some fresh garnishes = a perfect beverage to serve party guests.

1. Mixed Berry Sippers
I added freshly washed raspberries and blueberries to tall flute glasses, then topped it off with chilled Simply Mixed Berry Juice Drink.


A simple garnish of fresh mint finished it off!

Note that you can prepare these in advance, or leave out bowls of fresh berries and mint so that your guests can personalize their own beverages.

2. Tropical Sparklers
The sweet Simply Tropical has delicious fruity hints of mango and pineapple that worked beautifully with some fresh lemon juice.

I served them in sparkly sugar-rimmed coupe glasses that I made by rubbing the edges with a bit of honey, then dipping into a shallow bowl of sugar.

A squeeze of fresh lemon juice and bit of lemon rind garnish completed the drink. If you'd like it fizzy, you can also add a bit of soda water right at the end!

3. Fresh Cherry Fruit Punch
Simply Fruit Punch is definitely my favorite of the three new flavors!

Made with all natural ingredients and real sugar, it tastes like a fresher, more sophisticated version of the kind we drank as kids.

To highlight the cherry flavors in the punch, I added fresh cherries and thin lime slices to my glass.

I also used giant ice cubes (made with a special silicon mold) to keep the drinks ice cold without watering them down. It adds an easy, but unexpectedly elegant touch that your guests will love.

I hope these ideas inspire you to do the same at home! To learn more about these new juice drinks or to get more serving ideas, visit the Simply Orange page on Facebook. And let me know in the comments...which of these flavors would you like to try first?


This is a sponsored post on behalf of Simply Beverages, however, my opinions, recipes, and ideas are totally my own. I only work with companies that I genuinely use and love. Thanks to them--and you!--for making all this possible.
0

Chickpea & Chorizo Soup

This simple Spanish-style Chickpea & Chorizo soup is a favorite at our house, making an appearance at least once a month (if not more!) during the chilly months.

While the base recipe--what I've shared with you here--is always the same, I also love to bulk this up with other goodies found in the fridge.

Some of my favorite additions include wilted kale or spinach, diced turnip or butternut squash, shrimp, kidney beans, and even chunks of creamy diced avocado floated on top just before serving. It's endlessly adaptable, and always satisfying.

The recipe starts off simply--sliced Spanish-style chorizo sauteed with onions and garlic until fragrant.

Then you add some rinsed canned chickpeas, tomatoes, a few spices, and chicken broth, and let the whole thing simmer for about half an hour or so. 

And that's really it! Serve it up right away, or divide into batches for lunch tomorrow. This thing can be heated and reheated half a dozen times, and it always tastes fantastic.

(A chunk of crusty bread is optional, but definitely recommended.)

****
Loved this recipe? Here are three other easy soup recipes you might like:


And let's connect so you can find out the next time I post! Follow me on Twitter, Instagram, or Pinterest, become a fan on Facebook, or sign up to receive my once-a-week e-mail updates.

Thanks so much for reading! 


Chickpea and Chorizo Soup Recipe
Serves 4

Ingredients
2 tablespoons olive oil
1/2 pound Spanish-style cured chorizo, sliced
1 large onion, diced
3 large garlic cloves, crushed
1 tablespoon smoked Spanish paprika
1 teaspoon ground cumin
1/4 teaspoon ground cayenne (optional)
2 15oz cans chickpeas (preferably low sodium), drained and rinsed
1 36oz can whole tomatoes
1 quart low sodium chicken broth
Kosher salt and black pepper

Directions
Heat the olive oil in a large pot over medium heat. Add the chorizo and onion, and saute until the chorizo is slightly crisp, and the onion is soft. Add the garlic, paprika, cumin, and cayenne, and stir to combine well. Add the chickpeas, tomatoes with their liquid, and broth. Bring to a boil, then lower heat and let simmer about 20 minutes or until broth has reduced slightly.

Season to taste with kosher salt and black pepper, and serve.
0

Maialino's Orange Olive Oil Cake

I've been wanting to bake this olive oil cake for a while now. At least a year, if not more, and since January is the month when we do all the things we've been meaning to do, here it finally is!

This is my attempt at the famed citrus olive oil cake from Maialino, a restaurant here in New York City. It's one of those simple, but gorgeous restaurant desserts that people can't help but fall in love with, and then tell everyone about.

It's the kind of thing a celebrity might list as one of her favorite things about New York. She'll say something like "Walking around early on a Sunday morning when everyone is still sleeping and the olive oil cake at Maialino." It's the kind of cake that people will post a picture of on Instagram, and then all their friends will comment "oh I LOVE that cake!"

Dense, almost pudding-like, with a tight, wet crumb, this is exactly the sort of cake I love more than anything else. The top is dark and almost caramelized, while the inside is somewhere between gold and olive.

If you squeeze it, you can feel the oil, but it's not oily. I'm actually amazed by how well this cake holds all that richness.

Fragrant with citrus and a hint of bitterness from the zest, it's beautifully addictive. I spent most of my Saturday slicing myself one very thin slice after another (after, yet another).

At the restaurant, they serve this with whipped mascarpone, but I love it with creamy fresh ricotta. Homemade if you can do it, or buy the good stuff from the gourmet shop.

Unsweetened whipped cream would be nice, too. Maybe even tangy creme fraiche.


I wouldn't do normal whipped cream--this cake needs something with a touch of savoriness to it.

(I haven't tried it yet, but I think strawberries with a drizzle of very old and very sweet balsamic might be incredible on this.)

This cake is easy to make, but here are a few bits of advice to help you turn out a spectacular cake:

  • Make sure your pan has high sides. At least 2 inches, definitely. 3" would be better. I think a springform pan makes the whole thing even easier since you can then just release the sides. 

  • If you can, choose a Ligurian olive oil for this cake. It's more buttery and lighter than some other extra-virgin olive oils, which is key (this cake calls for a LOT of oil--you don't want something too spicy or overpowering).
  • To keep this dense cake from cooking unevenly, I recommend wrapping the cake pan with cake strips.  It's not a requirement, but it will definitely help guarantee success. 
Cake strips are thick strips of fabric that you soak in water and then wrap around the outside of the cake so that it cools down the edges and keeps it at the same temperature as the inside. Basically you want to slow down the speed at which the outside of the cake cooks so that it matches the center. This will keep your cake from doming on top or burning on the edges. You can buy cake strips, but you can also DIY a version with thick wet fabric or paper towels wrapped in foil. 

  • Oh, and feel free to play around with the flavors! Swap fresh lemon juice and zest for the orange (or do a bit of both!). Use a different liqueur instead of Grand Marnier (Campari would be fun for a more bitter cake, or perhaps even a limoncello? A ginger liqueur would be amazing, I'm sure!). A tiny bit of almond extract would be fantastic, too.

  • Let the cake cool in the pan for 30 minutes before taking it out, and then let it cool completely for a couple hours before serving. I honestly think this one tastes even better the next day. (Leave it covered at cool room temperature--don't refrigerate it!)

FYI that at Maialino, they serve this cake as muffins during breakfast, so you can definitely make this in a cupcake pan. The baking time would be reduced, of course, though I'm not exactly sure how long. (Maybe about 25 minutes?)

Enjoy!

****
Loved this recipe? Here are three other simple cakes you might like:


And let's connect so you can find out the next time I post! Follow me on Twitter, Instagram, or Pinterest, become a fan on Facebook, or sign up to receive my once-a-week e-mail updates.

Thanks so much for reading! 


Maialino's Citrus Olive Oil Cake Recipe
Adapted very slightly from Food 52

Ingredients
2 1/4 cups all-purpose flour
1 3/4 cups granulated white sugar
1 1/2 teaspoons kosher salt
1/2 teaspoon baking soda
1/2 teaspoon baking powder
1 1/3 cups extra-virgin olive oil (preferably a soft and buttery Ligurian olive oil)
1 1/4 cups whole milk
3 large eggs
Zest of 1 whole orange
1/4 cup fresh orange juice
1/4 cup Grand Marnier
Directions
Preheat oven to 350 degrees F. Grease a 9” springform pan (at least 2” in height) OR a 10” round baking pan (also 2” in height). Line bottom with a circle of parchment (grease the whole pan first as it will help hold the parchment in place).

Whisk together flour, sugar, salt, baking soda, and baking powder. Set aside.

Whisk together olive oil, milk, eggs, orange zest, orange juice, and Grand Marnier.

Add the dry ingredients and whisk until completely smooth and combined.

Pour into prepared pan, and bake 1 hour or until top is golden brown and a tester inserted in the center comes out clean (a couple tiny moist crumbs may attach..that’s OK!). Let cool in pan 30 minutes, before running a thin knife or spatula around the sides to loosen, then turning out onto a pan to cool completely at least 2 hours or overnight.

Serve with fresh ricotta or whipped cream.
0

Creamy Roasted Pepper, Carrot & Ginger Soup

It's nearly 1PM and I still haven't been able to get my dog outside for a walk. Eugene tried this morning, but he snarled and growled and snapped at him so much that he gave up, leaving it in my hands. My attempts to put on his harness have been similarly successful, ending with him running away and huddling in a pile of pillows or sorted laundry.

Hudson hates the winter. He hates rain and cold and snow, and will happily refuse to pee all day if it means he can stay indoors.

I don't blame him, as I'd likely do the same were it not for indoor plumbing.

Fortunately, working from home means that I can generally avoid going outside on the really bad weather days, and instead stay warm and cozy indoors. They're my favorite days to cook and experiment in the kitchen, and they're what led to this warm and comforting Roasted Pepper, Carrot & Ginger Soup.

There is nothing better than a steaming bowl of homemade soup on days like this. My Spicy Roasted Tomato and Mexican Chorizo with Sweet Potato are two favorites, but this new creamy veggie soup might knock those off the list.

It's so easy to make, too! You start out by chopping up a bevy of colorful peppers, some onions, and some carrots and roasting them in a very hot oven. This brings out the natural sweetness and adds a lovely smokiness to the soup.

Into the food processor or blender they go, along with some stock, garlic, and a good nub of peeled ginger.

Pureed until very smooth, then seasoned and thinned to your preference, it's a gorgeous soup for cold, winter days. The sweetness of the vegetables plus the spice of the ginger is reminiscent of asian flavors.

A squeeze of fresh lime brightens the whole thing up. This makes a big batch, which you can keep in mason jars in the fridge for quick lunches or meals throughout the week.

Just the thing to get you through these frigid days.

Now if you'll excuse me, I need to try and coax this dog outside one more time...

****
Loved this recipe?
Let's connect so you can find out the next time I post! Follow me on Twitter, Instagram, or Pinterest, become a fan on Facebook, or sign up to receive my once-a-week e-mail updates

 
Thanks so much for reading!  


Roasted Pepper, Carrot & Ginger Soup 
Yields about 6 cups
 
Ingredients
1 pound red, yellow, or orange bell peppers (I used mini peppers, but any kind of sweet peppers will do.), stems and seeds removed and chopped

1 medium red onion, quartered 
3 large carrots, cut into large chunks
3 tablespoons olive oil
Kosher salt
2-4 cups chicken or vegetable stock (use more or less depending on how thick you prefer your soup)
3 large garlic cloves, peeled
1 2-inch piece of fresh ginger, peeled
Ground black pepper 
Fresh lime wedges and sliced scallions, for serving

Directions
Preheat oven to 400 degrees. Spread peppers, onions, and carrots on a large roasting pan, and toss with olive oil. Season generously with kosher salt. Roast 20-25 minutes, tossing once halfway, or until all ingredients are soft and with a slight char. Let cool 10 minutes.

Combine vegetables with 2 cups of the broth, the garlic, and the ginger in a blender and puree until very smooth. (Depending on the size of your blender, you may need to do this in batches. Less powerful blenders will require longer blending time.) Add more broth as desired for a thinner soup. Season with salt and pepper to taste. Serve with lime wedges and scallions. 
 
0

Rosca de Reyes for Three Kings Day

Rosca de reyes (also known as Roscón de reyes) is a Spanish and Latin American dessert bread traditionally served on Three Kings Day, which is celebrated on January 6th. The holiday, known as the Epiphany, marks the day the wise men arrived to see and bring gifts to the newborn baby Jesus.

The soft, buttery yeasted bread is sometimes filled with rum-soaked fruits and decorated with candied fruits, nuts, or strips of sugar paste (similar to that found on Mexican pan dulce). There are as many recipes as there are bakers, but the flavors tend to be similar, with hints of citrus, almond, anise or cinnamon.

As an added surprise, a small baby figurine (meant to represent the baby Jesus) or a bean is usually hidden inside. The person who finds it in his serving is crowned king or queen of the day, and is responsible for hosting the next party.

There are actually many different versions of these celebratory breads throughout the world; you may also known it as "King Cake," which is popularly eaten in New Orleans and other parts of the South around Mardi Gras (King cake season technically starts on the Epiphany and then extends all they way through to Mardi Gras.)

In France, they eat a round cake known as galette de rois--made with puff pastry and a luscious almond cream.

Growing up, my family actually never ate rosca de reyes as it's not really common in Puerto Rico.

Instead, we celebrated Día de los Reyes by placing shoeboxes filled with grass under our beds on the evening of January 5th. In the morning, we'd wake to find presents where the box of grass had been, believing that they had been left for us by the wise men, whom we called "los reyes magos."

(The grass had been left as a snack for their camels.)

As a child, I used to wonder how all those camels fit in my bedroom. My parents used to scatter some of the grass around my bedroom rug and disturb a few things to make it seem like the camels had been there knocking things over with their big camel butts, and would tell us that they had special magic that would make sure we slept through the whole thing.

It was all pretty special and magical indeed, and I loved that, as one of the only Latinas in my elementary school, I got to have this whole other extra day of Christmas wonder to extend the season.

Plus, you know...the presents.

I've seen this sweet yeasted bread around for years, and thought it would be a fun way to commemorate the holiday this year, especially now that nobody leaves presents under my bed.
(I tried. No camels.)


I started off by making the yeast dough, which is a fairly simple yeast dough enriched with butter, milk, and sugar.

It's similar to a brioche, with the addition of a few dashes of extract (I chose almond and anise) and some rum-soaked fruit.

I then made the topping, which is what you see in that photo above. This is kind of a paste made by kneading sugar, flour, butter, and an egg yolk. (How gorgeous is that golden yellow egg yolk?)

It produces a sweet, almost sugar cookie-like crust on the top of the bread that I really had to resist eating on its own.

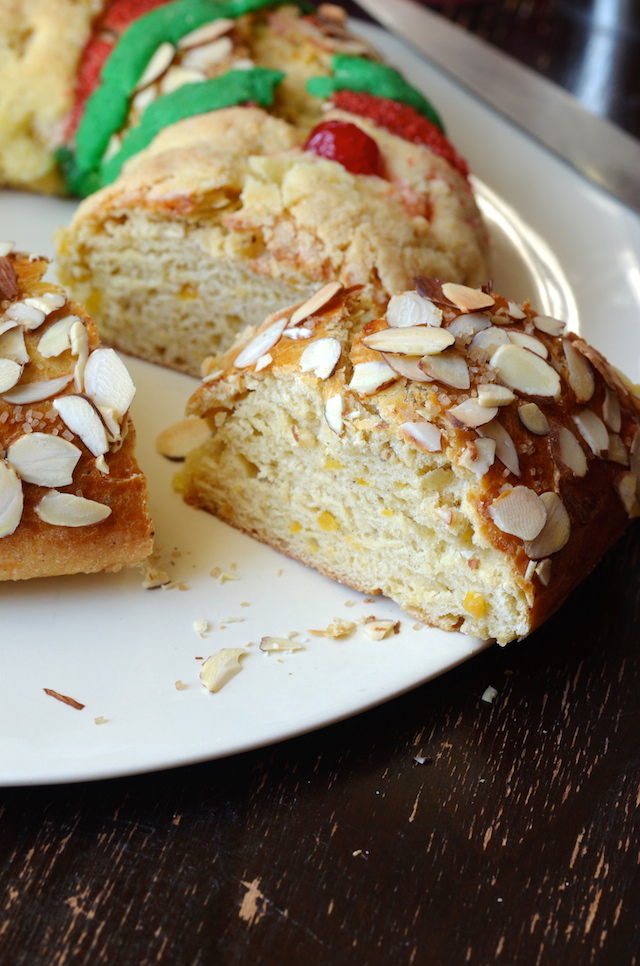
Sliced almonds, some sparkly red sugar sprinkles from the Dollar Spot bins, and a few red maraschino cherries finished off my design.

I kept it fairly classic, but you can really have fun here and go either the traditional route--with candied citrus--or get creative: nuts, chocolate drizzles, sprinkles or any kind of icing would also work!

Don't forget to add the trinket! I didn't have time to buy a plastic baby trinket, so I went through my drawers and decided to add this tiny little Poppin' Fresh figurine instead.

(He looks kind of baby-like, right?)

Traditionally, a dried bean or a coin would work, too!

When you cut into the bread, the dough is soft and studded with bits of the chopped fruit.

I used mostly apricot, but raisins, cranberries, figs, cherries, or just about any other dried or candied fruit would work, too.

It's wonderful served slightly warm with coffee or with a bit of soft, salted butter. The perfect treat for afternoon snack or breakfast.

 I hope you give this recipe a try, and that it becomes a part of your new Three Kings Day holiday traditions!


Rosca de Reyes (Roscón de Reyes/ Spanish King Cake)

Active Prep Time: 30 minutes
Inactive Prep Time (rising time): 90 minutes
Cook Time: 30 minutes
Total Time: 2 1/2 hours

Ingredients

For the dough:
1 cup chopped dried fruit (apricots, cherries, cranberries, figs, etc.--use your fave!)
1/3 cup golden rum (or orange juice for a non-alcoholic option)
1 packet active dry yeast
1/4 cup warm water
1 tablespoon + 1/4 cup granulated sugar, divided
1/4 cup milk
1/2 cup butter
2 tablespoons fresh lemon zest
2 tablespoons fresh orange zest
1 vanilla bean, split in half (optional; substitute 1 tablespoon vanilla extract)
2 teaspoons almond extract
1/2 teaspoon anise extract
2 large eggs, slightly beaten
1 teaspoon kosher salt
3 1/2 - 4 cups all-purpose flour

For the decoration:
1 large egg yolk
1/4 cup unsalted butter, softened to room temperature
1/2 cup all-purpose flour
1/2 cup powdered sugar
1/2 teaspoon almond extract
1/4 teaspoon green food coloring (optional)

1 cup sliced almonds (or other chopped nut like pecans)
Red sprinkles or sanding sugar
Maraschino cherries or candied citrus slices

For the egg wash:
1 large egg
1 tablespoon water

Directions
Make the dough: 
Combine chopped fruit and rum in a small bowl and microwave 30 seconds. Stir well to combine and let soak.

In the base of a mixer with dough hook attached, combine yeast, warm water, and 1 tablespoon sugar. Stir to combine and let sit 5 minutes until frothy.

In a small saucepan over low heat, combine the milk, butter, remaining 1/4 cup granulated sugar, orange and lemon zest, and vanilla bean. Let simmer until butter is completely melted, remove from heat, then remove the vanilla bean, scraping in the seeds with a knife. Stir in the almond and vanilla extract.

Add to the yeast mixture along with the eggs, salt, and 3 cups flour. Mix the dough adding more flour, 1/4 cup at a time, until the dough pulls away from the sides and forms a ball.

Add the soaked fruit with the rum, and let the dough knead at high speed for 5 minutes or until smooth and just slightly sticky to the touch.

NOTE: If dough is too wet, add a bit more flour. If dough is too dry, add a bit more milk or water.

Pour a few tablespoons oil in a large mixing bowl, add the ball of dough and flip over once to cover with the oil. Cover with plastic wrap, and let sit in a warm location for about 1 hour, or until dough has doubled in size.

Preheat oven to 350 degrees.

Shape the Dough:
Line a baking sheet with parchment paper or a silicone baking mat. Knead out the air in the dough, then form into a smooth ball and poke a hole in the center, pulling it out until the dough forms a large doughnut shape or ring. Place in the center.

The baby: If you’re adding a plastic baby toy, tuck it inside from underneath now. Note that you should let guests know there is a hidden baby in there so that nobody loses a tooth.

Make the decorative sugar paste: 
Combine the egg yolk, flour, butter, powdered sugar, and extract in a bowl and knead into a smooth dough. Divide into 4 or 5 equal pieces (you can dye part of it green, if you’d like) then press into small strips about 1 1/2” by 4” and lay along the ring of dough.

Decorate: Whisk the remaining egg and use a pastry brush to coat the dough with the egg wash. Sprinkle on sliced almonds, sprinkles, and sugar in a desired pattern. Dot the surface with maraschino cherries and dried fruit, if using.

Bake 25-30 minutes, or until golden, risen, and shiny. Cut off any excess sugar paste, and transfer to a rack to cool completely.

Serve warm or room temperature with coffee or dessert.
0
Back to Top