
Showing posts with label Asian. Show all posts
Showing posts with label Asian. Show all posts
March 28, 2017
Low-Carb Cauliflower Fried “Rice”
August 26, 2015
Mini Kimchi Quesadillas

It's the perfect snack food to serve with cold drinks when you have friends over to watch a movie or "the game." (Whatever that game might be.)

Oh...and you need butter. A lot of it.
Get your skillet nice and hot, melt a nice chunk of butter, and toss in a few tortillas. Layer in the cheese and kimchi, cover them with another tortilla and lower the heat a bit. You want the cheese to completely melt, the kimchi to heat through, and the tortillas beautifully crisp.

Cut them in half and serve them hot. This is one of those dishes that's kind of awesome eaten around the stove, serving them and eating them right as they come off the skillet.
So perfect.
****
Loved this Mini Kimchi Quesadilla recipe? Here are three other game day snack recipes you might like:
- Garlic Herb Pull-Apart Bread
- Baked Blueberry Chipotle Chicken Wings
- Bacon-Wrapped Habanero Pineapple Bites
Thanks so much for reading!
Mini Kimchi Quesadillas
Makes 4 small quesadillas, multiply as needed
Ingredients
2 tablespoons butter + more, as needed
8 mini corn or flour tortillas
1 cup shredded cheese such as cheddar or Monterey Jack
1 cup kimchi, roughly chopped
Kosher salt, to taste
Directions
Heat the butter in a skillet over medium-high heat until melted. Swirl the pan around to coat evenly.
Spread out the tortillas in the pan and let them crisp for a few seconds. Flip each one, then add a generous handful of cheese and a few forkfuls of kimchi. Cover with another tortilla and press down slightly with the back of a spatula.
Let cook about 2-3 minutes, then flip and continue to cook until other side is crisp, cheese is melted, and kimchi is heated through.
Remove from pan, cut each quesadilla in half, and sprinkle with kosher salt. Serve immediately.
July 30, 2015
Feed Your Passion Episode 1: Chinese-Cuban Fusion at Calle Dao

Calle Dao is owned by Marco Britti an Italian-born musician who developed a passion for Latin food while traveling the world with acts like Jennifer Lopez and Marc Anthony (YES!). While living in Havana for a year, he grew fascinated with the significant Chinese population in that city, and started researching the birth of Chino-Cubana cuisine, which for a time was popular in cities like New York and Miami.
At Calle Dao, he and Chef Humberto Guallpa, have created a menu that brings together some mainstays and flavors from both cultures, along with influences from other Latin and Asian countries. The result is a truly unique and inspiring menu that celebrates the fusion of global cultures in America.
Watch the video below (and don't forget to subscribe, comment, and hit the thumbs up if you like it!)
October 16, 2014
Grilled Thai Red Curry Shrimp

The last time I got them, I made more of a Spanish-inspired dish with chorizo and smoked paprika, but this time I decided to play around with Asian flavors.

After 30 minutes of marinating, I grilled the shrimp on a stove-top grill pan (I use this Le Creuset grill pan, which is one of my faves, but an outdoor grill would be even better!), and then tossed them in a sauce made from melted butter and a bit more curry paste. This created a luscious sauce that coated the shrimp thoroughly (all the better for licking off your fingers later on!).

Like with my previous whole shrimp recipe, this will also work with peeled shrimp, though in that case you really only need to marinate for about 10 minutes, and the cook time will also be shorter.

****
Love Always Order Dessert? Let's connect! Follow me on Twitter, Instagram, or Pinterest, become a fan on Facebook, or sign up to receive my once-a-week e-mail updates. And if you ever need any entertaining or cooking advice, please don't hesitate to e-mail me. Thanks for reading!
Grilled Thai Red Curry Shrimp
Serves 4 as an appetizer or 2 as an entree
Ingredients
10 giant whole shrimp (with heads on)
4 tablespoons Thai red curry paste
1/4 cup fish sauce
1 lime, juiced
1 teaspoon kosher salt
3 tablespoons butter, melted
Dried Thai basil, red chile flakes for garnish
Directions
Use a pair of kitchen shears to snip along the back of the shrimp, pulling out the vein. Place shrimp in a large bowl. Add half the curry paste, the fish sauce, lime juice, and salt, and toss until evenly combined and coated. Place in fridge and let marinate 30 minutes.
Combine melted butter and remaining curry paste in a clean large bowl.
Heat a grill pan or outdoor grill, and cook the shrimp 2-3 minutes on each side, or until fully cooked and slightly charred. Add the cooked shrimp to the bowl with the butter and curry paste, then toss to coat evenly.
Place in a serving bowl and season with kosher salt. Garnish with a sprinkle of dried basil and chile flakes.
Serve hot.
February 26, 2014
Baked Thai Coconut Curry Chicken Breasts

This weekend, I'm heading up to Vermont for a few days to work as a guest chef at Good Commons, so I want to make sure that Eugene is as well-fed as the retreat participants.
First up on this list are these Baked Thai Coconut Curry Chicken Breasts, which are beautifully fragrant, with just a touch of heat.

All the ingredients are pureed in the blender and then poured over the chicken--then the oven does the work.
So easy, and the final dish is rich and flavorful. Serve this one over fluffy jasmine rice or quinoa to soak up that lovely sauce. Leftovers would also be wonderful in a sandwich or wrap.
****
Love Always Order Dessert? Let's connect! Follow me on Twitter or Pinterest, become a fan on Facebook, or sign up to receive my once-a-week e-mail updates. And if you ever need any entertaining or cooking advice, please don't hesitate to e-mail me. Thanks for reading!
Baked Thai Coconut Curry Chicken Breasts
Serves 4-6
Ingredients
2lbs boneless skinless chicken breasts (not cutlets)
Kosher salt
Black pepper
1 (14oz) can full-fat coconut milk
3 tablespoons Thai red curry paste
1 1-inch piece fresh ginger, peeled
2 large garlic cloves, peeled
1 small bunch cilantro, root ends trimmed (leave the stems--they add amazing flavor!)
Directions
Preheat oven 350 degrees. Arrange chicken breasts in a single layer in a roasting pan. Sprinkle generously with kosher salt and black pepper.
In a blender, combine coconut milk, curry paste, ginger, garlic cloves, and cilantro. Puree until smooth, then pour mixture over chicken. Bake chicken for 30 minutes, then turn on broiler and broil for an additional 5-7 minutes or until crispy and slightly charred on top (keep on eye on the chicken as broilers vary).
Remove from oven and let rest 5 minutes before serving. Serve over rice or vegetables, with leftover pan sauce drizzled on top.
October 3, 2013
Orange Ginger Glazed Salmon

Those weeks when I know I'm going to be crazy busy and exhausted, I plan ahead and stock up on salmon at the grocery store (I also usually keep some in the freezer).
I love it because it's already so wonderfully flavorful on its own that I don't have to put much effort into it. A brush of oil and a sprinkle of salt and pepper, plus a few minutes under the broiler or in a skillet and dinner is ready. The side is usually a pile of salad greens or some previously roasted veggies.
I'm so happy that I have a husband who is totally cool with a plate of mostly-salad for dinner.

A brush of grainy mustard? Salmon dijon! (So fancy!)
I've also brushed on things like Chipotle Tabasco sauce (it's my jam), Peruvian chili pastes, and now, my new favorite:
Orange marmalade.


Sticky, sweet, tangy, and oh so flavorful.
And 15 minutes, tops.


Love Always Order Dessert? Let's connect! Follow me on Twitter or Pinterest, become a fan on Facebook, or sign up to receive my once-a-week e-mail updates. And if you ever need any entertaining or cooking advice, please don't hesitate to e-mail me. Thanks for reading!
Orange Ginger Glazed Salmon
Serves 2 (multiply as necessary)
Ingredients
2 salmon fillets (about 8-10oz each)
Kosher salt and black pepper
1/3 cup orange marmalade
1-inch knob of ginger root, grated (I grate an inch off the full root right into the marinade bowl)
3 tablespoons soy sauce
2 tablespoons olive oil
1 orange, juiced by hand (or substitute 1/3 cup orange juice)
Directions
Preheat oven to 400 degrees. Line a baking sheet or pan with foil (use something that has a bit of an edge so that it holds in any juices or marinade). Arrange salmon on baking sheet, and generously sprinkle each with salt and black pepper.
In a small bowl, whisk together marmalade, ginger, soy sauce, olive oil, and orange juice. Pour over the salmon. Drop the orange peels onto the baking sheet along with the salmon.
Bake the salmon about 10 - 15 minutes, or until cooked through. To brown the top, turn the broiler on for the last 3 or so minutes (optional).
Serve immediately, or let cool and store to use in salads or sandwiches.
December 29, 2011
Cleaning Out the Fridge Fried Rice

One of the best things I've made these past few days, has been fried rice. It's a great way to use up those leftover bits of turkey or ham from Christmas dinner, or to clear out any veggies that have been sitting in the fridge. It takes minutes, is incredibly forgiving, and can be adapted to your taste.

It's a very good movie (and book), which I really recommend, but one of my favorite jingles she comes up with is one where she makes a big sandwich filled with lots of leftovers an calls it her "frisk the Frigidaire, clean the cupboard bare sandwich." When Eugene and I saw that movie, we spent DAYS singing that little jingle over again, and I still sing it whenever I make a dish like this one.
The version you see in the photo here was made with bacon and just a little bit of turkey, but definitely feel free to improvise and use what you have one hand--shrimp, ham, turkey, chicken, even just veggies, would be perfect in this. This is DEFINITELY a "frisk the Frigidaire, clean the cupboard bare...fried rice."
An easy, cozy one-bowl meal, just right for this easy, cozy time of year.
*****
Did you enjoy this post? Be sure to share it with your friends on Facebook, Stumble, and Twitter! Consider following me on Twitter (@nandita) or Instagram, become a fan on Facebook, or sign up to receive my once-a-week e-mail updates by filling in your address in the box on the right.
Cleaning Out the Fridge Fried Rice
Ingredients
Olive oil (or sesame oil, if you have it)
4 slices bacon, cut into 1/2" pieces
1 yellow onion, diced
1 cup cold cooked meat such as chicken, ham, turkey, shrimp, or vegetables cut into small pieces
3 cups cold cooked rice (leftover take-out rice works perfectly here!)
3 eggs, whisked
Soy sauce
1/3 cup scallions, minced
Kosher salt and black pepper
Directions
Heat a large skillet or wok over high heat and add 2-3 tablespoons of oil. Add the bacon and cook until it starts to render and get crisp (about 3 minutes). Add the diced onions and cook for 2 more minutes until translucent, but not caramelized or browned. Add the meat or vegetables and saute for 3 minutes. Add the rice and cook until toasted and heated through, stirring every 2 minutes to make sure all sides get toasted.
Use a spoon to push the rice out to the sides and create a well in the center of the pan. Pour in the eggs and scramble, then pull in the rice and vegetables.
Add about 3 tablespoons of soy sauce and the scallions, stir until combined. Season with salt and pepper to taste, and serve.
May 10, 2011
Soy Sauce Vegetable Pickles

These pickles would also make a great addition to burgers or bbq pulled pork sandwiches; you can even add them to noodle soups!
The recipe is super quick and you can actually use the same batch of brine to make both the carrots and the mushrooms. This would also work with other vegetables like turnips, radishes, and parsnips, so feel free to improvise.

****
New to Always Order Dessert? Consider subscribing to my RSS feed, follow me on Twitter, become a fan on Facebook, or sign up to receive my once-a-week e-mail updates by filling in your address in the box on the right. And if you ever need any entertaining or cooking advice, please don't hesitate to e-mail me. Thanks for reading!
Soy Sauce Vegetable Pickles
Adapted from Momofukuby David Chang
Ingredients
1 cup sugar
1 cup red wine or white vinegar
2 cups water
3/4 cup low sodium soy sauce or tamari
1 2-inch knob of fresh ginger, peeled
2 cups assorted mushrooms, sliced into even sized pieces (such as shitake, oyster, trumpet, baby bella, etc.; can also use 2 cups julienned carrots, radishes, turnips, or parsnips.)
Combine the sugar, vinegar, water, soy sauce, and peeled ginger in a large, heavy pot. Add the sliced mushrooms and turn the heat to medium. Let simmer for 30 minutes, then let cool to room temperature in the pot.
Use a slotted spoon to transfer the mushrooms to a clean glass jar and top off with just enough of the pickling liquid to cover them. Cover and refrigerate. Will keep for at least 1 month. Brine can be immediately reused to pickle another batch of vegetables such as carrots, turnips, etc.
March 21, 2011
Bagged Lunch Ideas: Cold Sesame Soba Noodle Salad
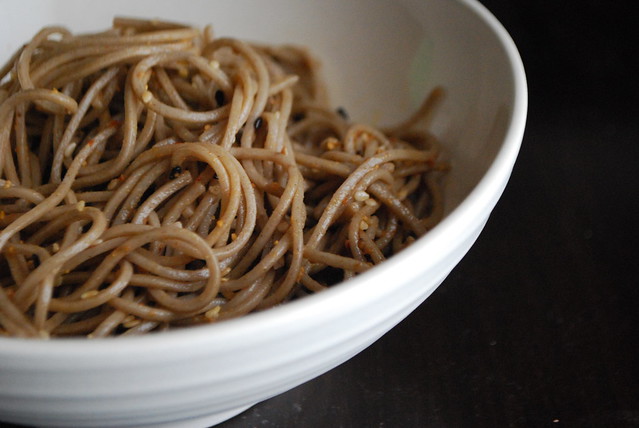
On Friday night, I made a big bowl of this cold soba noodle salad. Seasoned with toasted sesame oil, ginger, garlic, and spicy sriracha, it's a quick and easy dish that can be eaten as a side or as a main course. Soba is a great healthy alternative to standard wheat spaghetti. These Japanese buckwheat noodles are loaded with protein, vitamin B1 and B2, and rutin, a bioflavanoid similar to that found in green tea and red wine--not bad for a huge bowl of pasta!
I personally think that soba tastes best cold, which is perfect because it means you can make it in advance and leave in the fridge for a quick meal whenever you need it. Eugene and I spent most of the weekend digging our fork into the bowl in the fridge, and last night I split the leftovers into two containers so that we could each eat the rest for lunch today.
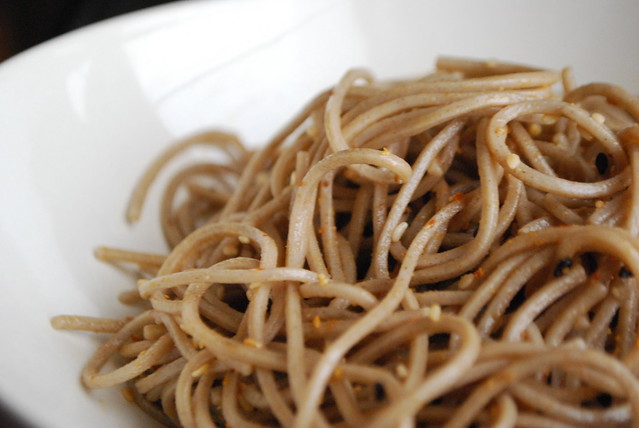
This is just a basic recipe for the noodles, but you should use it as a template and spice it up however you'd like. Add pieces of cold chicken or shrimp to make it a heartier entree, or toss in some crisp green beans, sliced almonds, or water chestnuts for added crunch. A shower of minced cilantro would also work nicely here. If you love spice, add a little extra sriracha to the dressing and up the kick (totally what I did!).
****
New to Always Order Dessert? Consider subscribing to my RSS feed, follow me on Twitter, become a fan on Facebook, or sign up to receive my once-a-week e-mail updates by filling in your address in the box on the right. And if you ever need any entertaining or cooking advice, please don't hesitate to e-mail me. Thanks for reading!
Cold Sesame Soba Noodle Salad
Serves 4-6 as lunch entree or side
12-13 ounces soba noodles (Japanese buckwheat noodles)
2 tablespoons sesame seeds
3 tablespoons sesame oil
1 tablespoon low sodium soy sauce
2 teaspoons sriracha or other chili paste
1 teaspoon honey
1 teaspoon fresh ground ginger
1 garlic clove, finely minced
Kosher salt
Black Pepper
Bring a pot of salted water to a boil and cook soba noodles for 5 minutes. Drain and rinse with cold water until cool. Place in a large bowl.
While the water boils, place a skillet over medium-high heat and add the sesame seeds. Toast gently over the heat, moving constantly to keep from burning. Will be golden brown and smell nutty when ready; 1-3 minutes. Remove from heat and set aside.
In a separate small bowl, wisk together the sesame oil, soy sauce, sriracha, honey, ginger, and garlic. Pour dressing over cooled soba noodles and toss to coat evenly. Sprinkle in the toasted sesame seeds, and season to taste with Kosher salt and freshly ground black pepper. Serve immediately or keep covered in the refrigerator for up to one week.
April 28, 2010
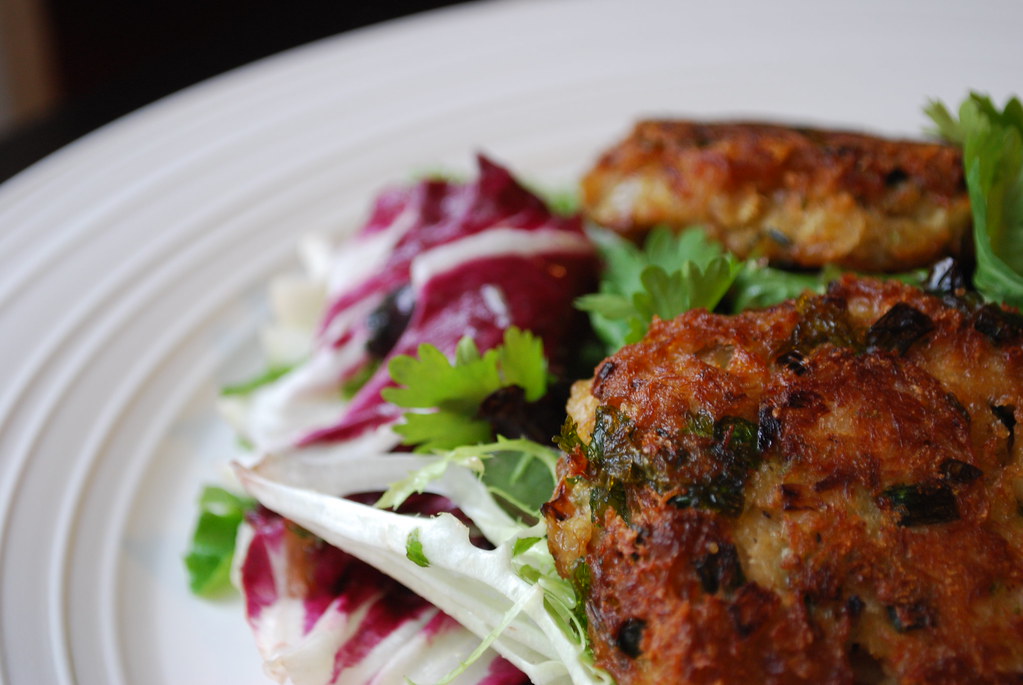
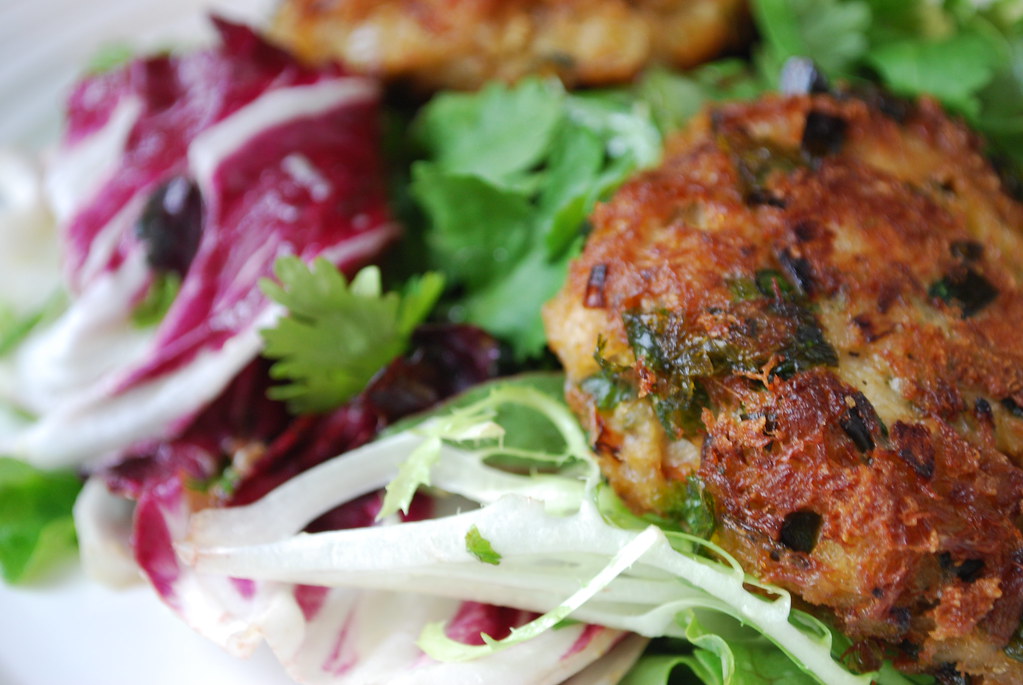
Ginger Scallion Crab Cakes
I'm a little bit obsessed with a restaurant here in the city called Fatty Crab. A funky take on Malaysian street food, the menu is an absolute assault of spice and flavor (in the best possible way). I went there for the first time last August for my friend Lindsay's birthday, during which she, a few friends, and I spent two hours splitting spicy family style dishes and moaning over every new flavor.
Think dishes like crispy pork served with gingery pickled watermelons, sticky sweet coconut fried rice, giant bowls of messy and fiery chili crab, and cocktails flavored with cilantro, lime, and generous shots of chili-infused rum. And I didn't even have to order dessert (which I *always* do!) because they just always give it to you automatically. For free. (Usually a delicious chewy mochi cake that's so good it keeps me up at night gnawing on my pillow.)
I seriously loved my first meal there so much, that I spent the next month daydreaming about it and trying to recreate the dishes at home. After hearing about me rave and rave for months, Eugene finally agreed to join me for a meal there. I was so psyched about this, and bopped around the apartment in expectation for days, convinced that he, too, was going to love it.
But he didn't!
For some, weird strange reason that I still don't understand, he doesn't like the place. You can imagine how much of let down this was; I would eat at this place constantly if I could, but my main and most adored dining companion is... Just. Not. A fan.
 ::Sigh::
So, while I hunt around for a dining buddy with a similar interest in the bold and the spicy, I've been forced to continue and try to chase down these intense flavors in my own kitchen. (The aforementioned Lindsay, who is herself rather bold and spicy and whom would have made a fine dining companion, is unfortunately disqualified from this role due to distance and upcoming international gallivants.)
I've come close a few times; once with a recipe for gingery meatballs that have been sitting in the queue for ages (soon! I promise!). My latest creation are these ginger and scallion crab cakes, which are packed with ginger and cilantro and enough heat to quell my Fatty Crab fantasies, at least for a week or so. Even if you have no idea what I'm talking about when it comes to this place, trust me when I say that these crabcakes are absolutely delicious and make for a brilliant dinner or lunch. They can even be prepared ahead of time, so that all you have to do before dinner (or a dinner party) is heat the oil and sizzle them until golden.
And yes, if you are one of those poor people who can't handle cilantro, you can skip it. (Though it breaks my heart to even type that...)
If you're wondering how to serve them, I love them over a big bed of mixed greens dressed with a mustardy vinaigrette (just whisk together a tablespoon of mustard with some red wine vinegar, diced shallots, and olive oil and toss with the greens). Depending on how big I make them, 2 or 3 crab cakes per person is enough for a meal. If you want something a bit heartier, you can also serve these with a lemon risotto, or with any number of grilled or steamed vegetables. I dig them with the salad though; crab cakes and salad are just perfect in my book.
 I hope you enjoy these! And if my raving has motivated you to check out Fatty Crab for yourself, email me first at Alejandra@AlwaysOrderDessert.com and I'll send you a list of my favorite "must try this" items from their menu.
A BONUS Challenge For You: I'm going to officially put it out there that I will bake a big 10" cake of your choice to the first person who obtains and sends me the recipe for those freaking amazing chewy mochi cakes (the actual Fatty Crab recipe, that is).
****
New to Always Order Dessert? Consider subscribing to my RSS feed, follow me on Twitter, become a fan on Facebook, or sign up to receive my once-a-week e-mail updates by filling in your address in the box on the right.
And if you ever need any entertaining or cooking advice, please don't hesitate to e-mail me.
Thanks for reading!
Ginger Scallion Crab Cakes
Serves 2-4
Ingredients
olive oil
2 garlic cloves minced
1 shallot minced
1 tablespoon grated fresh ginger
1 bunch scallions, chopped
1/4 cup cilantro, roughly chopped
1/2 teaspoon crushed red pepper
1 jalapeno, minced
1/4 cup plus 1 tablespoon mayonnaise
juice of 2 limes
1 teaspoon soy sauce (optional)
1 large egg, lightly beaten
1 teaspoon salt
1 teaspoon freshly ground black pepper
1 cup panko (Japanese bread crumbs/flakes) or 1 cup plain regular bread crumbs
1 pound fresh or pasteurized crab meat (claw or back-fin is fine for this dish, but you can also use the pricier jumbo lump)
Directions
Heat a couple tablespoons of olive oil in a medium sized skillet over medium heat, and add the minced garlic, shallots, and ginger. Saute for 2 minutes, just until they start to get a bit of color and release an aromatic smell. remove from heat and pour (along with oil) into a large bowl.
To the bowl, add the chopped scallions, cilantro, minced jalapeno, red pepper, mayonnaise, lime juice, soy sauce if using, egg, salt, and black pepper. Mix until well combined. Fold in the panko and crabmeat and gently mix until well combined (careful not to break up the crab meat too much).
Use a large spoon to scoop up servings of about a 1/2 cup and shape into a patty with your hands. Place on a wax or parchment paper-lined baking sheet and repeat with the rest of the mix (depending on how big you make the patties you should get about 8-10 patties).
Let the patties set for about 10 minutes (I used the time to clean up).
Pour about a 1/4 of olive oil into a heavy bottomed skillet (meaning the oil should come up the pan about a 1/4 inch) and heat over medium heat. When the oil is hot, use a spatula to gently slide the patties into the oil in batches. (I do 2-3 at time, max). Let fry on the first side for about 2-3 minutes and then flip using the spatula. Let fry on the other side for another 2-3 minutes or until crisp and golden brown. Remove from oil and let drain on a paper towel lined baking sheet.
Continue with the rest of the patties (you can also just make a few of them and leave the rest covered with plastic wrap in the fridge for up to 2 days).
Serve immediately on a bed of dressed mixed greens or with another favorite side dish. Offer cocktail sauce on the side, if desired.
November 3, 2009
Bamboo Charcoal Challah Bread
About five months ago, I came across a brief article about Bamboo Charcoal Bread by Monica Eng. The writer shared that a friend of hers had recently returned from a trip to China and brought her back a small loaf of the jet-black bread made with the powder of charred 5-year-old bamboo. The accompanying photo portrayed a squishy looking loaf of bread much more resembling of a lump of coal than something I'd want to eat for lunch.
And yet, I was intrigued.
It was in the description, which painted the bread as soft with a slight hint of sweetness that she thought could work perfectly in a French toast recipe. I think it was those last few words that grabbed me, because I proceeded to spend the next couple hours scouring the Internet for a local bakery that sold the loaf.
"This is New York City," I thought. "It must be here somewhere."
I found no mention local suppliers online, and though I popped into a couple Chinese bakeries I happened to pass that week, it was evident the mysterious loaf had yet to reach American shores.
So I decided to try and make it myself! I did a few searches for recipes online, but there weren’t any. I kept coming across random blog entries from bloggers in various Asian countries around the world who saw the bread in a local bakery and gave it a try. I e-mailed a few of them and left comments on the blogs of others, each time telling them about my little quest and asking them if they knew where I could find a recipe.
Soon, the responses started to roll in. The first blogger, a teenage girl in Malaysia, told me that she didn’t have a recipe, but suggested a few bakeries in her city where I could find the bread if I was ever in town. A second blogger from Singapore suggested that I look up recipes for Green Tea Bread and then simply replace the amount of green tea powder with an equal amount of bamboo charcoal powder. She cautioned that I should make sure to use bamboo charcoal powder as that it contains different properties than regular charcoal (more about that later).
I was about to take her advice when I received a third, and much more promising, message:
“I think I found what you’re looking for,” the writer told me. She included a link back to her post (where I’d left the initial comment) which she’d updated with a video of a Taiwanese cooking show about making bamboo charcoal French baguettes! It was completely in Chinese, but the blogger had helpfully included a rough English translation of the ingredients and recipe below the video and I was able to figure out the steps just by watching. She also advised that the bamboo charcoal powder could likely be used in any bread recipe but that I should add a little malt sugar along with it to enhance the flavor, as well as a little bit of additional water.

Armed with possible recipes and a new-found interest in Japanese manga,* I tackled my next challenge: finding bamboo charcoal powder.
This part was even harder than finding a recipe. The only online sources I found were international distributors who sell bulk to importers. Unless I wanted several thousand kilos of bamboo charcoal, that wasn’t going to work.
While researching, I learned that bamboo charcoal is very popular all over Asia because of its believed purification properties. The charcoal sticks are often used in water or can be placed in the refrigerator or in drawers to absorb odors and moisture much the way baking soda would be used. When used in the home (often displayed in a vase or basin) the charcoal helps to ionize and refresh the air. The fine powder is frequently used in face masks, soaps, and lotions since it is believed to detoxify and refresh the body and skin. And it is added to food for the same reasons: detoxification and to help eliminate harmful bacteria (such as in cases of mild food poisoning). The high mineral content also adds a subtle layer of flavor to the food and helps keep it fresher longer.
Naturally, the more and more I read about these amazing sticks, the more I couldn’t wait to try them. I finally found an eBay vendor in Singapore who sells whole sticks of bamboo charcoal for water purification so I bought a package or four sticks for ten dollars (including the shipping to NY from Singapore).
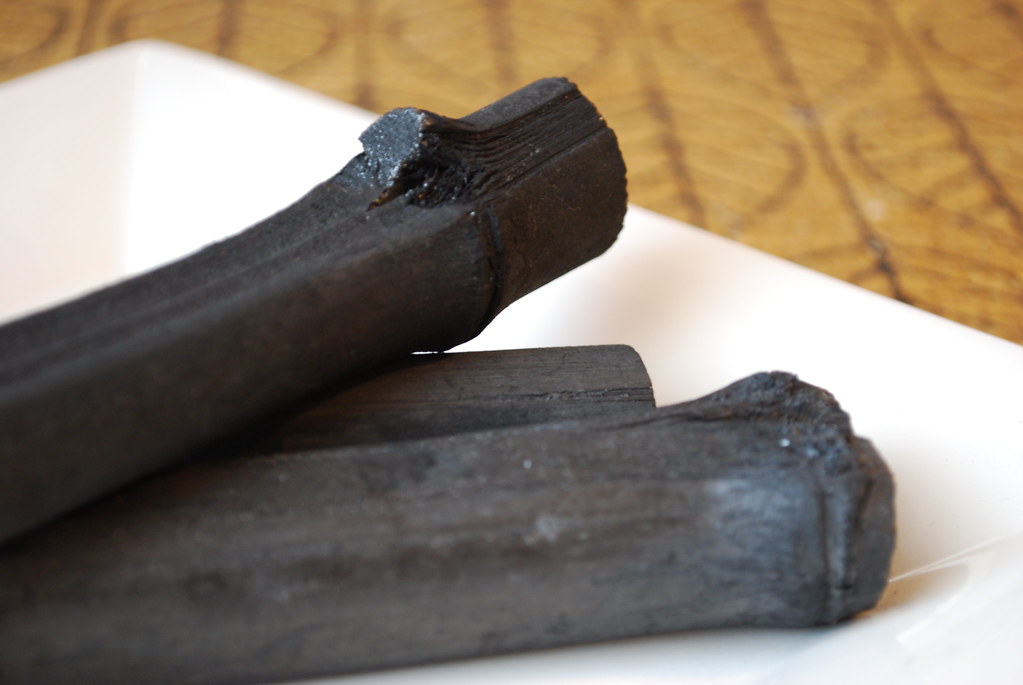
When they arrived, I was surprised by the texture of the sticks. They are very light and completely hollow, with a slightly brittle feel. When they hit against each other, they make an almost musical sound. On their own, they are completely odorless and tasteless. My plan was to grind one of the sticks down to a fine powder that I could then use in my bread recipe. From all that I’d read, I had decided to experiment with a basic challah recipe, since the soft egg-y sweetness seemed to best match the descriptions I’d read.
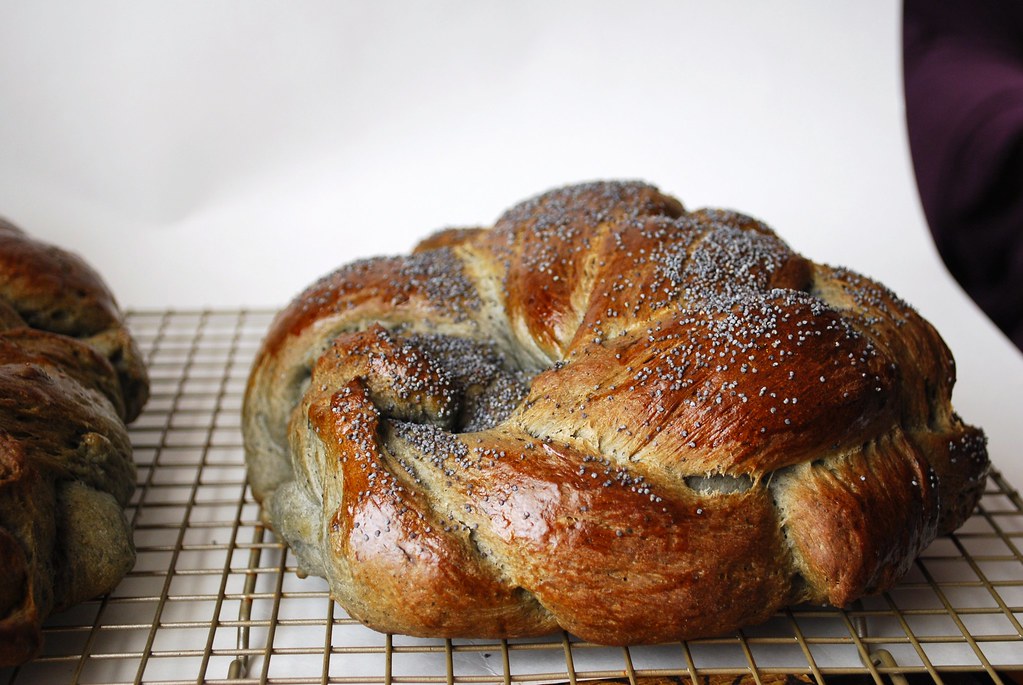
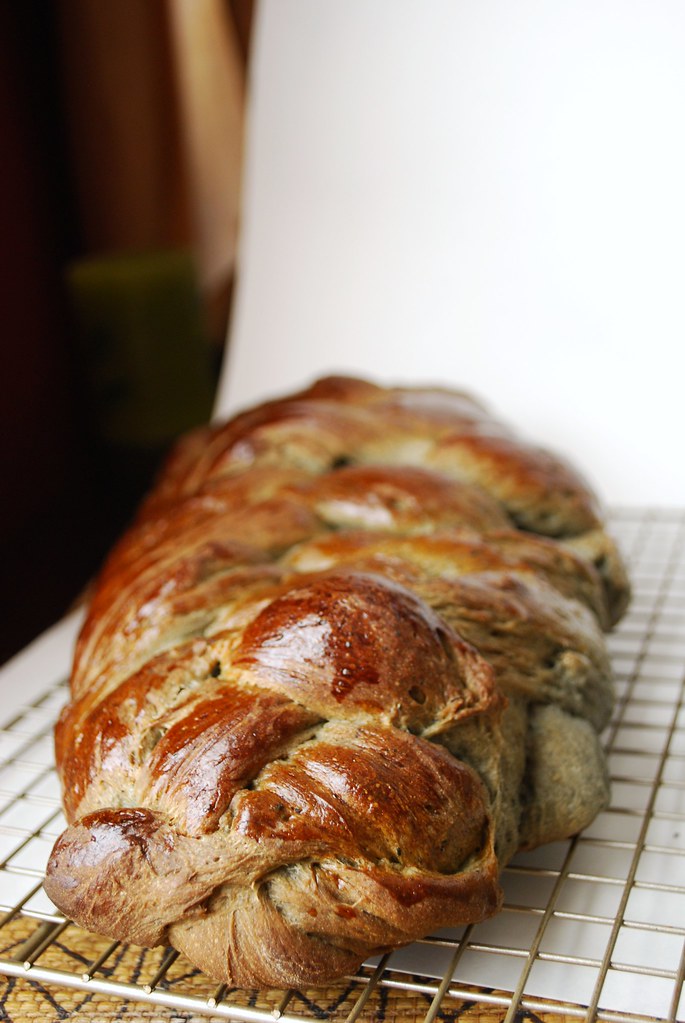
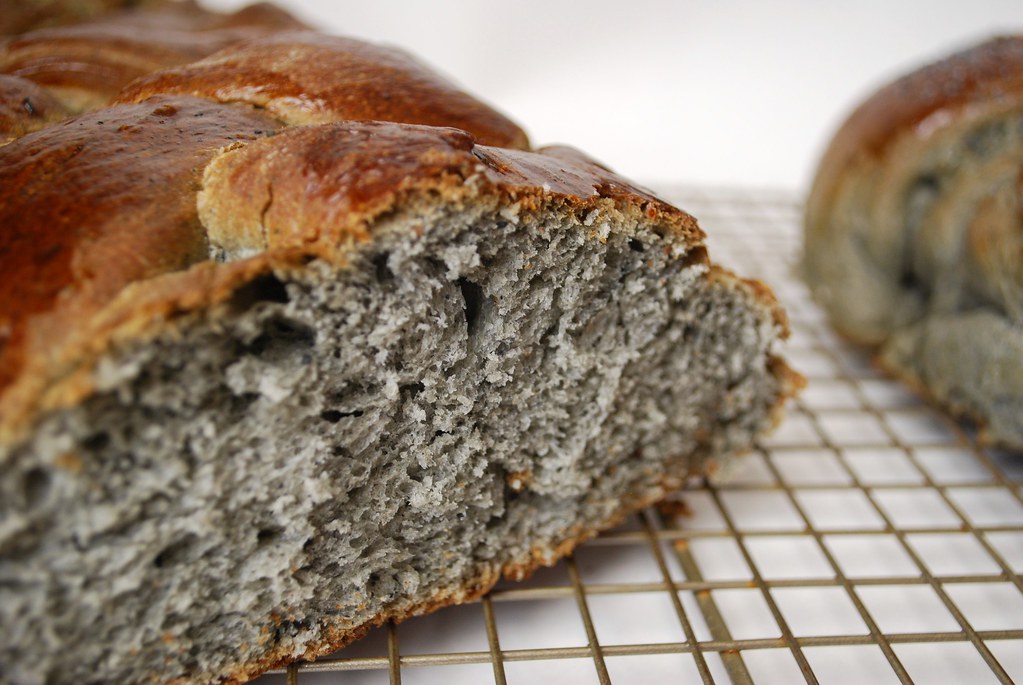
The results were exciting. The bread was chewy and slightly sweet, with a gorgeous charcoal gray color. I'd brushed the top with an egg wash, so it came out golden and glossy. I also sprinkled it with black poppy seeds since I thought they would complement the color (they did!). The most incredible part, was the way that the bread seemed to never get stale. We kept it loosely wrapped in plastic on the counter for about a week. Whereas my challah usually goes stale after 2 or 3 days, this bread was just as good the last day as the previous ones. I have no way if knowing it was a coincidence, but something definitely seems to suggest that it was the charcoal that kept it so fresh.
If you decide to try making this for yourself, I have a one important note: Make sure you grind the charcoal very, very finely. A coffee or spice grinder would be ideal for this and then it couldn’t hurt to go over it once again with a mortar and pestle. The charcoal doesn’t dissolve, so if it’s not incredibly fine, then your bread will end up with an unpleasant sandy texture.
And definitely let me know if you try it or if you have any more thoughts or knowledge about bamboo charcoal. Clearly, I’m a fan!
* Side Note: I actually ended up spending quite a bit of time on her site, which is a kind of Manga fangirl/boy site. The article that mentioned the charcoal bread was about a particular Manga series called Yakitate! Japan!, which translates to “Freshly Baked! Ja-pan!, with “pan” also meaning “bread” in Japanese” It’s a story about a boy on a mission to create a “Ja-pan” or a national bread of Japan that can rival the best breads of the world in international competitions. He travels to Tokyo to study with master bakers and there gets into all kinds of exploits. Each installment of the series features various kinds of quirky bread recipes, and the website I found was a collection of all the breads he made with links and suggestions so that actual fans of the show can recreate the breads at home. I think the series sounds brilliant so I’ll definitely have to check that out at some point.
Bamboo Charcoal Challah Bread
Makes one large braided loaf (can be doubled if you'd like to make more)
1 package active dry yeast
1 cup lukewarm water
1/2 cup sugar + 1 teaspoon sugar for the yeast proofing
1 tablespoon of molasses
1/4 cup olive oil, plus more for greasing the rising bowl
2 large eggs + 1 large egg for the egg wash
1/4 cup finely ground bamboo charcoal powder
1 teaspoon salt
4 to 4.5 cups all purpose flour
poppy seeds or black sesame seeds for sprinkling over top (optional)
In a large bowl, proof your yeast by whisking with 1 teaspoon of sugar in 1 cup of lukewarm water. Set aside and let sit until the yeast starts to foam.
Once it has foamed, pour into the base of an electric mixer and used the whisk attachment to mix in the olive oil, the two eggs (one at a time), sugar, and bamboo charcoal powder.
Switch to the dough hook and slowly add the salt and the flour, one cup at a time until it comes together and pulls away from the sides. Allow to knead in the mixer until smooth. (About 5 minutes.) If the dough seems too wet, add a little more flour, ¼ cup at a time.
Turn out the dough onto a floured surface and roll into a ball. Grease a large bowl well with olive oil and place the dough ball in. Turn once to cover the top and cover with plastic wrap.
Place in a warm place to rise for an hour or until doubled in size. (I use my turned-off oven as the heat from the pilot light is perfect temperature.) Use your fingers to gently poke the air out of the dough, roll back into a ball, grease, cover and let rise again for another 30-45 minutes.
Once the dough has finished the second rise, roll out onto a floured surface and gently knead into a smooth ball. Cut into six equal size balls and roll each one into a tapered snake shape, about 10 inches long each. Arrange the six rolls next to each other in a row and pinch the ends together. To braid, start from the right and go over two, under one, and over two. Tuck in closer and repeat again with the right-most piece of dough repeating until the entire loaf is braided. Set on a baking sheet lined with parchment paper.
Beat the last egg and use a pasty brush to lightly brush over the loaf. Let rise for another hour.
When you are ready to bake, preheat your oven to 375 degrees (if you are rising the dough in the oven please be sure to remove it first).
Once the oven is ready, brush the loaf again with egg wash and sprinkle on the poppy seeds if using. Place in the oven to bake for 30-40 minutes or until the top is glossy and golden brown.
Cool on a rack and serve.
To store leftover bread, wrap well with plastic wrap and keep in a cool dry place but outside of the fridge.
September 6, 2008
On Shirataki Noodles

I miss pasta. I miss heaping bowls of steaming linguine with red clam sauce. I miss the feel of a spoonful of classic spaghetti alla Bolognese. I miss ravioli and oozy bites of lasagna or bouncy tagliatelle coated in creamy cheese sauces. I even miss (don't judge me) the thin, springy strands of 10-cent ramen coated in that much-too-salty flavor powder (my favorite is "oriental"). I miss the ease of pasta. Few things match the comfort and convenience of tossing a box of rigatoni into a rapidly boiling pot. Shhh... Listen. Can't you practically hear the woosh as they pass from cardboard box to bubbling water?
I tried substitutions. I played around with soy noodles and low-carb noodles and nutty-textured whole wheat noodles. I painstakingly julienned thin strips of zucchini and boiled and served with sauce just like I would normal linguine. And everything looked so good! It looked right. But the moment I lifted fork to mouth, the excitement was gone because it just didn't *taste* right. And, as I'm sure you'll agree, it really is all about the taste.
So I basically gave up on trying to recreate these memories at home, settling for the occasional indulgent bite of my boyfriend's pasta which he'll hold up in front of me, steamy and dangling from the fork just inches from my face. And those bites...man...those bites are good. And they're good enough to make me rethink this whole way of eating. So I battle it out in my head. The bouncy bite of al dente vs. the single-digit-sized dresses hanging in my closet. And I'm almost sorry to say that for this girl, this girl who trained in Tuscany and who can, if asked, turn a mound of flour and eggs and water into something bouncy and wonderful, well even for her, those dresses win.

But I still miss it, and I began to assume that this would just be it. But then something happened. Something I never expected. There I was, pushing my cart through the refrigerated aisle in a search for Greek-strained yogurt, when my eyes fell upon something new. A plastic bag filled with...cooked spaghetti? I picked it up: Tofu Shirataki. Yam and tofu noodles, it explained. I turned it over and smiled. 3 grams of carbs. 2 grams of fiber. That's 1 net carb. And the serving size? Well it was the whole bag! I grabbed a few and tossed in my cart excited about the possibilities.
Folks, I love this stuff. I love it. I made carbonara first, frying bits of thick, country bacon until crisp, tossing with shaved pecorino, and breaking one giant egg over it all, letting the golden yolk ooze and pour over the strands. It was good. It was very good. It was pasta. The next night I made a cream sauce from whole-milk ricotta, lemon zest, and fresh basil. I cracked black pepper over it all and curled up with my bowl.
It doesn't taste weird. It doesn't taste like anything, actually. Made from the root of an Asian plant called the Elephant Yam (which bears no relation to those starchy Thanksgiving yams), the noodles are somewhat transluscent and have practically no calories, carbs, or really much of anything. They can be made from the yam alone, but these can be a bit rubbier than the ones made from a tofu-yam blend which are springy, but not in an overly pronounced way. I've tried both and prefer the tofu kind, but will eat either. The noodles are tasteless and take on the flavors of whatever it is served with. Note that the water it comes in smells a bit odd. Almost fishy or slightly chemical, but it can be easily rinsed away in cold water and then boiled for a minute or two to completely wipe it out and it doesn't affect the taste of the noodles at all.
If you miss pasta, try this. Buy a few bags (look for them at Whole Foods and Trader Joes near the tofu, tempeh, and vegan products in the refrigerator case; your local Asian markets should have them too. They can also be purchased online in boxes of 12.) Once you have them, be sure not to boil them like you would pasta. Just a minute or so to rinse off the package water then finish off in the sauce you make or toss into a cold noodle salad. Add to soup. Top with sauce or cheese or olive oil and garlic. Add herbs. Add spices. It's pasta. Enjoy it.
January 30, 2008
Making Mochi

"This is gross," said my brother, never one to mince words. "Why would he bring us such weird candy?"
My parents were equally puzzled (albeit less rude) and turned away after a couple minutes, preferring the familiar sweetness of the Godiva this friend had also brought.
While I admit that I didn't love the way the candy tasted either, I was fascinated with the texture. I love chewy, squooshy things. My brother is regularly grossed out by the way that I tend to play with my food when I think that nobody is watching--hollowing out a loaf of bread and squishing the doughy mass into a tight little ball or emptying out the filling of a truffle and licking it off my finger before eating the shell. I love getting my hands dirty with food; I have no qualms about plunging my hands into raw turkeys or kneading sticky piles of flour and eggs into pasta dough. It's probably also why I love Silly Putty and Play-Doh, and why I was always getting in trouble for stealing that gummy blue putty tape that my elementary school teachers used to stick posters to the wall.
Given these proclivities, it's no wonderf I've spent the past few weeks intrigued with the idea of making my own mochi. My friend Matt is obsessed with mochi ice cream and regularly sends me e-mails and IMs that say little more than "Mochi is just so wonderful." I'd been plotting to teach myself to make it so that I can surprise him with a little tray of homemade mochi ice cream balls when he comes to visit me next month. My impromptu expedition to the Japanese grocery store last weekend proved to be the perfect way to get started on Project Homemade Mochi.
I decided to start by teaching myself to make daifuku--a round ball of mochi stuffed with Anko, a sweet red bean paste made from azuki beans. I'd never tasted it before, but had seen various pictures on the web (particularly this lovely shot from Kyoto Foodie). I love the lumpy squooshy look of it and was excited to get started. Of course, Alejandra being Alejandra, I didn't really bother to find a recipe before hitting the store. One would think that no recipe + everything in a foreign language would make for an unsuccessful trip, but not for me! Using what bits I'd read about what mochi is and my memory of the taste, I haphazardly selected ingredients that seemed like they might be right: rice flour, a package of sweetened red bean paste, confectioner's sugar, and some tapioca starch. I lucked out as this plus water and food coloring was really all I needed.
 When I got home I searched online for mochi recipes. They all seemed to follow a similar pattern, but varied in amounts and ratios. Most advised using the microwave as a quick way to cook the dough, but few other instructions were clear. Bored and eager to get in the kitchen, I decided to just wing it.
In a large bowl I mixed equal parts rice flour (I used dango-ko, which is a mix of glutinous and non-glutinous rice flour and--rather fortuitously--seems to be the  kind best suited for microwave preparation) and tepid water. To this I added powdered sugar, a few drops of red food coloring, and some almond extract (just because I'm obsessed). I processed with a hand blender until smooth and then poured into a Pyrex pie dish that I covered and placed in the microwave.
 kind best suited for microwave preparation) and tepid water. To this I added powdered sugar, a few drops of red food coloring, and some almond extract (just because I'm obsessed). I processed with a hand blender until smooth and then poured into a Pyrex pie dish that I covered and placed in the microwave.
While the dough cooked, I rolled little balls out of chilled sweetened red bean paste and dusted everything with starch in anticipation of the sticky dough. After letting it cool a bit I dusted my hands with starch and scooped some out. Molding it was easy: I simply rolled a ball out of the mochi dough then flattened it out a bit on the floured mat. I plopped a ball of red bean paste in the center and then pulled up the sides of the mochi dough like a little bag (it reminded me of making Beggar's Purses back at school). I pinched the top and then rolled around in my hands until smooth on all sides. I repeated this about a dozen times. It was easy, but sticky and messy (my favorite!).
 After shooting them, I covered them with plastic wrap and stored in the fridge. I had one for breakfast this morning and it was delicious. The gooey mochi dough had a subtle sweetness and a faint hint of almond, and the red bean paste was oozed out in a creamy contrast to the stickiness of the mochi. If you've never tried red bean paste before, it literally tastes like sweet refried beans--but it's good!
I'm not sure if it's just because I made them to my tastes or if my palate has just changed over the past year, but I can honestly say that I loved these treats. I'll be tackling the ice cream version next--possibly with my own homemade green tea ice cream!
A Few Helpful Tips:
1. Dust EVERYTHING with tapioca (or potato or corn) starch: the surface, your hands, spoons, plates. This dough is incredibly sticky and it's the only way to handle it.
2. I tend to have naturally cold hands--a huge benefit when working with chocolate and confections, but if you are naturally warm-handed, I would suggest washing with very cold water before you get started. It will keep the dough from sticking as much.
3. Play around with extracts or food colors--I don't think that it's exactly traditional, but it gives the final treats a great look and taste. I started out with just a few drops of red, but then decided I wanted them to be hot pink so I threw in a bit more and loved the final look. I'm excited to try out other color combinations.
4. Blow off the extra starch before eating--you'll want to keep it nice and dusty for storing, but as it's tasteless, it takes away from the experience.
Daifuku--Anko-stuffed MochiDaifuku literally means "great luck" in Japanese. Apparently, the word fuku means both "belly" and "luck." It seems that the original meaning of big belly, which referred to the filling nature of the confection, evolved over the years to mean a bringer of good fortune. When I first read this, I instantly thought that the belly part referred to the fact that the daifuku actually look like little bellies. I've taken to calling them "chubby belly cakes" in my head--but that's just me... ;)
Ingredients1 1/2 cup Dango-ko rice flour1 1/2 cup tepid water
2/3 cup confectioner's sugar (feel free to adjust according to personal preference)1 package or can of sweetened Anko (red bean paste), refrigerated to keep firm.food coloring (optional)almond extract (optional)tapioca, potato, or corn starch for dusting and controlling the sticky dough
You will also need a microwave and a flat microwavable dish such as a deep-dish pie plate.
1. In a large bowl, mix the rice flour, sugar, and water until smooth. You may need to use a hand blender or mixer to make sure there aren't any lumps.
2. If desired, add drops of food coloring and/or extract and mix in thoroughly. Note that the batter will be quite thin--very similar to pancake batter in consistency.
3. Pour batter into a shallow microwavable dish and cover with plastic wrap. Microwave for 4 minutes. Remove dish and pull off plastic to release steam. Stir the mix until smooth again (it will be cooked in some parts and not in others so don't worry if it looks uneven). Microwave again for another 3 to 5 minutes until the top is dry.
4. While mix cooks, take out the refrigerated bean paste and roll into small balls about the size of a chocolate truffle. Dust your hands with starch or confectioner's sugar to keep from sticking.
5. Remove mochi dough from microwave and let cool for several minutes. You can speed this up by pounding it with a flour-covered pestle until shiny and smooth.
6. To Mold: taking one heaping tablespoon of dough out of the dish and place in your starch-covered hands. Work into a circle and then flatten on the floured board. Drop a ball of red bean paste inside and the pull mochi around the edges like a little purse. Pinch the top shut and then use your hand to smooth into a soft round shape. Dust with additional starch and set aside. Repeat this process until you use up all the mochi.
Cover finished Daifuku tightly with plastic wrap and refrigerate to store (or freeze). Serve and enjoy much the way you would any other cookie or small cake.

January 28, 2008
Pink Noodles and Super Mayonnaise: Shopping at the Sunrise Mart

In the movie Hook, (yes, that Robin Williams debacle) there is a scene where Peter and the Lost Boys sit around a table with rumbling tummies and empty plates dreaming up the delicious treats they wish they could be eating. Their imaginations are so strong that it isn't long before the plates are piled high with cakes and meats and strangely colored porridges that they wolf down and flick across the table at each other as lost boys are wont to do. I've been thinking about that scene quite a bit lately since I started browsing the magnificent food por(n)tal, Tastespotting, during my lunch hour. I find myself wishing that, like Robin and the lost boys, I could will my average work cafeteria meals into some of the incredible dishes that stream by on that site.
 I go there for inspiration, ideas, and pure entertainment. I'm completely dazzled by some of the images I see pop up and am quite proud to have had a couple of my own (mediocre) photos included in the line-up. While browsing the site a few days ago, my eyes were immediately drawn to a gorgeous bouquet of pink noodles. I followed the link to Cake Wardrobe's blog where I read her post about finding these ume plum udon noodles among the racks at a cool Japanese grocery store located around the corner from St. Mark's Place. Her descriptions were so exciting that I instantly decided to pay the market a visit.
 I went on Sunday. After brunch with a friend in Chelsea, I made my way east towards the village. I had very vague directions, (only the name of the store and that it was "near St. Mark's Place.") and so it took a bit of wandering before I finally stumbled around a corner and found myself at the entrance to the Sunrise Mart.
 The store is located at 4 Stuyvesant Street, right above the St. Mark's Bookshop. You have to take an elevator to the second floor and the moment the doors open, it's as if you've left New York. The store bustles with people: older Japanese men and women shopping slowly, NYU hipsters loading up on candy and fresh sushi, and a disproportionately high number of mom's pushing baby strollers (seriously, it's like a Japanese Park Slope in there). Even though I told myself that I was only there to buy some of those pink ume noodles, I somehow found myself reaching for a basket and checking to make sure they accept credit cards (they do). The basket filled up quickly, as I indiscriminately tossed in anything that struck my fancy. As everything is labeled in Japanese, it's almost impossible to know what you're buying without reading the mandatory English nutritional labels stuck over the back of everything (thank you FDA), but even then it's kind of a guessing game.
  I love puzzles, so it was just the thing to get the ideas flowing. "I'll make green tea ice cream!" I thought as I threw in a pricey bag of ground Matcha powder. I followed the Matcha with a pound of ginger root, a bag of fiery-looking dried chiles, some rice flour and red bean paste to make daifuku (mochi cakes filled with red bean paste--an idea inspired by the cute little PacMan-like mochi on P
 eko's Kyoto Foodie blog). Never having actually tasted daifuku before, I made sure to pick out a plump little premade one from the fridge to serve as a guide. I also grabbed a little package of quail eggs (a dozen for two dollars--Whole Foods sells them at 1 dollar each), a package of pink noodles, and a little box of gorgeous cherry blossom tea that "blooms" when you pour hot water over it. From the snack aisle I picked out a box of chocolate candy sticks and a plastic container full of teriyaki flavored nori snacks. The item that I am most excited about, however, was found in the refrigerated section in the back: a squooshy squeeze bottle of "Super Mayonnaise." Super! Mayo! And it comes with a star tip! I'm already giddy about the possibilities...
The Details:
Sunrise Mart
Japanese Specialty Foods
4 Stuyvesant Street, Second floor
New York City, NY 10003
Hours: 11a-10p
Subscribe to:
Posts (Atom)
