Smashed Watermelon Rum Cocktail

On Saturday night, Eugene and I went to a show followed by drinks at a bar. Technically we went in looking for food, but the kitchen had closed early at 10PM. We decided to stay for a drink anyway, and each picked out something from the seasonal cocktail menu.

My choice was a watermelon cocktail that combined muddled watermelon, citrus, and dark rum.

One sip and I got excited. "I love this drink! I love it!"

I drink a lot of watermelon cocktails during the summer, but for some reason, I've never paired watermelon with rum before. With tequila and vodka and gin, yes, but never rum.


My mistake, because it turns out that watermelon + good dark rum is cocktail magic!

This is my version of the drink I had that night.

You start off with cubes of chilled, seedless watermelon and mash them down in the bottom of a glass.

This is the important part--you don't want to puree--you want there to be chunks of watermelon, because then the fruit absorbs the rum and once you drink the liquid part, you can dig a spoon down to the bottom and enjoy spoonfuls of boozy fruit while you wait for the bartender to pour you another one.

(If you've ever had a drunken watermelon, it's a similar idea, except that it's in the bottom of your cocktail.)

Some fresh lime juice, a bit of brown sugar if you'd like, crushed ice, and a good golden or dark rum (NOT spiced). I used a Venezuelan rum called "Diplomatico," but I also love "Flor de CaƱa" rum from Nicaragua. Go ahead and pick your favorite!

This is the time of year when people start moaning about how summer is almost over, which is a lot of nonsense. We still have nearly a full month! And with fantastic watermelon rum cocktails like this, I intend to enjoy every single second of it!


****
Loved this recipe? Here are a couple other watermelon recipes you might like:


And let's connect so you can find out the next time I post! Follow me on Twitter, Instagram, or Pinterest, become a fan on Facebook, or sign up to receive my once-a-week e-mail updates.

Thanks so much for reading!


Smashed Watermelon Rum Cocktail
Makes 1 cocktail, multiply as needed

Ingredients
1 1/2 cups diced seedless watermelon, chilled
1 fresh lime, juiced
1 teaspoon raw brown sugar (optional)
2 oz. gold or dark rum (not spiced)
Crushed ice

Directions
Combine watermelon, lime juice, and sugar (if using) in the bottom of a tall cocktail glass. Use a muddler to mash the watermelon. Add the rum, stir, then add crushed ice and stir again before serving.

0

Mini Kimchi Quesadillas

The combination of kimchi, melted cheese, and crisp tortillas is one of those things that sounds weird, but somehow totally works. I didn't come up with the concept of Kimchi Quesadillas; that honor goes to Roy Choi of the amazing Kogi BBQ truck in LA. I tried them on my most recent trip to the West coast and fell hard for that spicy, salty, crispy combo.

It's the perfect snack food to serve with cold drinks when you have friends over to watch a movie or "the game." (Whatever that game might be.)

The ingredients are simple. Tortillas (I prefer corn, but flour works, too), some kind of freshly shredded cheese like a sharp white cheddar, and kimchi. If you make homemade kimchi, definitely use that. If you're buying it, look for a good quality brand. You want something kind of artisan with great flavor, crispness, and spice. Skip the cheap-o mass-produced kind.

Oh...and you need butter. A lot of it.

Get your skillet nice and hot, melt a nice chunk of butter, and toss in a few tortillas. Layer in the cheese and kimchi, cover them with another tortilla and lower the heat a bit. You want the cheese to completely melt, the kimchi to heat through, and the tortillas beautifully crisp.

I like salt so I season the whole thing generously, too. You don't have to. (But you should.)

Cut them in half and serve them hot. This is one of those dishes that's  kind of awesome eaten around the stove, serving them and eating them right as they come off the skillet.

So perfect.

****
Loved this Mini Kimchi Quesadilla recipe? Here are three other game day snack recipes you might like:
 

And let's connect so you can find out the next time I post! Follow me on Twitter, Instagram, or Pinterest, become a fan on Facebook, or sign up to receive my once-a-week e-mail updates.

Thanks so much for reading!


Mini Kimchi Quesadillas
Makes 4 small quesadillas, multiply as needed

Ingredients
2 tablespoons butter + more, as needed
8 mini corn or flour tortillas
1 cup shredded cheese such as cheddar or Monterey Jack
1 cup kimchi, roughly chopped
Kosher salt, to taste

Directions
Heat the butter in a skillet over medium-high heat until melted. Swirl the pan around to coat evenly.

Spread out the tortillas in the pan and let them crisp for a few seconds. Flip each one, then add a generous handful of cheese and a few forkfuls of kimchi. Cover with another tortilla and press down slightly with the back of a spatula.

Let cook about 2-3 minutes, then flip and continue to cook until other side is crisp, cheese is melted, and kimchi is heated through.

Remove from pan, cut each quesadilla in half, and sprinkle with kosher salt. Serve immediately.
 
0

Feed Your Passion Episode 5: Kitchen Essentials

This week on Feed Your Passion, I invited Chef Grace Ramirez over to talk kitchen essentials and decluttering.

I have a thing for kitchen gadgets so my pantries are stocked (perhaps...overstocked?). As a chef who has had to move quite a bit, Chef Grace knows all about what's worth keeping, and what needs to go. She shared some of her favorite must-have kitchen items, and then helped me tackle my kitchen clutter.

(It was hard, you guys!)

Watch the fun episode below:

0

Cream-Braised Pumpkin Scapes

It's the word "scapes" that got me. They were piled up by the kale and beets on the farmer's table, large flat green leaves with soft, hollow-looking stems and the occasional corkscrew tendril flying out like a tiny green telephone cord.

The sign said "Pumpkin Scapes $2." I love garlic scapes, so seeing that there was something called "pumpkin scapes," got me really excited.

"What do you do with those?" I asked the farmer, who jumped up seeing that I was curious about them.

"You saute them in oil or butter and they get really sweet!"

That was all I needed to hear before selecting one of the biggest bunches to take home and try.

You might be wondering, what are pumpkin scapes?

Also called pumpkin leaves or pumpkin greens, they're basically the leaves and vines that grow with pumpkins. They're totally edible and quite delicious, but can be a bit prickly to the touch.  They're covered in a bit of fuzz that can feel a little bit strange and itchy, so keep that in mind when you go to cook them.

To prep, you'll want to cut off the leaves and tender, hollow stems, discarding the long thicker bottoms. Then give them a rough chop and a quick rinse, before dropping into a pan filled with hot oil and garlic.

I sauteed them quickly at first, then, remembering the thing the farmer said about sweetness, added in a cup of heavy cream and some nutmeg, then reduced the heat to low. I let them simmer in the cream, watching it reduce and thicken, giving them a bit of a stir every so often until the leaves looked tender and dark green.

Some flour would have thickened it all further, but I like a lighter, looser version, with just slightly reduced cream and a green that still stands out. 

I dove my fork right into the pan and was thrilled by my first taste.

"These are SO good!" I shouted at Eugene, who was in the living room watching a soccer game.

I immediately regretted not buying a second or third bunch.

The taste is definitely sweet, without any of that bitterness or muddiness you get from other greens like chard, mustard, dandelion or beet greens. They're really lovely and mild, and apparently quite nutritious, with relatively high levels of iron, calcium, and vitamin C.

Not bad for something most people probably thought was meant to be discarded!

That night, they were my dinner, along with a grilled and split link of chorizo, and I've been counting down the days until Saturday when I plan to buy two or maybe even three bunches to play with.


****
Loved this Pumpkin Scapes recipe? Here are three other vegetable recipes you might like:

And let's connect so you can find out the next time I post! Follow me on Twitter, Instagram, or Pinterest, become a fan on Facebook, or sign up to receive my once-a-week e-mail updates.

Thanks so much for reading


Cream-Braised Pumpkin Scapes

Ingredients
1 punch pumpkin scapes
2 tablespoons olive oil
3 large garlic cloves, sliced
1 cup heavy cream (you could substitute full-fat coconut milk for a vegan version, too!)
1 teaspoon nutmeg (use more or less to taste)
1/4 teaspoon red chile flakes (optional)
Kosher salt and black pepper


Directions
Trim off the thick ends of the pumpkin scapes, leaving only the tender hollow stems and leaves. The tendrils are also OK to eat. Chop roughly and rinse well under cold running water. Set aside.

Heat olive oil in a large skillet with a top over medium-high heat. Add the garlic and saute for 30 seconds before adding the pumpkin scapes. Saute in pan, stirring until all greens are coated with the oil. 2-3 minutes.
Add the cream, nutmeg, and chile flakes. Season with kosher salt and pepper, and reduce heat to a gentle simmer. Let cook about 5 minutes, stirring occasionally, until the cream reduces slightly and the greens are tender and dark green. Adjust seasoning and serve hot.


0

Syrup-Soaked Almond Semolina Cake

In New York City, ordering food is a pretty common thing. Even though I love to cook, I also really love craving something like zucchini fries or basil fried rice or blackened salmon, clicking a few buttons online, and having that very specific thing arrive 20-40 minutes later.

One of my favorite things to order for delivery is a delicious Syrup-Soaked Semolina Cake from a middle eastern restaurant in our neighborhood.

The truth is, it's unfortunately not a great restaurant. The rest of their dishes are executed with a pretty obvious lack of care and skill, but that cake is killer.

Made from a slightly crumbly combination of semolina flour and ground almonds, the cake is delicate and nutty--almost reminiscent of a great sweet cornbread.

The best part is the syrup. The cake arrives soaked in an ambrosial honey and orange-blossom syrup that invades each crumbly bite and seriously makes me swoon.

I love this semolina cake so much that I will regularly order some of that mediocre food, just so I can get the dessert. (Because they won't deliver just a single $2 piece of cake.)

I did once order 5 pieces of cake in order to meet the $10 delivery minimum, but that was kind of ridiculous, and not one of my prouder moments since I just spent that whole night in a cake coma.

Learning how to make the cake at home was a much better move, and this version comes pretty close to the one made by that restaurant.

Please note that like with most traditional desserts, there are dozens of variations of semolina cake from many countries throughout the Mediterranean and North Africa. Some are made with ricotta cheese or yogurt, others without the nuts, and the syrups vary in flavor, too.

This is just one way to do it, and I hope you enjoy it as much as I do.

****
Loved this Syrup-Soaked Almond Semolina Cake recipe? Here are three other cake recipes you might like:
 

And let's connect so you can find out the next time I post! Follow me on Twitter, Instagram, or Pinterest, become a fan on Facebook, or sign up to receive my once-a-week e-mail updates.

Thanks so much for reading!

Syrup-Soaked Almond Semolina Cake
Makes 1 9-inch loaf cake

Ingredients
1 1/3 cup semolina flour (either fine or coarse will work—or use an equal mix of both)
3/4 cup almond meal or ground almonds
3/4 cup granulated white sugar
1 teaspoon baking powder
1 teaspoon kosher salt
1/2 cup unsalted butter, melted
2 large eggs, slightly beaten
1 cup full-fat coconut milk
1 teaspoon almond extract
1 teaspoon vanilla extract

For the syrup
1 1/2 cups water
1 cup granulated sugar
1/2 cup honey (use orange blossom honey, if you have it!)
4 tablespoons butter, cut into pieces
1/2 teaspoon kosher salt
1 tablespoon orange blossom water

Directions
Preheat oven to 350 degrees. Grease a 9x5” loaf pan with baking spray and line with parchment paper so that it overhangs on the sides.

Whisk together the semolina, almond meal, sugar, baking powder, and salt. Add the melted butter, beaten eggs, coconut milk, and extracts, and stir well until evenly combined. Pour into the prepared baking pan and let rest 10 minutes before baking for 25 -35 minutes or until dark around the edges and slightly cracked on top. Remove from baking pan and let cool on a rack.

While the cake bakes, prepare the syrup. Combine the water, sugar, honey, butter, and salt in a medium saucepan and bring to a boil. Reduce heat and let simmer 10 minutes, or until reduced by a quarter. Remove from heat and let cool to room temperature.

Place the cooled cake in a shallow baking pan and pour all the syrup over the top and sides. Leave the cake to absorb the syrup, occasionally spooning some from the pan over the cake (like basting a turkey!) until it is nearly all absorbed. 


0

Spicy Chipotle Salmon Tacos

It's been at least two months since my last taco recipe so we are WAY overdue, friends.

This time around it's all about these spicy Chipotle Salmon Tacos with an easy Cumin-Lime Mayo sauce.

Salmon is already packed with tons of great flavor, so you really only need a few other simple ingredients to pull these together in record time.

They're an ideal weeknight meal, or great for a lazy weekend when you have mouths to feed, but not much motivation.


You start out by prepping the salmon. I like to get a big gorgeous piece of wild salmon as it's the best in terms of flavor and nutrition, but definitely pick your favorite kind.

I pat it dry then brush with the adobo sauce from a can of chipotles in adobo.

I literally just scoop out a few spoonfuls of it straight from the can to the fish and brush it on evenly. Sprinkle liberally with salt, pepper, and some oregano, and you're done!

Pop this under the broiler for about 7 minutes. (You can also bake it in a hot oven for about 15 minutes, or cook it on a grill.)

Let it cool slightly then use a fork to flake it into large chunks.

The sauce is just mayo with some fresh lime juice and cumin, whisked together.


Do NOT forget to warm up the tortillas on a hot skillet or right over the flame. Don't just use tortillas straight out of the package--that's like eating a hot dog straight out of the package. It's cooked, technically, but...it's just not ready to eat, yet.

The rest people can do themselves!

Serve the salmon with the sauce and tortillas and your favorite toppings. I keep it simple with sliced radishes and cilantro. Chopped onions, avocado, cabbage slaw or any other number of classic taco toppings would work here, too.


Taco perfection!


****
Loved this recipe? Here are three other taco recipes you might like:


And let's connect so you can find out the next time I post! Follow me on Twitter, Instagram, or Pinterest, become a fan on Facebook, or sign up to receive my once-a-week e-mail updates.

Thanks so much for reading!


Chipotle Salmon Tacos
 Serves 4

Ingredients
1 1/2 pounds wild salmon fillets
1 can chipotles in adobo sauce
Kosher salt and black pepper
1 teaspoon dried oregano
1/2 cup mayonnaise
1 lime, juiced
2 teaspoons ground cumin
Corn tortillas, for serving
Fresh cilantro, sliced radishes, limes, and other toppings for garnish

Directions
Preheat broiler. Line a baking sheet with foil and place salmon fillets on top.

Spoon out three tablespoons of adobo sauce from chipotles (reserve the peppers for another use). Brush sauce over the top and sides of the salmon.

Sprinkle generously with salt, pepper, and oregano. Broil about 6" away from broiler for about 7-10 minutes or until cooked to desired doneness.

While the salmon cooks, whisk together mayonnaise, lime juice and cumin.

Remove salmon from oven and let cool slightly while you heat tortillas on a skillet or over a gas burner.

Use a fork to flake salmon into chunks.

To assemble tacos, spread warm tortillas with mayo sauce and top with salmon and desired toppings. Eat immediately.
 
0

Feed Your Passion Episode 4: Vendy Plaza Food Market in Harlem

In this week's episode of Feed Your Passion, I brought Eugene along with me to explore Vendy Plaza in Harlem's La Marqueta.

Tucked under the Harlem train tracks, this cool food market features live music, wine, and some of the best food vendors from around the city. We tried everything from fresh fruit smoothies and toasted banana marshmallows to empanadas, samosas, and bbq pork.

Some seriously delicious eating, for sure!

Watch the short video below and don't forget to subscribe so you don't miss a single episode!

0

Cucumber Lime Agua Fresca

Just a quick and simple recipe for you, today!

Cucumber Lime Agua Fresca is a cool drink made from pureed cucumbers, lime juice, and a bit of sugar. It's kind of like a cucumber lemonade, except the fresh cucumber is the predominant flavor. It's spectacular and just the thing for hot summer days.

I love the concept of aguas frescas, but often find that they are far too sweet for my tastes. I prefer to add just a small bit of sugar and let the fruit flavor shine through.

(Yup...cucumber is a fruit!)

Also...I need to be honest with you.

As lovely as this is on its own, it is also the PERFECT base for just about every spirit. Gin, tequila, vodka...all wonderful with this. Though you might like to know that...


****
Loved this recipe? Here are a couple other cucumber drink recipes you might like:


And let's connect so you can find out the next time I post! Follow me on Twitter, Instagram, or Pinterest, become a fan on Facebook, or sign up to receive my once-a-week e-mail updates.

Thanks so much for reading!


Cucumber Lime Agua Fresca
Makes 2-4 servings

Ingredients
4 large cucumber, ends trimmed and cut into large chunks
2 limes, juiced
1 cup water
3 tablespoons sugar or honey (use more or less to taste)

Directions

Combine the cucumbers, lime juice, water, and sugar in a blender and puree three minutes, or until very smooth. (A high-speed blender works exceptionally well for this!)

Strain through a fine mesh sieve to remove any remaining seeds or solids.

Taste and adjust seasoning, then serve over ice.


0

Feed Your Passion Episode 3: Gluten-Free Colombian Treats at Big Booty Bread Co.

Gluten-free baking might seem like a totally new thing, but many cultures have actually been making incredible gluten-free baked goods for thousands of years.

In this episode of my web series Feed Your Passion, I head to one of my FAVORITE bakeries in NYC-- Big Booty Bread Co. (yup...that's the name!) to learn all about chewy, cheesy, and ridiculously delicious Colombian breads like pan de bono, pan de queso, arepas, and more!

Watch the video here:

0

Watermelon Salad with Mojito Dressing

You guys know I love dessert and that it absolutely is a MUST after my meals, but note that this doesn't always have to mean a decadent slab of cake.

(Not that there is anything wrong with that!)

Sometimes on hot summer days, all I want is a touch of crisp sweetness and there is nothing better than a bit of watermelon or round out a sunny summer meal.

This simple watermelon salad is one of my favorite things to serve when I'm cooking for groups in the summer. Diced sweet ripe watermelon is tossed with a simple dressing of lime juice, torn mint, honey and a dash of salt.

It's easy, gorgeous, and super satisfying.

Watermelons are perfect right now, so take advantage and whip this up asap.


****
Loved this recipe? Here are a couple other watermelon recipes you might like:


And let's connect so you can find out the next time I post! Follow me on Twitter, Instagram, or Pinterest, become a fan on Facebook, or sign up to receive my once-a-week e-mail updates.

Thanks so much for reading!


Watermelon Salad with Mojito Dressing
Serves 6-8

Ingredients
1 seedless baby watermelon
2 large limes, juiced
2 teaspoons honey
1/4 cup fresh mint leaves, torn
1/4 teaspoon kosher salt

Directions
Peel and dice the watermelon.

In a large mixing or serving bowl, whisk together the lime juice and honey. Whisk in half the mint and the salt.

Add the watermelon and toss well to coat each piece with the dressing. Garnish with remaining mint leaves and serve immediately.

0

How to Host a Tiki Party


There are only a few things I love more than a theme party. Especially when it gives me an excuse to dress up in something festive. This year, I got my friends to dig out their prettiest tropical sundresses and Hawaiian shirts for some Polynesian-themed revelry at my Retro Tiki Party.

Scroll down below to see how I pulled it together, and get some inspiration for your next celebration!

The Drinks

The idea to throw this party came about while brainstorming themes for my ongoing "Summer of Punch" recipe collaboration with Smirnoff this year. I've always wanted to throw a retro tiki-style party, and since tiki parties are all about the fun tropical punch drinks, it was a perfect match!

I started out by researching classic tiki cocktails. Typically made with spirits like rum, I mixed things up a bit and created vodka versions that highlighted some of my favorite Smirnoff flavors.

My party bar featured three updated tiki cocktail punches. The overall favorite was definitely the Blue Raspberry Island Punch, made with Smirnoff Raspberry, cream of coconut, pineapple juice, blue curacao, and soda.

I also made a Peach and Passion Fruit Mai Tai using Smirnoff Peach and a Vodka Pina Colada Punch using classic Smirnoff No. 21.


I served the punches in a mix of punch bowls and beverage dispensers with cups, ice, cocktail umbrellas, and garnishes on the side for DIY serving. It's such a relaxed and low-key way to host a party because it allows guests to help themselves while I can focus on food and greeting guests.

Setting up the Tiki Bar
It's always smart to separate your food and drinks as it allows for more flow in your party space. This is especially important if, like me, you're entertaining in an apartment or other small space.

I set my bar in my office, which is just off the main party room.

I started off with a plain surface (in this case, my cleared-off desk!) and covered it with some neutral colored scarves to add texture and color.

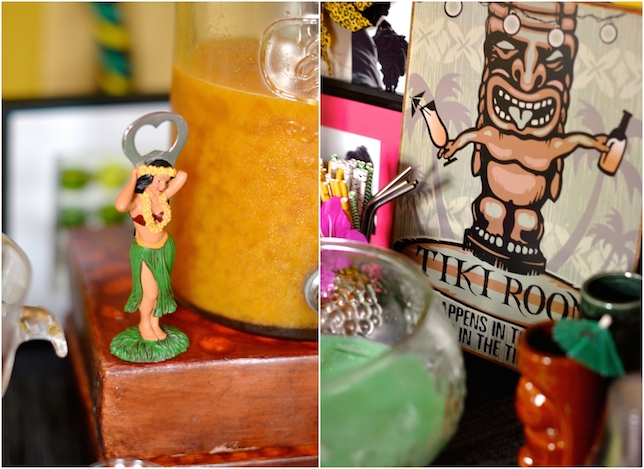
I used stacks of books and blocks to add a variety of height to the bar, and added interesting touches like a cute hula girl bottle opener and a vintage style metal Tiki bar sign I found at a discount store.

Set up your punch bowls and other bar accessories ahead of time, then fill them with the beverages at the very last minute. This will save you time, and help keep the drinks cool before guests arrive.

Tiki mugs are a must for any tiki party. You can find real vintage ones at thrift stores or online shops. You can also find sets of inexpensive modern reproductions at party stores. I paid about $3 to $5 each for my mugs.

TIP: Don't feel like you need to buy one for every guest--even just a few to use as decoration (or to hold things like straws, cutlery, or cocktail stirrers) is enough to give it that classic tiki party feel!


The Food
Have fun with the food, but definitely keep it simple. I decided to add a modern twist by making my party a "Tiki Taco Party."

This allowed me to have a mix of fun, but easy dishes that satisfied all my guests. I broke the menu up into Polynesian or pu-pu platter style appetizers and snacks, with a DIY taco bar for the main course.

I created a fun (but easy! I promise!) Pineapple Chutney Cheese Ball that I shaped like a pineapple and decorated with pecans and the real crown from an actual pineapple. Served with plantain chips and rice crackers, it was a popular appetizer that also added to that retro, kitschy atmosphere.


A couple hot appetizers that can be prepped in advance and finished just before serving are always a hit. I went with simple Chinese-Style Pork Spare-Ribs and Spicy Bacon-Wrapped Pineapple Bites, which are a riff on a retro rumaki appetizer.


For the DIY Taco Bar, I offered a choice of roasted and pulled pork, ancho-pomegranate brisket, and a simple black bean and corn salad, as well as blue and yellow corn tortillas.

The meat was easy to prepare a few days in advance in my slow cooker and then reheated just before serving. Anytime you can do stuff in advance for a party, do it! You will be so thankful you did!


For the DIY taco bar toppings I set out bowls of my homemade restaurant-style salsa and homemade pineapple salsa (served in a pineapple bowl!).

I also added some simple toppings like salted red cabbage slaw, cumin-spiced sour cream, cilantro, chopped red onions, guacamole, and cotija cheese.

With a big meal like this, you don't really need a big dessert, but a little something sweet to end the night is always a good idea!

I made these easy Guava Coconut Crumb Bars and set out some additional fresh cut pineapple and watermelon for snacking.

Decorations
Don't feel like you have to spend a lot of money buying fancy decorations! I always recommend looking around your house for objects you already own to create the perfect party scene or tablescape.

Bamboo placemats or table runners, colorful tablecloths or floral napkins can all be pulled into service for this theme.


Another tip?

Just about any souvenir you've ever bought on an island, or beach vacation could work for this party theme. Think about things like large conch shells, sand dollars, stoneware, wooden bowls or serving pieces, or colorful scarves.

If you've ever stayed in a tropical resort or hotel, you might have noticed that it always smells amazing from the minute you step inside.

I like to mimic that with a sweet-smelling coconut or hibiscus candle burning in the bathroom or entryway. Such a subtle touch, but I promise you it really makes an impact.


Add Color with Tropical Fruit and Flowers
My absolute favorite decorative touch is natural tropical fruits. Pineapples, coconuts, bananas, and other tropical fruits make amazing natural and affordable decorations.

I bought a few of each and scattered them around the room.

(The pineapples smell amazing, too, and add to that wonderful island feel.)

The best part? You can chop them up for an amazing fruit salad (or more cocktails!) the next day.

Leis and flower necklaces for your guests are a must for any tiki or Polynesian-themed party, and they're incredibly affordable.

I was able to buy two dozen silk lei necklaces from a party store for about $10 and kept them by my door. I gave one to each guest as he or she arrived.

(Yes...even Hudson Riverton got one!)

I also went to a local 99-cent store and bought a few stems of silk hibiscus flowers that I cut down and used both for table decorations and to give to my guests to tuck into their hair.


The Perfect Tiki Party Playlist
Finally (and possibly most important of all!) don't forget the music! Every tiki party needs an amazing playlist. You can check out streaming sites for a premade one.

The genre of music best associated with tiki parties is called "Exotica," which is a super fun and weird mix of tropical sounds with beach and wild animal noises. Look up artists like Martin Denny for a perfect example of this.

Other songs and musicians to consider include: Don Ho (of course!), Elvis Presley (especially the soundtrack to the movie Blue Hawaii!), Henry Mancini for great jazzy lounge music, Louis Prima's version of I Wanna Be Like You from The Jungle Book, The Beach Boys, Santo & Johnny, The Tornadoes, and The Polynesians.

I hope that this inspires you to throw your own tiki theme party!

For more fun summer cocktail recipes and ideas, follow Smirnoff and the hashtag #Punch4Everybody on Instagram and Facebook, and check out their fun party boards on Pinterest!


This is a sponsored post written by me on behalf of Smirnoff for IZEA. All opinions are 100% mine.
Please remember to always drink responsibly!


Blue Raspberry Island Punch Cocktail
Serves 12
Ingredients
2 cups Smirnoff Raspberry
1/4 cup blue curaƧao
4 cups canned chilled pineapple juice
2 14oz cans cream of coconut 1 liter chilled club soda

Directions
Whisk together all ingredients except club soda in a large punch bowl. Add 4 cups ice and top off with club soda.

Serve with additional ice on side
Visit Sponsors Site
0
Back to Top