Showing posts with label Dip. Show all posts

Roasted Jalapeño Lime Remoulade

This easy spicy Roasted Jalapeño Lime Remoulade is the perfect topping sauce for crab cakes or fish tacos. It's also wonderful as a dip served with fried shrimp, dolloped over oysters, or to use in sandwiches or burgers.

Roasting the jalapeños softens the heat a bit and adds a touch of smoky charred flavor to the sauce. You can roast the peppers under a flame broiler or on a traditional grill. If you don't have either option, you can also roast them in a 425 degree F oven for about 20 minutes, though you likely won't get the same charred exterior.


0

Corn and Black Bean Salsa Salad

It takes about 5 minutes to pull this ridiculously easy Corn and Black Bean Salsa Salad together, but the final dish is one of those that's surprisingly good. I call it a "salsa salad" because it really is both!

You can serve it up with a big bowl of salty chips (like these homemade tortilla chips!) or spoon it over tacos or serve it up on its own as a light vegetarian main course.

It's also a great side for grilled chicken or fish, or can be added to mixed greens to bulk them up a bit. I've even stirred this into corn chowder or other light summer soups.


It's incredibly versatile and a universal crowdpleaser. Bring a big bowl of it to your next party, and watch it disappear as you rake in all the compliments.

(You're welcome!)

Note that while you can definitely make and serve this right away, I think the trick that makes it SO good is to let it chill in the fridge for a couple hours so that the flavors all have a chance to get to know each other.

Give it a quick toss just before serving and it'll be good to go.

You can also feel free to improvise a bit--add grilled zucchini, roasted peppers, or switch up the spices as desired.


****
Loved this recipe? Here are three other salsa recipes you might like:

And let's connect so you can find out the next time I post! Follow me on Twitter, Instagram, or Pinterest, become a fan on Facebook, or sign up to receive my once-a-week e-mail updates.

Thanks so much for reading!


Corn and Black Bean Salsa Salad
Serves 6

Ingredients
2 cups cooked corn kernels (fresh or frozen & thawed both work!)
2 cans black beans, drained and rinsed
1/2 large red onion, diced
1 large jalapeño pepper, finely diced
1 red bell pepper diced
1/2 cup fresh cilantro, chopped
2 teaspoons ground cumin
1/2 teaspoon smoked spanish paprika OR chili powder
2 tablespoons olive oil
Juice and zest from 1 large lime
Kosher salt and black pepper, to taste

Directions
Combine all ingredients in a large bowl and toss well to combine. Season with kosher salt and black pepper to taste. Cover and chill at least 2 hours and up to overnight before serving.

0

Fresh Pineapple Salsa

I love a good fruit salsa. That combination of sweet and spicy is absolute magic with salty tortilla (or plantain!) chips.

I served this gorgeous Fresh Pineapple Salsa at a party I threw recently, and it was one of the first dishes to go. Best made a few hours in advance, I suggest throwing all the ingredients together, then folding the cilantro in at the very end just before serving.

If pineapples are in season and readily available, definitely use a fresh one, but it will work with good canned pineapple, too (just be sure to drain it well, and don't get the kind that's in syrup!). Then you just add diced red or white onions, jalapeño (as much or little as you want to taste!), fresh lime juice, cilantro, and a bit of salt. 

I served my pineapple salsa in a bowl I made by hollowing out a real pineapple--a simple trick that makes it that much more festive for your next summer party, but you can also just toss it in a bowl.

This is one of those dishes that's as pretty as it is delicious.

Happy summering!

****
Loved this recipe? Here are three other salsa recipes you might like:


And let's connect so you can find out the next time I post! Follow me on Twitter, Instagram, or Pinterest, become a fan on Facebook, or sign up to receive my once-a-week e-mail updates.

Thanks so much for reading!


Fresh Pineapple Salsa
Makes about 3 cups

Ingredients
1 whole pineapple, cored and diced (about 2 1/2 cups)
1/2 red onion, diced (about 3/4 cup)
1 jalapeño pepper, seeded and diced
1 large lime, juiced
1/4 teaspoon kosher salt
1 cup fresh cilantro, chopped

Directions
Toss all ingredients together in a large bowl, reserving part of the cilantro. Cover and chill at least two hours before serving. Toss again just before serving, and garnish with reserved cilantro.

Serve with tortilla chips or as a topping for tacos. 


0

Rainbow Veggie Dippers

I'm obsessed with summer colors. There are few things more inspiring to me than the rainbow of fruits and vegetables that fill the market shelves and produce stands this time of year.

If a vegetable is sold in a color that it's not typically sold in (read: purple potatoes, multi-colored carrots, orange tomatoes)--I will probably buy it.
These Rainbow Veggie Dippers are a super quick little appetizer idea for your next summer party. Takes minutes to put together, but for some reason people go wild for them.

It's really just dip and crudites, but the trick is all in the presentation.

Your favorite dip or dressing (I'm using blue cheese dressing here, but ranch or Caesar would work, too) is piped into the bottom of a shot glass. You can use a spoon, but a piping bag keeps it neat and prevents it from streaking down the side of the glass.

(I tried it several ways. Trust me on this.)

Then all you have to do is layer in a rainbow of veggies in different colors. I used rainbow carrots, bell peppers, zucchini and roasted purple sweet potatoes for mine. Use whatever you have or love!

Cucumbers, celery, radishes--anything that can be cut into a long-ish spear will work.

It's a fun and easy way for people to snack on veggies at cocktail parties. No need to worry about double-dipping!

****
Loved this Rainbow Veggie Dippers recipe? Here are three other party appetizer ideas you might like:


And let's connect so you can find out the next time I post! Follow me on Twitter, Instagram, or Pinterest, become a fan on Facebook, or sign up to receive my once-a-week e-mail updates.

Thanks so much for reading!


Rainbow Veggie Dippers
Makes 12 appetizers

Ingredients
1 1/2 cups creamy dressing (such as blue cheese, ranch or caeser salad dressing)
2 pounds of assorted vegetables cut into 3" sticks (suggestions: bell peppers, carrots, cucumber, zucchini, roasted sweet potatoes, blanched asparagus, etc.)

For assembly: 12 tall double-shot glasses, piping bag

Directions
Place dressing into a piping bag, and pipe about 1 1/2 tablespoons into the base of each shot glass (use more or less depending on the size of your glass). Layer in the veggie sticks.  Serve immediately, or cover loosely with plastic wrap and chill until serving (up to 4 hours).


0

How to Make Labneh

Because I'm Puerto Rican, people often assume that Latin food is my favorite. It's definitely very high up there, and I do tend to cook with those kinds of flavors and ingredients often, but the truth is that given the choice, I'm more likely to pick Middle Eastern dishes and flavors.

I love garlicky yogurt sauces, beautifully seasoned lamb, tangy cheeses, and crispy fritters. I go wild for desserts flavored with rose and orange blossom or drenched with honey syrup. I think Turkish delight is as delightful as the name promises, and am obsessed with chewy Lebanese ice cream. I garnish my savory dishes with sweet dried fruits and toasted nuts. My pantry is filled with jars of sumac, za'atar, aleppo pepper, pomegranate molasses, and harissa.

One of my favorite snacky treats is labneh--a yogurt "cheese" made from thick, strained yogurt that's been seasoned with a bit of lemon and salt.

It's simple to prepare--simply whisk together the three ingredients, and then let it drain overnight in a cloth-lined sieve. 12-24 hours later, and the yogurt has thickened into something luscious and spreadable.

(FYI that you'd typically use cheesecloth for this, but I couldn't find mine, so I went with a piece of leftover lace from my sewing box. Honestly, any sort of loosely woven cloth would work!)

You can enjoy it right then, but upon recommendation from one of my favorite chefs, Chef Philippe Massoud of Ilili Restaurant here in NY, I then whisked it until light and shiny. As a savory dip, top it with very good oil and a generous sprinkle of za'atar later, and it's absolutely perfect. A wonderful alternative to hummus or guacamole or any other dip. I also love it sweetened with honey or rose-flavored syrup and slivered almonds.

Labneh can also be used in other ways--try spreading it into a sandwich or on warm toast, dollop it over braised meat or soup, and you can even bake with it or serve it alongside a simple cake or other sweet treat.

It's beautifully versatile, and easy to prepare. If you're anything like me, I suspect that once you make it for the first time, you'll be tempted to do it again and again!

****
Loved this recipe? Here are three other Middle Eastern-inspired recipes you might like:


And let's connect so you can find out the next time I post! Follow me on Twitter, Instagram, or Pinterest, become a fan on Facebook, or sign up to receive my once-a-week e-mail updates.

Thanks so much for reading


Homemade Labneh

Ingredients
2 cups full-fat plain Greek yogurt (do not use low or non-fat!)
1/2 teaspoon kosher salt (I like mine salty, so I actually use a bit more than this--adjust according to your taste)
1 tablespoon fresh lemon juice
Olive oil and za'atar or honey, for serving (optional)

Directions
Place a sieve over a deep bowl, and line with cheesecloth or other loosely-woven cloth so that it overhangs on the sides.

In a separate bowl, whisk together yogurt, salt, and lemon juice.  Scrape into the prepared sieve, and cover the yogurt with the overlapping fabric. Place in refrigerator and let drain for 12-24 hours (the longer, the thicker. I usually like about 16 hours.)

Once drained, flip the labneh out into another bowl (discard the liquid (whey) or use for marinating meat!) and whisk it by hand for a couple minutes until light and and shiny. This makes it exceptionally creamy and luscious. You can technically skip this step, but it's really worth the extra effort...I promise!

Garnish it as desired and serve.
Ingredient Note: You can definitely use regular plain yogurt instead of Greek, but just keep in mind that this kind has more liquid in it, so it'll take longer to reach the thick creamy consistency + you'll also end up with a bit less of the final product than if you start with Greek yogurt, which has already been strained.


0

Turkish Molasses Tahini Dip

A couple days ago, my friend Olga shared a link on Facebook to a post about everyday life in Istanbul. The article was part of a series from the blog A Cup of Jo, where she interviews mothers who are raising their children outside of the US. In it, the mother described a typical Turkish breakfast, which consists of a variety of items including warm breads, cheeses, clotted cream with honey, cucumbers, olives, and (most notably) a spread made from molasses and tahini.

I had both tahini and molasses in my pantry, so I popped into my kitchen and combined a few teaspoons of each to test it out.

I was blown away!

The creamy nuttiness of the tahini (a sesame spread similar to a nut butter that's often used in hummus) went beautifully with the dark, rich sweetness of the molasses. I seasoned it with a bit of sea salt and added a dash of cayenne for heat, then served it with salty crackers.

I absolutely love this new spread and am excited to use it in new ways. Thinned with a bit of warm water, I bet it would be beautiful drizzled over strawberries. It would also be incredible on warm toast or an english muffin as a pre-workout snack.

I can even see it as a thin layer in a cake!

Seriously so many possibilities here!

****
Love Always Order Dessert?
Let's connect! Follow me on Twitter or Pinterest, become a fan on Facebook, or sign up to receive my once-a-week e-mail updates. And if you ever need any entertaining or cooking advice, please don't hesitate to e-mail me. Thanks for reading!     


Turkish Molasses Tahini Dip
Makes 1 cup

Ingredients
1 cup Tahini
2 tablespoons molasses (if you don't have or like molasses, a dark honey or maple syrup would work well, too)
1/2 teaspoon kosher salt
1/4 teaspoon ground cayenne (optional)

Directions
Combine all ingredients and whisk until smooth. If too thick, try warming it up slightly on the stove or a microwave until it stirs easily.
Feel free to adjust with a bit more molasses for a sweeter, richer flavor.


0

Cumin Cilantro Yogurt Sauce

This tangy and slightly-spicy yogurt sauce is a regular at my home. I love serving this with fish tacos (another regular around here!), using it as the base dressing for chicken or tuna salad, or even with crudite as an easy dip.

Note that it's important to use Greek-style yogurt for this (full-fat, please!), as it will be too thin with regular plain yogurt.

****
Love Always Order Dessert? Let's connect! Follow me on Instagram, Twitter or Pinterest, become a fan on Facebook, or sign up to receive my once-a-week e-mail updates


And if you ever need any entertaining or cooking advice, please don't hesitate to e-mail me

Thanks for reading!     


Cumin Cilantro Yogurt Sauce
Makes 2 cups

Ingredients
2 cups plain Greek-style yogurt (preferably full-fat)
Zest and juice of 1 large lime
1/2 bunch cilantro, ends trimmed
1 small garlic clove
1 1/2 teaspoons ground cumin
Kosher salt and black pepper

Directions
Combine yogurt, lime zest and juice, cilantro, garlic, and cumin in a food processor and puree until smooth. Season to taste with salt and black pepper, and serve chilled.


0

Vegan Roasted Tomato Crema

This simple creamy dip or sauce is one I make when cooking for vegan friends. It's wonderful served over tacos or roasted vegetables, as a dip for chips, or even as a spread in wrap sandwiches.

To make this extra creamy, make sure to use silken tofu, which is more delicate and will give the crema a light texture. Note that if you don't eat soy, you can also use coconut yogurt in place of the tofu.

****
Love Always Order Dessert?
Let's connect! Follow me on Twitter or Pinterest, become a fan on Facebook, or sign up to receive my once-a-week e-mail updates. And if you ever need any entertaining or cooking advice, please don't hesitate to e-mail me. Thanks for reading!    


Vegan Roasted Tomato Crema
Makes about 3 cups

Ingredients
6 roma tomatoes, cut in half lengthwise
2 garlic cloves, minced
olive oil
1 teaspoon black pepper
1/2 teaspoon kosher salt
1/2 pound silken tofu (half a typical package)
1/3 cup full-fat coconut milk
1 teaspoon ground cumin
1/4 teaspoon ground cayenne

Directions
Preheat oven to 425 degrees. Place tomatoes cut-side up on a baking sheet. Drizzle tomatoes with olive oil and sprinkle with minced garlic, pepper, and salt. Roast 15-20 minutes, or until tender. Remove from oven and let cool.

Combine tomatoes, along with any juices from the pan, silken tofu, coconut milk, and spices in the blender and puree until very smooth. Season with kosher salt and black pepper to taste. Then transfer to a bowl, cover, and chill until serving.

Variations: feel free to add fresh herbs, additional garlic cloves, or other spices to personalize the flavor.


0

Green Chutney (Indian Mint & Cilantro Sauce)

I first moved into my apartment about six years ago. I hadn't met Eugene yet, and was living the life of a single girl in Manhattan. Although I cooked pretty regularly (certainly much more than the average single girl in Manhattan), I did also do my fare share of ordering in.

My favorite spot back then was an Indian restaurant that let you do the ordering online through their website. I would often come home exhausted after a long day, pull out my laptop, and order up my favorite dinner of lamb kheema (a ground lamb dish), naan, lamb samosas, and gulab jamun--a sticky sweet dessert that I'm still completely addicted to.

The food would arrive in about half an hour--a pile of steaming styrofoam containers (I know! I know. So bad.) topped off with a little bag filled with condiments--yogurt raita, a sweet chutney, and my favorite--green chutney. I would tear into the bag while sitting on my lumpy purple couch, and inhale the meal as I watched Sex and the City reruns.

The perfect single girl evening.

For a while, I didn't actually know that amazing sauce was called green chutney; I just knew that I loved it in all its spicy tangy green goodness, and wanted them to send more than the usual single tiny plastic container of it. So I got online and googled "spicy green Indian sauce" to find out the name.

And there it was--green chutney. A condiment similar to pesto or chimichurri made by grinding or pureeing fresh herbs (mint and cilantro/coriander) with garlic, coconut, ginger, acid, and chiles.

From then on, all my orders included the phrase "Extra green chutney, please!!"

Unfortunately...they didn't always comply with my request...

So, I learned to make my own. (And now you can, too.)

What to do with green chutney: while there are many variations of this lovely condiment, this is my favorite. A batch of this will keep refrigerated for a week to 10 days, and can be used with grilled meats or vegetables, as a spread in sandwiches, and whisked into yogurt to make a great dip. It's also a wonderful marinade (I love it with shrimp and white fishes like halibut).


****
Love Always Order Dessert? Let's connect! Follow me on Twitter or Pinterest, become a fan on Facebook, or sign up to receive my once-a-week e-mail updates. And if you ever need any entertaining or cooking advice, please don't hesitate to e-mail me. Thanks for reading!  


Green Chutney Recipe
Makes about 2 cups

Ingredients
1 large bunch cilantro (also known as coriander), ends trimmed (about 3 cups, loosely packed)
1 small cup fresh loosely packed mint leaves
1/4 cup ground unsweetened coconut (substitute 1 teaspoon honey if you don't like coconut)
6 cloves garlic
1 jalapeno
1/4 cup fresh lime juice
1 teaspoon ground cumin
1 teaspoon ground ginger
1 teaspoon kosher salt

Directions
Combine cilantro, mint, coconut, garlic, jalapeno, lime, cumin, ginger, and salt in a food processor or blender, and puree until smooth. Add water a few tablespoons at a time to loosen the mixture until smooth (you want something similar to pesto in texture). Taste and adjust salt as desired.


0

Strawberries with Lime Curd Yogurt Dip


I don't really have any business calling this a "recipe." It's more of an idea. A suggestion.

And a very good one, at that.

This dip is just two ingredients--thick, full-fat Greek yogurt and lime curd. You whisk the two together to taste, adding more or less curd as you'd like.

I recommend going with "more" over "less." You want this to taste decadent, not breakfast-y.

This creamy, tangy dip is just the thing to serve with a pile of ripe, fresh berries during those hot summer days when you don't want to turn on the oven, but would like something other than ice cream.

There is also a bit of carefree luxury about it. Like "oh I just whisked this up to serve." Like you're the sort of person who just regularly whisks up fancy-tasting treats like this.

You can make homemade lime curd, but I never do. I rarely have the patience for homemade curd when the kind in the jar is so lovely and luscious. Just be sure to get a good bottled lime curd--free of things like high fructose corn syrup and artificial flavors.

My favorite? Dickinson's. I get it at my supermarket, but it's also sold on Amazon. (They also make a very good lemon curd.) Also look for curd at fancy vacation village gourmet shops. They'll be a bit overpriced, but so are all souvenirs, so you might as well get something you can really enjoy.

Leftover curd is perfect for breakfast, again with the yogurt, but this time in more reasonable morning proportions. My current favorite weekday breakfast is yogurt topped with lime curd, blackberries, shaved unsweetened coconut and fresh mint. Curd is also good sandwiched between graham crackers and dipped into sour cream--it's like instant key lime pie!

****
Love Always Order Dessert? Let's connect! Follow me on Twitter or Pinterest, become a fan on Facebook, or sign up to receive my once-a-week e-mail updates. And if you ever need any entertaining or cooking advice, please don't hesitate to e-mail me. Thanks for reading!


Strawberries with Lime Curd Yogurt Dip

Ingredients
1 quart ripe strawberries
1 cup full-fat Greek yogurt
2-3 tablespoons lime curd

Directions
Wash strawberries and place in on a serving plate. In a small bowl, whisk together the yogurt and lime curd, adding more or less lime curd, to taste. Place in a ramekin and serve alongside berries as a dip.


0

DIY Pantry: Homemade Nutella (vegan recipe)

One of my favorite workshops during this past weekend's Sweet Escape Retreat (more about that soon!), was the DIY Pantry class, during which I showed the attendees how to make easy homemade versions of popular condiments and pantry staples. In the hour-long workshop I showed them how to make a quick strawberry jam and homemade ketchup, but the definite hit was my recipe for Homemade Nutella.

This quick and dairy-free version tastes almost exactly like the kind you get in the bottle, but doesn't contain any funky ingredients. Even better? It's made entirely in the food processor--all you have to do is combine the ingredients and let the machine do the work.

The recipe starts off with blanched hazelnuts--this is key as it eliminates the need for you to roast and remove the skins yourself, which is a total pain in the butt (trust me. I tried it that way once and it wasn't fun.).

I get my blanched hazelnuts from nuts.com (one of my top three favorite shopping websites EVER!), but you can also find them at the bulk aisle of grocery stores like Whole Foods. They're about a dollar or two more expensive per pound than the ones with skins, but it saves you so much time and effort, that it's totally worth it.

Photo by Connie of UrbanBakes.com, via Instagram
You then puree this with unsweetened cocoa powder, powdered sugar (I used organic as it's GMO-free), a bit of salt, some vanilla extract, and hazelnut oil, which helps loosen the spread and also intensifies the hazelnut flavor.

You'll note that in the recipe I am flexible with the oil--that's because different batches of nuts will have more oil than others, so you'll have to use your eye and just keep adding oil until it hits the right creamy texture.

Another thing to note is that as this is homemade, it's unlikely that you'll get it as perfectly smooth as the bottled kind. Many of the bloggers on the retreat actually noted that they preferred the slightly gritty texture as it felt "more rustic and natural." I have to agree!

P.S. Check out retreat attendee Judith's post about the class here.

****
Love Always Order Dessert? Let's connect! Follow me on Twitter or Pinterest, become a fan on Facebook, or sign up to receive my once-a-week e-mail updates. And if you ever need any entertaining or cooking advice, please don't hesitate to e-mail me. Thanks for reading!


Homemade Nutella (Vegan, Dairy-Free)
Makes 3 cups

Ingredients
4 cups (1lb) blanched hazelnuts
2 cups powdered sugar
2/3 cup cocoa powder
1/4 cup hazelnut oil plus more as needed (Note: substitute walnut, canola, grapeseed, or coconut oil if you can't find the hazelnut oil although note that the hazelnut oil will give it the stronger "nutella" flavor)
1 tablespoon vanilla extract
1/2 teaspoon kosher salt

Directions:
Process the hazelnuts in a food processor about 2 to 5 minutes,  until they start to form an oily hazelnut butter (similar to a rough peanut butter).

Scrape down the bowl, and add the powdered sugar, cocoa powder, hazelnut oil, vanilla extract and salt and continue to process, scraping down the bowl and adding more hazelnut oil, a few tablespoons at a time, until the mixture becomes smooth and glossy (similar in texture to jarred Nutella). 
Once it reaches the desired texture, transfer to a jar for storage. Store in the refrigerator for up to 6 weeks.


0

How to Make Homemade Crème fraîche

It should come as no surprise that I like to end my days with something sweet.

And this sweet thing usually goes through phases. Last month it was microwave mug cakes--scant spoonfuls of flour, sugar, and spice whisked with an egg and zapped just long enough to produce a tiny hot, spongy little cake.

The weeks before that, I was into homemade dark chocolate bark studded with bits of cracked espresso beans. (Delicious, but an unwise evening snack as it usually left me up all night thinking up projects.)

Now, with sunny warm days upon us, it's berries.
Strawberries, in particular, washed in cold water and served alongside a bowl of tangy crème fraîche and crunchy, toasty coconut palm sugar. It's the sort of treat that seems and tastes gloriously indulgent, and yet is not something that would be out of place on the breakfast table.

I rediscovered my love for creme friache just a few weeks ago when I attended a reception hosted by the folks at Vermont Creamery. For dessert, they served rich flourless chocolate cakes topped with a cloud of the silky sour cream, and I was blown away by how perfectly it worked to balance out the sweetness of the rich cake.

The flavor, if you've never tried it, is a bit of a cross between mascarpone and sour cream. It's got the cultured tang you might know from yogurt or buttermilk, but there is also a very lovely sweetness like that you get from good heavy cream. And the texture is thick and a bit gooey, like marshmallow fluff.

When my gifted container finished, I bought another and then a third, and then this weekend I was dismayed to find that the container was nearly empty yet again. I wanted to serve it along with dessert at the Mother's Day lunch I was preparing for my mom and mother-in-law, but I didn't have time to buy more.

That's when I remembered a long ago article that mentioned how incredibly easy it is to make creme fraiche at home. I got online and found that it really was easy.

As easy as whisking together good heavy cream and a few tablespoons of buttermilk or yogurt or even just some storebought creme fraiche. I happened to have a small unopened bottle of Ronnybrook cream (the best around here), so I poured it into a bowl and stirred in equal parts Greek yogurt and what was left of my Vermont Creamery container.

I covered the bowl with a piece of the plastic (poking in a few holes to allow air to travel), and left it on top of the stove overnight.

By Sunday morning, the bowl of cream had turned thick and silky. I was so excited that I brought it into the bedroom where Eugene was still sleeping. "Look at this! I made creme fraiche!" I exclaimed.

"That's nice," he mumbled, then rolled over back to sleep.

I left the room hugging my bowl then placed it in the fridge to chill and thicken a bit more. I served my homemade creme fraiche to the moms along with fresh strawberries, blackberries, and coconut palm sugar. They loved it.

The bowl is nearly empty again, and I think I just may have to make another batch.

This is definitely a dangerous skill to have acquired...

****
Love Always Order Dessert? Let's connect! Follow me on Twitter or Pinterest, become a fan on Facebook, or sign up to receive my once-a-week e-mail updates. And if you ever need any entertaining or cooking advice, please don't hesitate to e-mail me. Thanks for reading!  


Homemade Creme Fraiche Recipe

Ingredients
2 cups good quality heavy cream (not ultra-pasteurized)
1/3 cup buttermilk, yogurt, or creme fraiche (or a combination of these adding up to 1/3 cup)

Directions
Whisk the heavy cream and buttermilk together in a glass bowl. Cover with plastic wrap that's been poked several times to allow air to pass. (You can also use cheesecloth.)

Leave at warm room temperature for 12 to 24 hours, or until the cream has thickened into the texture of loose whipped cream. Give it another stir, cover tightly with a new piece of plastic wrap, and place in refrigerator for at least 8 hours. It will thicken and set completely. You can now serve this with both sweet and savory dishes, or use for cooking. (Just as you would use sour cream or store-bought creme fraiche).

You can also sweeten or flavor the creme fraiche after it's ready--some good additions are lemon or orange zest, vanilla beans, dried herbs, or sugar. 

Keeps well 1 week to 10 days when stored in a tightly sealed container in the refrigerator.


0

Listen to Your Body (Spinach Garlic Hummus Recipe)

One of the best bits of advice I've ever received in my life came from a high school teacher.

Mrs. Langlieb was an amazing lady who taught religion and philosophy classes at my school. These courses were a little different than the typical high school fare. For example, one of my favorites was called "On Death & Dying," which was based on the work of Elizabeth Kubler Ross and delved into everything from what happens to your body as it dies (death rattles, rigor mortis), the afterlife, caring for a dying person, and the grieving process. There were even a few classes on things like "how to write a sympathy card" and "what to do when attending a wake."

It sounds like an odd, depressing class to offer young students, but I think it was probably one of the most useful ones I've ever taken.

She also taught a class on sex, love & relationships. Again, not what you expect in high school--especially not a private Catholic high school, but this lady was special. I remember we once spent a week discussing the subject of intimacy in relationships during which she showed us a clip from Dawson's Creek. It was the episode where Pacey and Joey had sex for the first time. The clip showed Pacey standing behind Joey and lovingly brushing her hair, at which point she turns around and tells him she's ready to sleep with him, and they soon embrace and end up on the bed together. She explained that the intimate act in that scene was not the sex or the kiss, but rather the moment where he brushed her hair.

I think what made her so great was that once the doors to her room shut, it was like a whole different world. She made sure we covered all the things required by the curriculum, but she also made a lot of time to let us talk about other things that were affecting us--whether those be academic or personal--always without judgment.

And on days when we seemed high-strung or perhaps even just tired, she would shut off the lights, turn on soft music, and encourage us to meditate or pray silently for 15 minutes. I would sometimes fall asleep during these moments, awaking with a start and fabric creases on my face.

Mrs. Langlieb would silence my apologies and say, "It's OK. You have to listen to your body and do what it says." She then talked at length about the importance of checking in with yourself and figuring out what your body needs. A nap? A glass of water? A few minutes of quiet?

I've since used this phrase in my life over and over again, and find it particularly important these early weeks of January. December can be an exhausting time for many of us. There is stress. There are emotions. There is snow. Regular schedules go out the window. Not to mention the invitations, parties, and guests. And then there is the sugar--cookies and peppermint candies, fudge, and dozens of baked treats.

It's wonderful, but it is a lot, and by the time that January rolls around, many of us are ready to barrel in with good intentions and dramatic declarations.

But sometimes, I think it's important to stop and be quiet first. Take a little time to listen to your body, and find out what it really needs.

For those of you whose bodies need green and protein, give this little twist on classic hummus a try. Packed with spinach, it's brightened up with lemon zest and juice, and uses water to reach the perfect creamy hummus consistency. I know raw garlic can be harsh for some people, so I simmer it gently in the olive oil first--just enough to take the bite off while infusing the oil with great flavor.


****
New to Always Order Dessert? Consider subscribing to my RSS feed, follow me on Twitter, become a fan on Facebook, or sign up to receive my once-a-week e-mail updates by filling in your address in the box on the right. And if you ever need any entertaining or cooking advice, please don't hesitate to e-mail me. Thanks for reading!


Spinach Garlic Hummus
Makes about 4 cups

Ingredients
2 cans chickpeas
1/4 cup olive oil
4 large garlic cloves, sliced
1/4 cup lemon juice
2 tablespoons tahini
1 10oz package chopped frozen spinach, thawed and drained
Zest of one large lemon
1/2 cup water
Kosher salt, to taste

Olive oil, za'atar spice for garnish (optional)

Directions
Drain chickpeas and rinse well under cold running water. Add to food processor base. Combine olive oil and sliced garlic in a skillet and heat just until the garlic starts to sizzle and become fragrant, about 2-3 minutes. Remove from heat and pour into food processor. Add the lemon juice, tahini, thawed spinach, and zest. Puree until smooth, adding water slowly until it is creamy. Season to taste with kosher salt.

Transfer to a bowl, cover, and let chill in the refrigerator. As it chills, the flavors will blend together and intensify. Sprinkle with za'atar and a drizzle of olive oil before serving, if desired. Store leftovers in the refrigerator, covered. Will keep about 1 week.
0

Red Pepper, Parsley, and Walnut Spread

DSC_1139

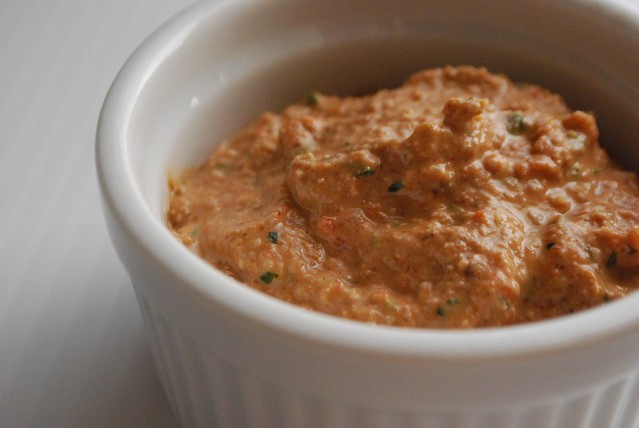
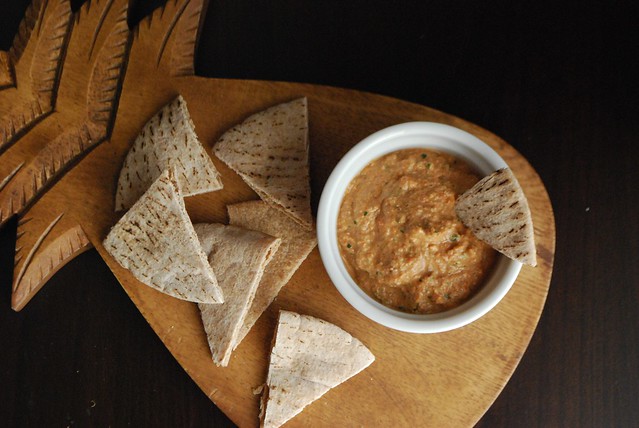
I recently fell in love with a red pepper dip I tasted at one of my favorite Mediterranean restaurants that tasted like a cross between a traditional Muhammarah and a fresh Mexican salsa.  Honestly--it was fantastic! That place has a little shop in front when you can buy pretty much everything on their menu to take home, so before we left, I bought a small container of the dip for "research purposes."

On the menu, the dip was described as a pepper dip with walnuts and garlic. I knew there was a lot more in there, so I started tasting (aka "researching") and trying to identify all the flavors. I'm letting you know right now that this isn't it. This is a lovely dip that resulted from my various experimentations. It's not the exact one I was hoping to make, but it's so good and so versatile that I had to share it.

DSC_1147

Made with roasted red peppers, onions, walnuts, and a few other good things, this spread is wonderful on warm pita or in a sandwich in place of mayo, but it goes even further than that! You can also use it the way you would any pesto--on pasta, tossed with shrimp before grilling or sauteing, even dolloped onto tomato or lentil soup as a garnish!

The spread keeps well in the fridge for about two weeks (just give it a little whisk before using if it starts to separate), and is a quick way to pack lots of flavor into a weeknight lunch or dinner.

I'm still working on cracking the code behind that other magical dip and will be sure to share it with you as soon as I do, but until then, I'm sure you'll love this one.

DSC_1149


****
New to Always Order Dessert? Consider subscribing to my RSS feed, follow me on Twitter, become a fan on Facebook, or sign up to receive my once-a-week e-mail updates by filling in your address in the box on the right. And if you ever need any entertaining or cooking advice, please don't hesitate to e-mail me. Thanks for reading!

 
Red Pepper, Parsley, and Walnut Spread

Ingredients
3 red bell peppers, whole (see notes in recipe for substitutions)
1 cup shelled and roasted walnuts
3 cloves garlic, peeled
1 half onion, peeled
1 teaspoon Kosher salt (plus more if necessary)
1 bunch Italian flat parsley, rinsed and trimmed of the bottom 2 inches of stem
1 tablespoon smoked spanish paprika
olive oil


Directions
Roast the bell peppers by placing directly over the flame on a gas stove, turning with tongs until blackened all over. (You can also use a broiler or grill; or substitute an equivalent of store-bought roasted red peppers) Place blackened peppers in a paper bag or in a bowl covered with plastic wrap, and let steam and cool for 15 minutes.  Use your hands to peel the peppers (leaving just a bit of the charred skin), also removing the seeds and core.

In the base of a food processor or blender, combine the peeled and seeded roasted peppers, the cup of walnuts, the 3 cloves of garlic, the half onion, salt, parsley, and smoked paprika and puree until smooth. Drizzle in about 2 tablespoons of olive oil, and puree again. Taste and adjust salt as needed.

Serve immediately as a dip, use as a spread in sandwiches, toss with pasta, etc. Will keep in an air-tight container in the refrigerator for 2 weeks.
0

Retro Recipes: Molded Salmon Mousse


A creamy and savory salmon molded salmon mousse is a classic and kitschy way to feed a crowd. Made from canned salmon (this is basically the ONLY thing canned salmon is really good for) and pantry staples, it's a budget friendly dish that will be sure impress. And yes, you can replace fresh cooked salmon for the canned salmon, or sub 1 cup of the canned salmon for 1 cup of smoked salmon. Or you can even try it with tuna! It's a very adaptable recipe; just have fun with it!

For my retro party, I made this mousse in two really cute fish-shaped molds I found at Sur La Table for about $10 each. I used paprika, olives, and pimentos to decorate the finished mold and served it atop a bed of fresh dill with a knife and plenty of crackers for snacking.

The mousse can be made up to 24 hours in advance and unmolded just before serving. To quickly release it, I just filled a basin with hot water and quickly dipped the underside of the mold in it for a quick 15 seconds. I placed a plate over the mold and quickly flipped it over. It slid out easily (if it doesn't, just repeat the dip in the hot water and try again).

I used an olive cut in half to make an eye, strips of pimento to make scales, and a dusting of pimento for color. The salmon mousse leftovers will keep well-wrapped in the fridge for an additional 2-3 days after your party.

Oh! And just so you know. If you have trouble finding a mold or something goes wrong while taking the mold out, (nothing will! Don't worry!...but just in case) you can just whip it up and serve as a regular dip. None will be the wiser!

****
New to Always Order Dessert? Consider subscribing to my RSS feed, follow me on Twitter, or sign up to receive my once-a-week e-mail updates by filling in your address in the box on the right. And if you ever need any entertaining or cooking advice, please don't hesitate to e-mail me.


Molded Salmon MousseServes about 20 as part of a party buffet; can be halved

1.5 envelopes unflavored gelatin
1/4 cup cold water
1/2 cup boiling water
1/2 cup mayonnaise
2 tablespoons fresh lemon juice
2 tablespoons finely diced shallots
Dash of Tabasco (I used a smoked chipotle tabasco for a little smokey heat)
1 tablespoon smoked spanish paprika (plus more for garnish)
2 teaspoons kosher salt
2 tablespoons finely chopped fresh dill
2 cups flaked canned salmon, skin and bones removed (can replace 1 cup smoked salmon for 1 cup of the canned salmon)
1 cup heavy cream

Watercress or fresh dill, crackers, pimentos, for garnish and serving


Directions

1. Soften the gelatin in the cold water in a large mixing bowl. Stir in the boiling water and whisk the mixture slowly until the gelatin dissolves. Cool to room temperature.

2. Whisk in the mayonnaise, lemon juice, diced shallot, Tabasco, smoked paprika, salt, and dill. Stir to blend completely and refrigerate until the mixture begins to thicken slightly, about 25 minutes.

3. Use a food processor to puree the flaked salmon (use a little cream if the mixture sticks). Fold this pureed salmon into the slightly gelled mayonnaise mixture using a spatula.

4.In a separate bowl or the base of your mixer, whip the cream until it is thickened to soft peaks and fluffy. Fold gently into the salmon mixture (don't worry if a few small white streaks remain).

5. Transfer the mixture to a 6- to 8-cup bowl or decorative mold. (I used 2 4-cup fish-shaped molds I purchased from Sur La Table for $10 each.) Cover and refrigerate for at least 5 hours.

6. To serve, dip the bottom of the mold in a basin of hot water for 20 seconds, then overturn onto a serving dish. Garnish with fresh dill or watercress. If using a fish shaped mold, use an olive to make the fish "eye" and pimento strips to make scales. Add crackers or toast points (I like pumpernickel!) for serving
1
Back to Top